How to Make Metal Rust in Less than 10 Minutes
Disclaimer: This post may contain affiliate links, meaning, if you click through and make a purchase we (or those featured in this post) may earn a commission at no additional cost to you. View our full-disclosure here.
I don’t know about you but my heart skips a beat when I come across reclaimed wood, rusty metal, and forged iron. There’s something to be said about pieces that speak their history through their old age and rusty patina, and it’s one of the reasons I’m so drawn to mountain homes and log cabins.
However, there are times when those reclaimed materials are out of budget, or even just difficult to find. Luckily there are ways to make new items look old, and today I’m sharing how you can make metal rust in less than 10 minutes!
How to Make Metal Rust
There’s a project we’ve had in mind for our RV, all we needed was some antique horseshoes. I can’t tell you how many times I came across rusty horseshoes while we were living in Georgia, but I wasn’t quite ready for my project so I kept telling myself I’d get them later.
Fast forward several months and now that we’re ready for the project I can’t find old horseshoes anywhere! Well, that’s only partially true, I did find some online but wanted them NOW because I’m impatient. I did find a couple at a local antique shop but there were only two (I wanted at least three), and they didn’t have holes in them which we wanted to make it easy to attach to our reclaimed wood. Oh yeah, and they were suuuuuper heavy.
In case you didn’t know, traveling in an RV means you have to be extra careful about how much weight you add to the motorhome, and every little thing adds up. Naturally, I’m drawn to overly heavy wood and iron. Go figure.
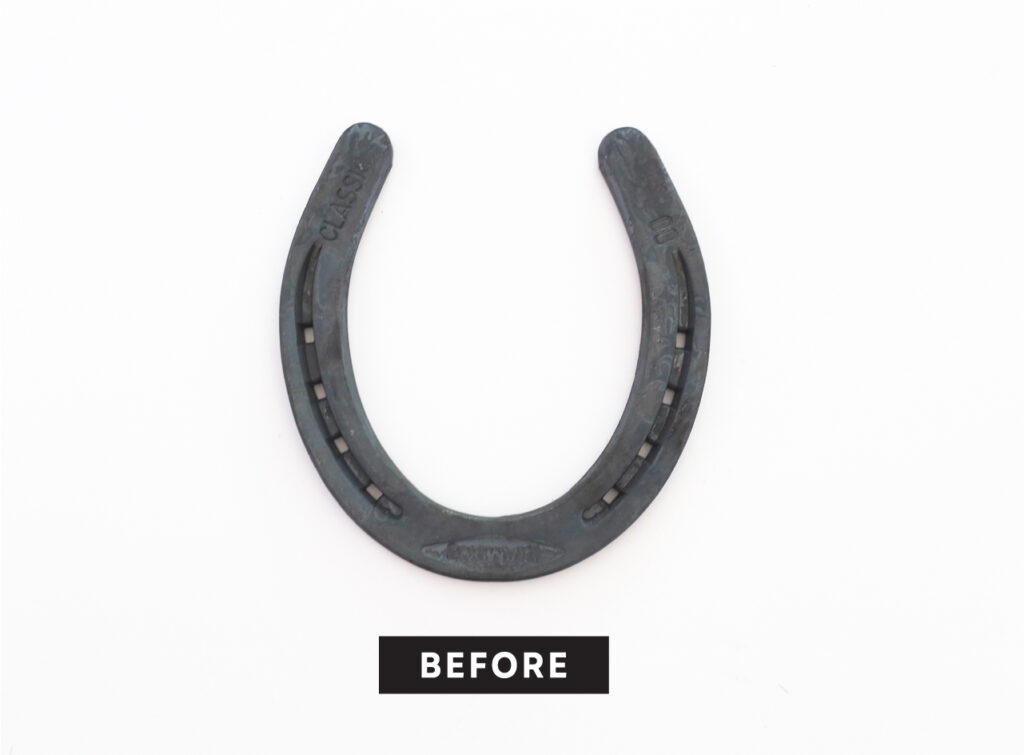
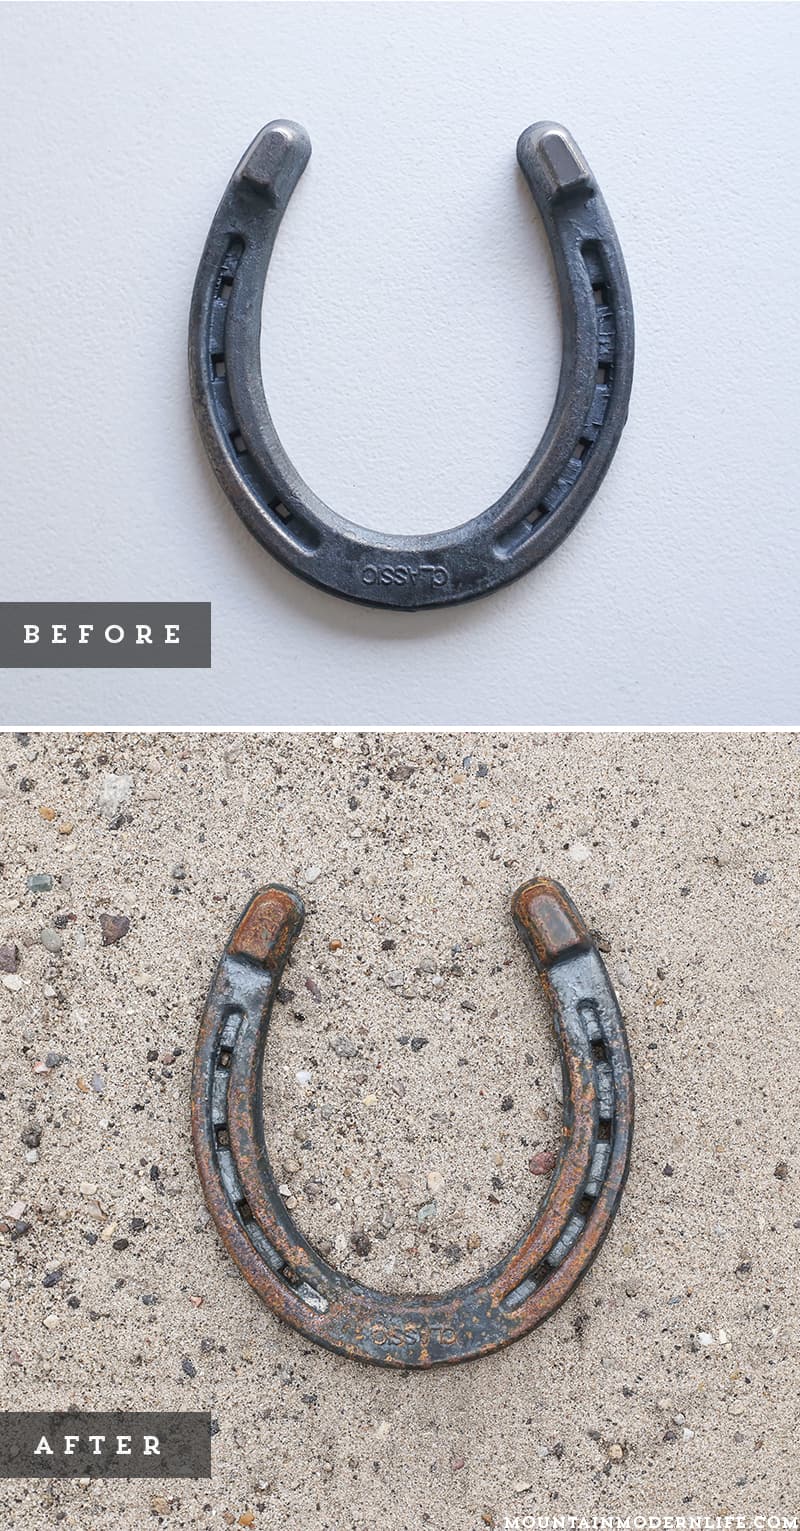
Even something as small as a horseshoe all of a sudden seems to weigh a whole heck of a lot more than I ever realized. Anyway, since my mission to find antique horseshoes was a fail I decided it was time to fall back on plan B, buy new horseshoes and make them look old. I was able to pick up a 4 pack of horseshoes for $8 at a local tractor supply store. There were different kinds so we picked up the ones that are supposedly “lightweight”. You can see what the horseshoes looked like before adding rust in the photo below:
“Three things must be present for rusting to occur: iron, oxygen, and water. Rust forms when these three elements combine and create an electrochemical reaction.” – ignitecleaners.com
What you’ll need to make metal rust
I gotta tell ya, making metal rust in fast forward was even more fun than I anticipated. Plus you probably have everything you need to try this out right now. The only thing we had to buy was salt. We had Himalayan salt, which may work, but I wasn’t sure how much I’d use so we just grabbed a big container of table salt for $1.
I didn’t really follow any specific recipe for this. I originally came across this post on how to make metal rust and planned to follow it to a tee, but then I became all impatient and excited and just did my own thing. The good news is that it worked.
Supplies/Tools
Don’t forget about safety – while these are household items you want to be extra careful when mixing, and wear proper eye protection and gloves. Be sure to do this away from kids and pets and keep in mind that if this mixture gets onto any metal it will rust it. I recommend doing this outside so you have good ventilation, and don’t risk ruining anything.

Watch the Video Below: How to Make Metal Rust
Step 1:
The first thing you will want to do is grab your steel/iron/metal and place it into a container or bucket. I just used a small, plastic storage container.
After I placed my horseshoe in the container I poured some white distilled vinegar on top. I didn’t measure but I poured just enough so that it covered the horseshoe and then I sorta swished it around on top. You could pour some of the vinegar into a spray bottle and spray your metal objects instead.

Step 2:
Let your metal objects sit in the white vinegar for as little or as long as you want, then drain the vinegar from the container.
For this specific horseshoe, I let it sit in the white vinegar for about 5 minutes before I emptied the vinegar from the container.
Step 3:
At this point, you’ll want to add peroxide on top of your metal objects. You can mix it with vinegar and salt inside a spray bottle if you want.
I had pre-mixed roughly 5 oz of peroxide with 2 oz of vinegar and started spraying that onto the horseshoe while it was still in the container. My spray bottle wasn’t working that well and I became impatient so I just took off the spray cap and dumped the mixture onto my horseshoe. This is where it starts to get fun because the peroxide starts to bubble on the metal and you can see the rust color coming on.
Step 4:
Add salt.
I then sprinkled …err dumped… a bunch of salt on my horseshoe and the rusty color started to come out even more. Ooooooooh! #EasilyAmused

Then I called Eric over because I was all excited to show him, but I wanted more bubbles and fizz so I poured a bit more hydrogen peroxide on top. I didn’t measure.

Step 5:
Remove from mixture and let air dry.
After a few minutes, I swished the horseshoe around in the solution to sort of rinse off the salt and then patted it dry with a paper towel. You don’t want to wipe it too hard or it could remove some of the patina. You’ll see that it’s a bit rusty but don’t worry if it doesn’t look exactly the way you want, it actually rusts more as it dries. This is what mine looked like right after I removed it from the mixture – I did this all in less than 10 minutes.

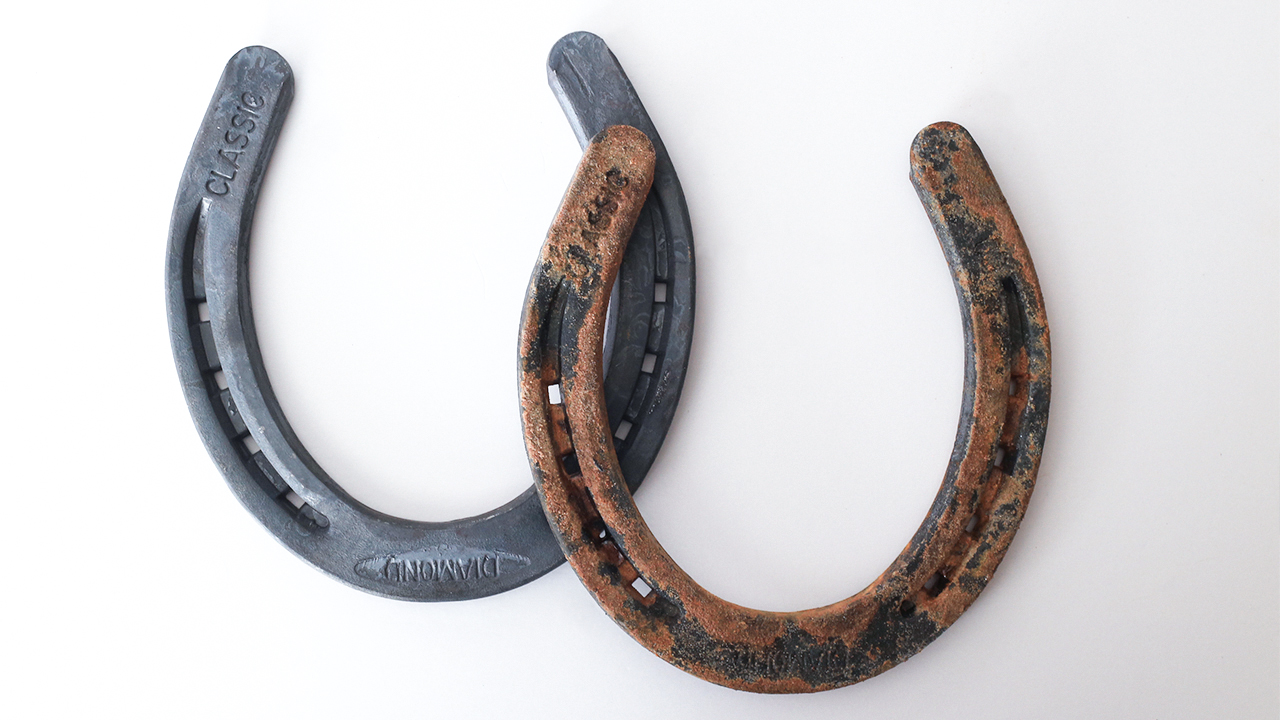
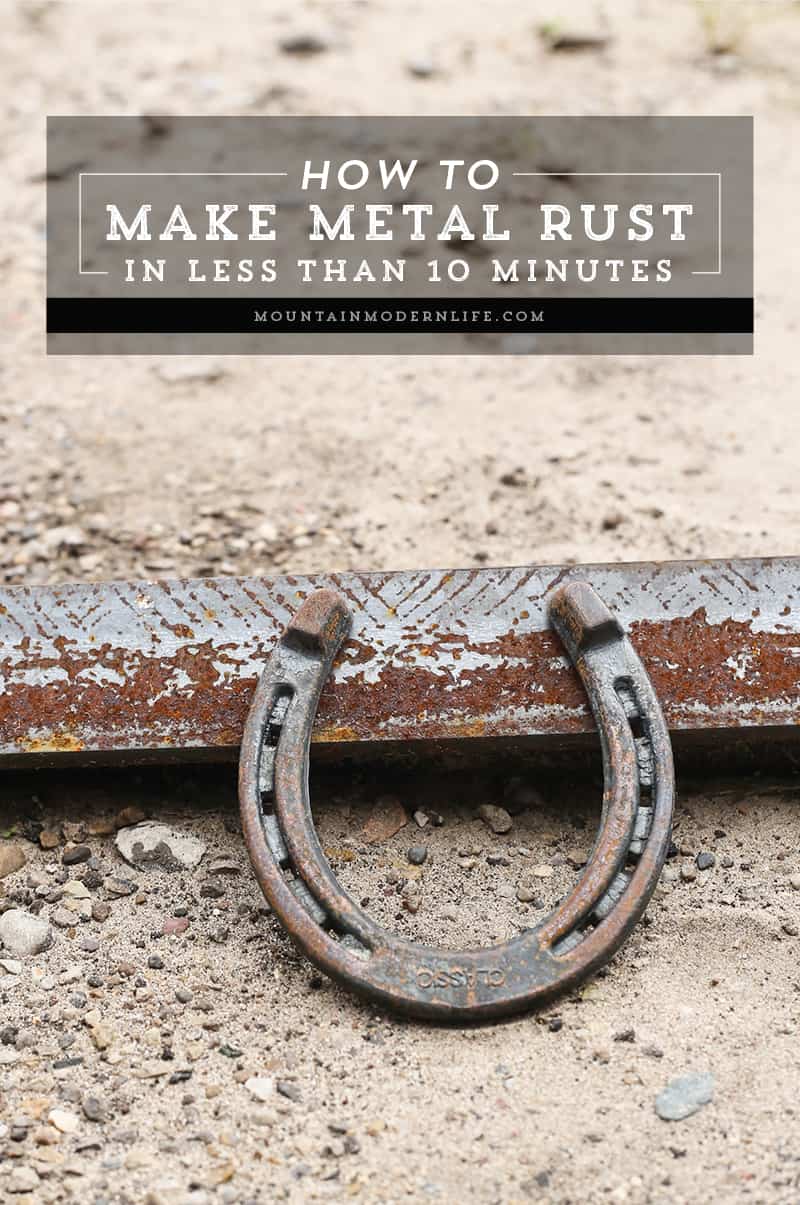
It was getting dark outside so I just let it sit overnight and the next day this is what my horseshoe looked like, next to metal that’s been rusting for years:

This process gave the new horseshoe a nice copper colored patina, and I love that some of the bluish-grey color of the iron is coming through the rust. The natural looking corrosion is pretty amazing.

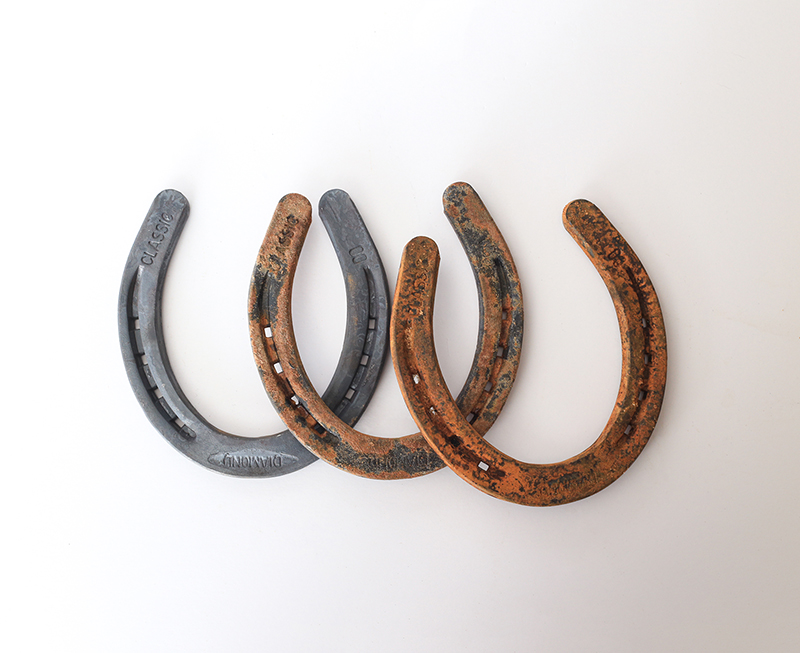
I made a few more horseshoes prior to this one and let some of them sit for about an hour because I wasn’t noticing the color change right away. I later realized that they get rustier as they dry. So I would just say to experiment. If you don’t like how your metal looks after 10 minutes and air drying, you can always repeat the process and keep them in the solution for a longer period of time 🙂

Step 6:
Spray with a clear sealer.
You’ll want to add a clear sealer to prevent the rusty patina from flaking off and staining anything they touch.
To be honest, I waited a while before sealing mine which was a BAD idea. Some of the patina had rubbed off by then, including getting on some of my towels. Oops. When I did seal them I just used some leftover Spar Urethane and a foam brush, but you can use any clear sealer and may prefer a spray-on kind.
The second time I did this I went ahead and sealed the horseshoe after about 2 hours, but you can always wait overnight.
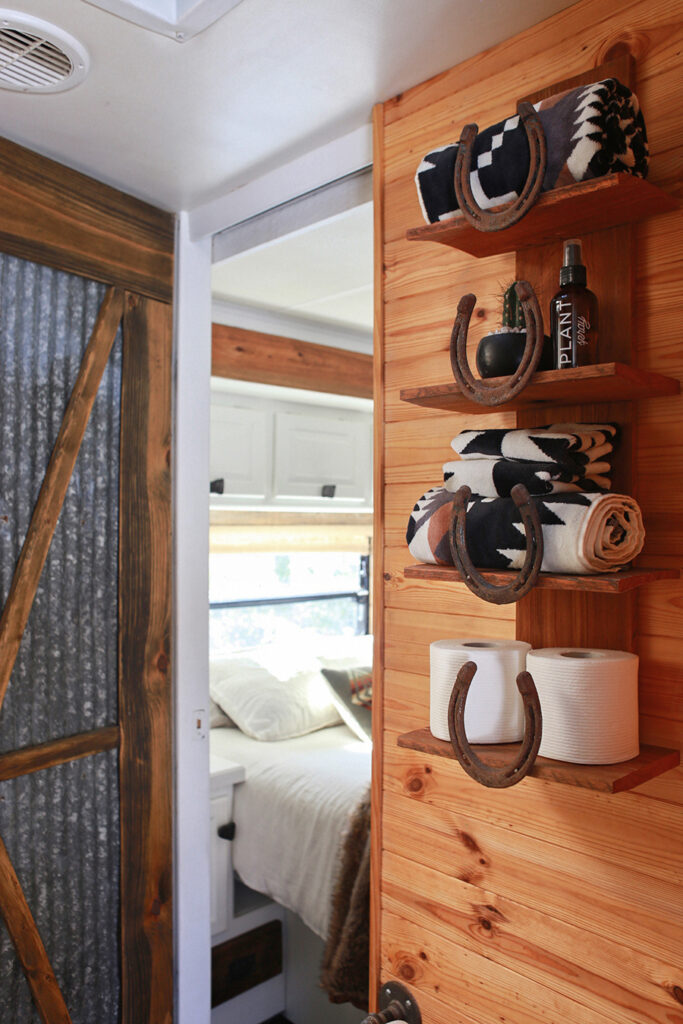
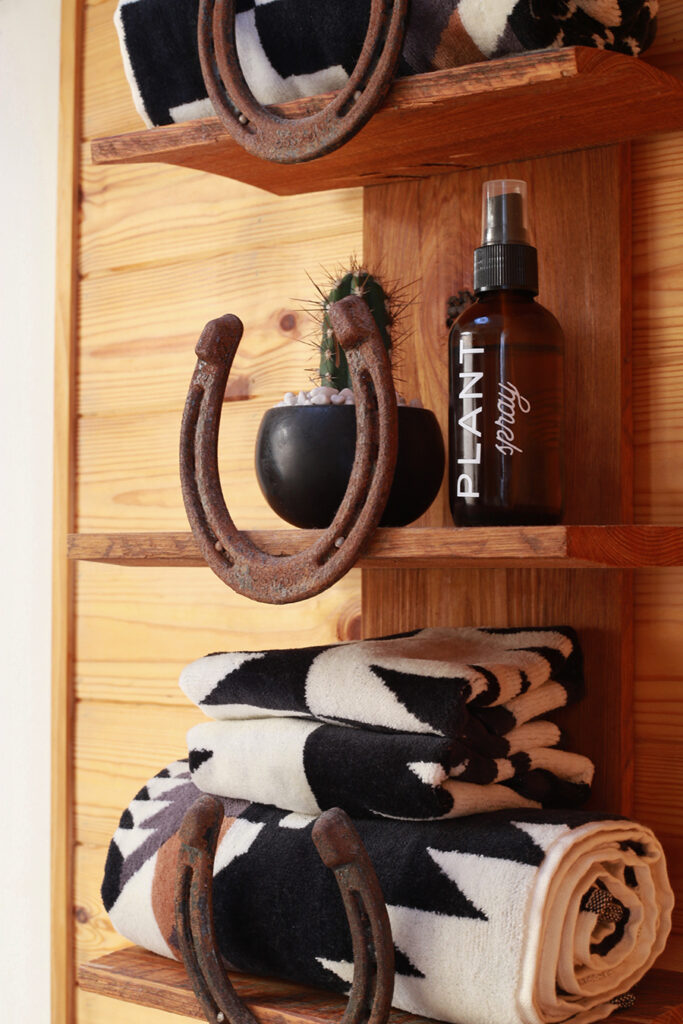
That’s it! Now we have some rusty, antique-looking horseshoes that are perfect for our project.
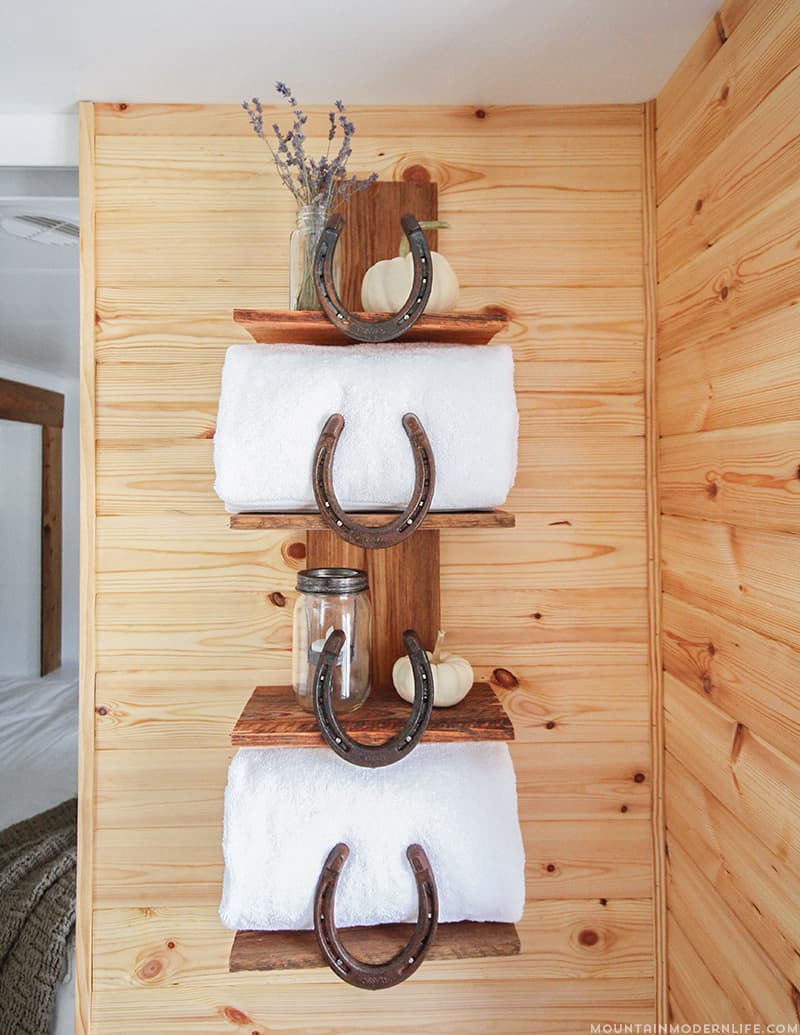
Update: You can see the DIY horseshoe shelf we made for our RV bathroom below – these photos were taken a few years after we did this project.
Lessons Learned
Not all metals will rust
After receiving a lot of comments and emails about this not working on certain objects I wanted to add that not all metals will rust. I believe it has to have iron in it in order to rust, and if it’s galvanized, stainless steel or some other type of metal that doesn’t corrode then this process won’t work. I learned this the hard way by trying to rust some galvanized buckets I had on hand and read up about it here.
Sealer IS important
If you don’t want the patina to rub off on you or anything else it touches, you’ll definitely want to apply a clear sealer!
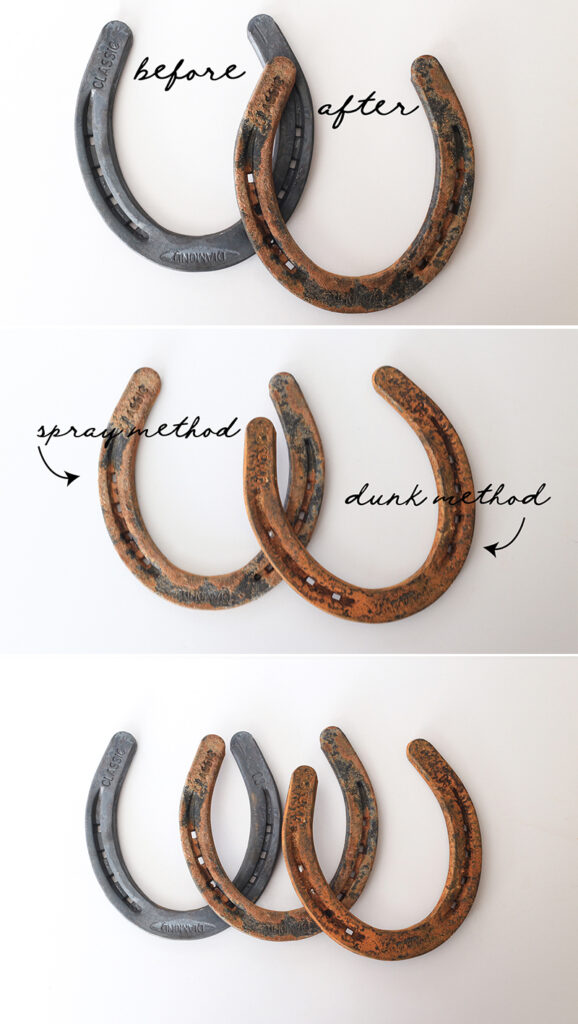
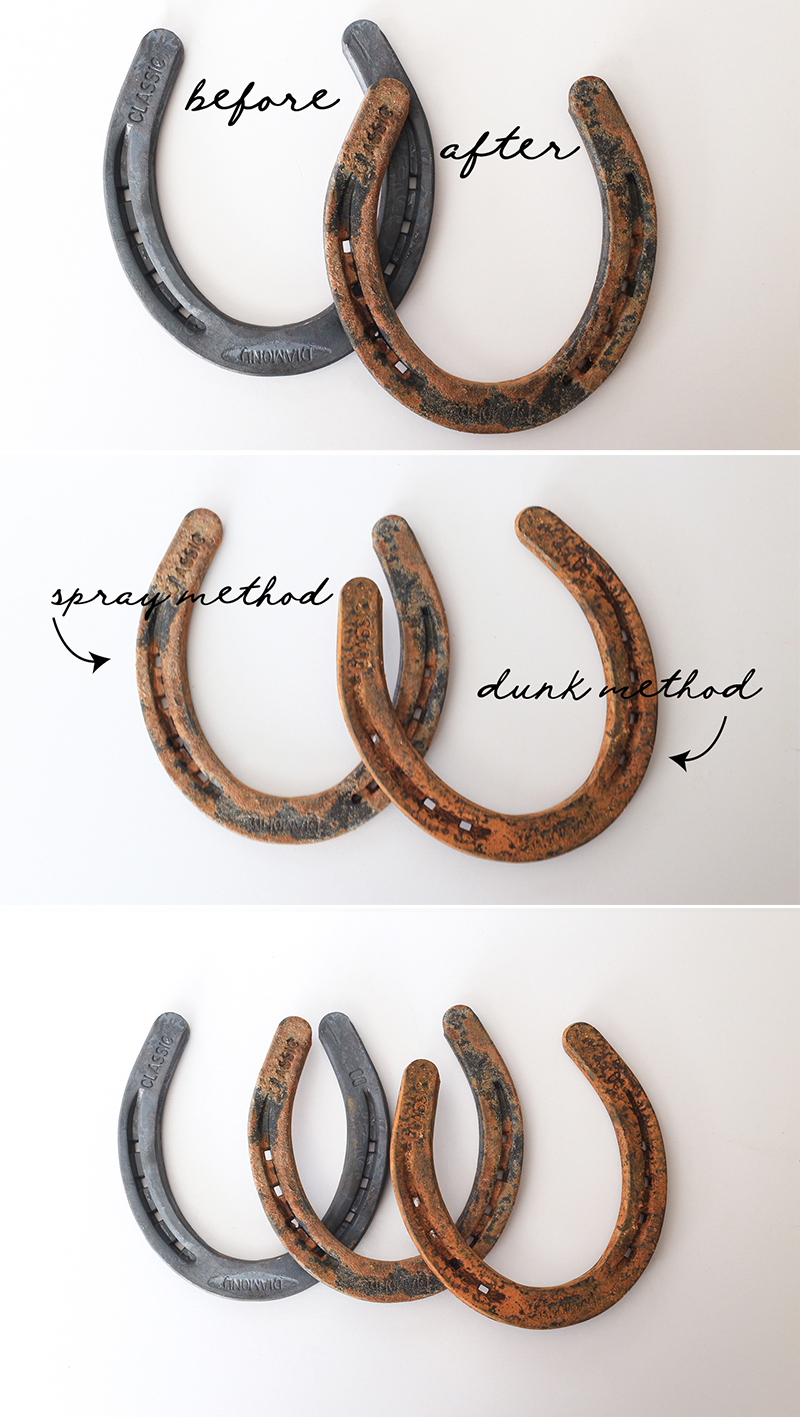
Spray vs. Dunk
If you watch the video at the top of this post you’ll see the difference in the spray vs. dunk method. Basically, the spray method will allow more of the contrast of the original metal to show through and it is easier to work in layers and add more rust if you want. The dunk method could cover nearly the entire metal object, depending on how much you cover and how long it sits. Although you’ll notice a few of my “dunked” horseshoes still have a decent amount of contrast.
Let it dry
I know it may not seem like it’s changing right away or the patina may not seem as bold while the object is wet, but if you’re patient and let it sit for 5-10 minutes you’ll notice just how much of a patina was created. Of course, you can always add more, but I went a little overboard on some just because I was being impatient and kept adding more of the mixture.
This is just one way to rust metal, but I’m definitely a fan. If you decide to try this out we would love to hear about your results in the comments below. And if you have a specific technique that you prefer when it comes to making new metal look old, we would love to hear about that too!


Thank you for posting this, worked very well on my welding project. I wanted a rustic feel and I got just that. Wondering how you disposed of the liquid after your horseshoe was adequately rusted?
Yay, that’s awesome! We just flushed it down the toilet in the shop on the farm where we were staying. We had read you can flush it down the sink or toilet as long as you follow it with lots of water.
What clear sealer do you like to use?
You can use any kind of clear sealer such as a poly or acrylic sealer. I believe we used Rustoleum’s Crystal Clear Enamel Sealer, and have had good luck with it.
Use silicone lube in the spray can…. Don’t use a clear coat paint…cause that looks tacky
if it contacts carpet or drapes it’ll stain without sealer. Otherwise paste wax makes a nice natural looking protectant.
If a magnet sticks to it, you can rust it, though some metals might require scratching first.
This is a great and simple idea. Too many recipes called for “acid” no way I’m handling that stuff or having it around my animals. This is actually household items. I have an old metal birdcage from Europe that was painted black and I think I’m going to try this. It is going onto my screened in porch. My initial idea was to make it look like pewter but way too involved. I’m not a DIYer so if it has a lot of steps I keep looking.
That’s how I felt when I was looking for a way to rust up these horseshoes. I’d love to hear how your birdcage turned out!
I found a website from a physics department at University of Illinois that says hot iron (steel) rusts faster than cold. So you could try heating the metal in your oven or over a campfire etc. Use a tongs!!! It may also give a deeper rust effect if you heat and repeat the procedure several times before finally sealing. Hope it helps.
It should be noted that vinegar and hydrogen peroxides are both acids though, just weaker ones.
For future readers many things are ‘acid’, vinegar is acetic acid for example.
Love your shelves. I’m going to try this later today for tags that look like the stuff buckets are made of. I have tried bleach, leaving in rain, nothing happened. I want to put my name on them but I want the tags rusty. Will let you know if it works with this type.
I haven’t tried it on metal tags but would think it would work the same. I’d love to hear how they turn out, or if you find a different solution!
Katie
Happy days ! This is a great way to rust your project ! I’ve just finished a set of old skool roof racks for my 64 ” super snipe car ……it looks rockin ….thanks……
Yay, that’s awesome to hear!
Would this work with a tricycle that is already a tiny bit rusty?
Hmmm… I’m not sure but you could always test a small area first. The reaction is pretty quick so you should know within 30 minutes.
Wow I want to weather a plastic robot , but I want to use authentic ingredients (rust) not faux paint … so I’m gonna get some old nails n follow ur recipe, hopefully the remains dry ingredients will brush onto my Figure – I’ll let I know how I get on –
They turned out great. Wondering if this would work on aluminum horseshoes which are really very lightweight. I have some old spurs that I’ve used as drapery tie backs before that looked pretty neat. Also a beautiful bit that will never be used on a horse again. My vet is opposed to the use of all of these items on equines, and told me the only good use for a bit is for making a toilet paper holder. And, this would make a really cool looking one, at that.
First off, I love that you’re using old spurs as tie backs! I wasn’t sure about the aluminum horseshoes so I just looked into it and it seems aluminum doesn’t technically rust, but it can corrode. Here are a couple posts that may help:
https://www.finishing.com/432/54.shtml
http://www.brandonandshelby.com/2012/01/how-to-rust-aluminum.html
Let me know if you try something that works!
Katie
Can I do this on painted horseshoes? And will it work
I haven’t tried it on painted surfaces so I’m not sure. Have you thought about lightly sanding them first? If you do try this technique, let me know how it goes!
We just used your solution on a large chain that will be exposed to hang a pallet wood picture. Looks awesome.
Yay, that’s awesome and sounds like a really cool project!
Thanks for the ideas I need to rust up some carriage bolts for a wheelbarrow that I’m putting new handles on. The old handles had completely dissolved .
I tried this on an old milk crate…… didn’t work- even a little bit. I was very disappointed 🙁
What a bummer 🙁 The crate must have been made out of aluminum, stainless steel, or some sort of metal that doesn’t corrode or have iron in it.
Galvanized metal use bleach vinegar and salt
Galvanized metal,tin,store bought shiny jingle bells bleach instead of the peroxide let sit in bleach 24 hrs then in vinegar 24 hrs remove rinse set out in sun. this makes fumes do it outside
I have use this recipe, and it works well… I put the solution in a spray bottle that allows me to continue to spray to add more color as I desire.. Make sure to let it dry very well and then I use a soft paint brush to lightly dust off the flaky rust build up.. then a good clear coat…
I followed your instructions to get rust on tin. BUT nothing happened. Is my peroxide old? I used Hydrogen Peroxide – is that okay. What happened?
Hi Dorothy, do you know what kind of metal it is that you’re trying to rust? I believe it has to have iron in it in order to rust, and if it’s galvanized, stainless steel, or some other type of metal that doesn’t corrode that may be the issue. I learned this the hard way by trying to rust some galvanized buckets I had on hand.
tin,galvanized metal ,shiny store bought jingle bellsto get them rusty Put in bleach 24 hrs,then vinegar 24hrs rinse well set out in sun to dry. Do outside it creates fumes
Love this! FYI If it is JUST rusty vinegar (never tried with HO and/or salt) It make a great stain and/or base for staining. Filter and use on wood.
Hi, love your ideas! I’m wondering if it would rust over paint? Thanks
Hmm, I haven’t tried it before but is the paint on the entire surface or only some of it? It only takes a minute to try so you may want to give it a go and see if it works. If so, let me know what happens!
I needed to “weather” horseshoes as well for a wall mounted wine rack i am building for a friend! WORKED FABULOUS!!! Thank you! When i get the project done, I will drop a couple of pictures via email…. but it worked perfect!!
That sounds amazing! So happy this worked for your project 🙂
mixing vinger and peroxide is so dangerous – i put mysef in hospital doing this
I do believe it produces hydrocloric gas
Just what I was looking for! Thanks for writing this DIY article. I’m going to rust some large bolts and washers to make hooks.
That’s awesome Deon, I’m glad it was helpful! We loved how easy it was to do, let us know how the hooks turn out 🙂
If this doesn’t work you can use Bleach in place of Peroxide Do it outside(fumes)
thank you for sharing this. I am DOING THE COR TEN PROCESS TO SOME OUTDOOR PLANTERS, WILL THE RUSTOLEAN ENAMEL CLEAR SEALER BE GOOD TO EXTERIOR AS WELL OR THERE IS ANOTHER SPECIFIC PRODUCT YOU WILL SUGGEST? THANK YOU!!
Hey Veronica, we haven’t actually used the Rustoleum Enamel Clear Sealer on exterior items. With that said it is made for indoor/outdoor uses so it should be good to go. However, if you are looking for something different you may want to look into an exterior Spar Urethane sealer those tend to work pretty well based on the research I’ve done. Anyway, I hope this helps and make sure to let me know how it all turn out 🙂
Hello,
A very interesting article. I came across your site when searching for a method to test steel for rust resistance. Do you think the treatment you used to make these horseshoes rust would do for telling stainless steel from normal steel? Have you ever tried the same experiment on stainless steel? If yes, did it resist?
Regards:
Laszlo
Hey Laszlo, we’ve tried it on galvanized buckets and there was no effect, meaning it didn’t work. We haven’t tried it on stainless steel however everything we’ve read while doing our research suggests stainless steel will not rust using this method. Anyway, I hope that helps 🙂
I think thats really cool how a metal rust but not all the time . I liked the experinet !
Thanks breanna, if you try it out make sure to let us know how it goes 🙂
Just wanted to say that you can buy paint with iron in it – so that you can rust things that are not steel- just paint them with that first. My concrete birdbath looks like its an old rusty antique now!