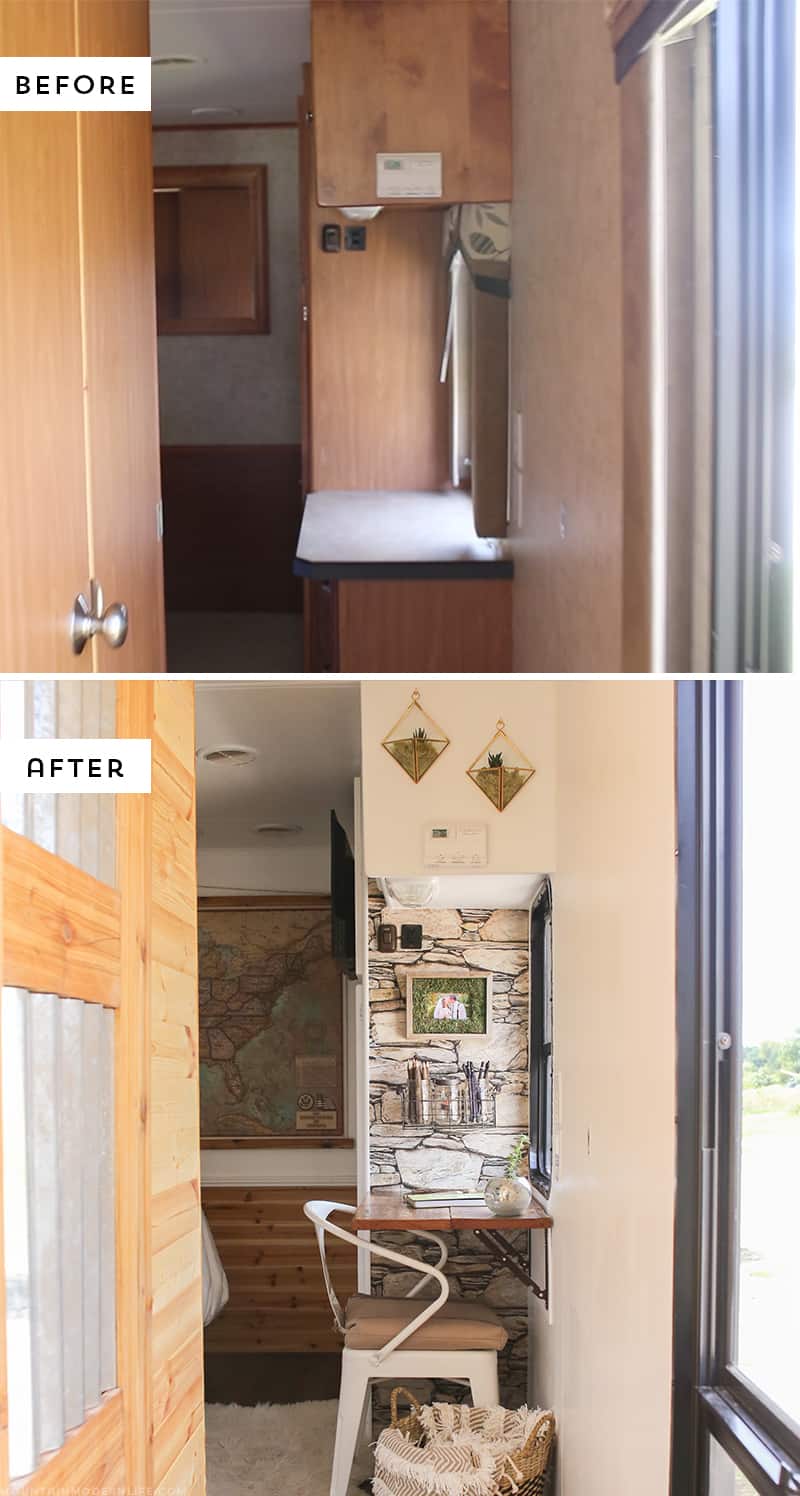
before-and-after-photo-2008-tiffin-openroad-mountainmodernlife.com

UPDATE: All new featured RV tours will be posted on my other website, Wanderful RV Interiors. Existing tours will slowly be moved to the new website, and anything already moved will automatically redirect.

Disclaimer: This post may contain affiliate links, meaning, if you click through and make a purchase we (or those featured in this post) may earn a commission at no additional cost to you. View our full-disclosure here.

We've been talking about adding a wall-mounted desk in the bedroom of our RV for quite a while now, and decided to keep this project as easy as possible because my brain needed a bit of a break, haha. If you're looking for a creative space saving solution that doesn't require much time, I think you'll love how easy this project is! We have used Minwax® products in several projects throughout our home and RV so I was excited to team up with them for this project. It was fun to use products I had never tried before, and I hope you will find this post helpful and inspiring for your next project! Last month we made a trip up to North Carolina and picked up some reclaimed wood from our friend Steve, the owner of the cabin wedding venue we were married at. We wanted to add some character to the RV and knew that using reclaimed wood was definitely going to do that for us. Of course we have to be really careful about the weight we add to the RV which means we have to be selective about where we add wood. For the most part, we've been sticking to lighter wood like cedar and pine, but felt this was the perfect opportunity to use some of our reclaimed oak wood. Seriously, how freakin' pretty is this wood? I just love those saw marks! We previously removed a nightstand from the bedroom knowing that we would replace it with a wall-mounted desk, which you can catch a glimpse of in the photo below: I don't know about you, but I'm all about furniture that can be hidden or folded down to create more space when not in use, like the pull out table we made for the living room. DIY Reclaimed Wall-Mounted Desk The first thing we did was measure the space where our wall-mounted desk was going to be installed, and then cut our wood down to size. The plan was to attach two separate pieces to create a top with more depth. If you're using reclaimed wood for a project I think one of the most important steps is getting it all cleaned up. Our wood had been air dried so we used our steam cleaner to sanitize it. We then sanded it down, vacuumed it and wiped it down with mineral spirits. Not gonna lie, I was really indecisive about which direction to go for staining and sealing the wood. I wanted to keep the character, especially the saw marks so I didn't want anything too dark but I wanted to enhance the color and wood grain. I love how our rustic wall hangings turned out after I stained them with Minwax® Wood Finish Golden Oak, but as I said earlier I wanted to keep this project as easy as possible so I turned to Minwax® Polyshades® It's a stain and protective finish in one which means less work and time. Yup, sounded good to me! I have learned my lesson about taking chances on stain colors as the shades can vary greatly on different woods. For that reason I picked up a couple options to test on a scrap piece of wood before I made a decision. I tested American Chestnut and Classic Oak. The Chestnut was redder than I wanted but the Classic Oak was perfect! By the way, you can actually use Polyshades® to stain on top of existing finishes. So if you're looking to darken the color of an existing stain you may want to consider using it.  I went ahead and filled in the holes/knots in the wood with some Epoxy and after waiting 24 hours I sanded the wood down again before starting the staining process. We recently did this with our kitchen and bathroom countertops, and I love it so much better than just filling in the knots or gaps with wood filler. As for the Polyshades®, I did notice that it was a much thicker consistency than stains without the polyurethane mixed in, so I stirred it a little longer than usual. I then stained the reclaimed oak wood using a natural bristle brush which worked well, although I did read that some people prefer to use a sock, so that may be something for you to consider. I love how the wood came to life and the character was enhanced by the color of the stain and protected by the poly. The wood looked so pretty after one coat that I thought I would leave it at that, but then randomly decided to create a mixture of half Polyshades® Classic Oak and half Polyshades® American Chestnut (I just mixed them together in a mason jar). Once the stain was dry (we waited 24 hours), we used our Kreg Jig to attach the two boards to one another. We also added some wood glue in between the boards and made sure to wipe off any excess. Once our two boards were stained, sealed and attached to one another our wall-mounted desk was basically done. All that was left was to attach it to to wall using these brackets, which was probably the most difficult part since we are installing this inside our RV. The area of the RV that the brackets are being installed is where a cabinet previously was. We had removed it a while back with plans of adding this desk in it's place. For that reason, we knew that screws had previously been in the wall, and figured we could use some of those holes for these brackets. Of course it didn't work out as smoothly as we had hoped and the holes didn't line up exactly where we needed them. After a bit of maneuvering we got the brackets installed and secured to the wall. If you're installing this at home it's a good idea to make sure at least one of the screws goes into a stud, or you may need to use anchors. And if you're installing something like this into a RV just be extra careful. It's probably best if you are installing it somewhere that you know can handle the weight or if you removed something else that was previously screwed into the wall. You may also want to check out this post about various RV wall fasteners. After we installed the brackets we felt the desk wasn't as secure as we wanted so we did a bit more research and then decided to add a piece of plywood behind the brackets. The piece of plywood was cut to size, painted, and then screwed into the wall. We then screwed the brackets directly into the plywood. It's amazing how much sturdier the desk is now.  And here is our new desk mounted to the wall inside the bedroom of our RV, woo-hoo! I love how it turned out and think this is going to be a great little nook to work on the laptop or craft it up. Not to mention it's exciting to think about the different views we will have from this window :) I especially love how warm and rich the color is and to think that we have wood in our home that's nearly 200 years old is also pretty awesome. So far we've pretty much kept the desk up, but this is what it looks like folded back down: Overall, we're super happy with how our wall-mounted desk turned out. Not only is it functional, but the wood brings so much character to our RV. Here's a before and after photo of our new desk area: After doing some research on using Polyshades® for wood projects, I came across a few tips that I wanted to pass along to help your next project go smoothly. Tips to keep in mind when using Polyshades®: Make sure the wood is sanded with 220 grit sandpaper and clean of dirt or dust Test the color on scrap wood or an inconspicuous area Use a natural bristle brush or a sock (make sure it's lint-free) to apply it May be easier to use on projects with less detail/curves Are you planning any space saving solutions in your home or RV? If so we would love to hear about it in the comments below! See how Minwax® can help you enrich the wood and create beautiful and meaningful pieces in your home. Learn How: Minwax.com/madewithlove