UPDATE: All new featured RV tours will be posted on my other website, Wanderful RV Interiors. Existing tours will slowly be moved to the new website, and anything already moved will automatically redirect.
Disclaimer: This post may contain affiliate links, meaning, if you click through and make a purchase we (or those featured in this post) may earn a commission at no additional cost to you. View our full-disclosure here.

Have you ever gone dumpster diving? Ya know, where you raid the dumpster for items others have deemed “trash”, in search of treasures to save and transform into a reclaimed beauty?
A couple of years ago while we were living in an apartment, the hubs and I found out that the complex was renovating all of the units, and in doing so were tossing all of the old cabinets into the dumpster. Although the property management company saw these old cabinets as trash, I saw their potential.
No, they were not made of the best quality, but at the time I needed something to hold my paint supplies, and I figured a cabinet or two would offer the perfect solution.
I felt a little odd going out and raiding the apartment dumpster so I called management first to see if they were okay with me taking a few of them off their hands {and maybe all of the knobs I could find too, lol}. They were more than happy to let us snag what we wanted, although I’m sure our neighbors thought we were a bit cray-cray.
Okay so true confession, we didn’t actually have to jump into any dumpsters since the old kitchen and bathroom cabinets were overflowing next to it, but I would have!
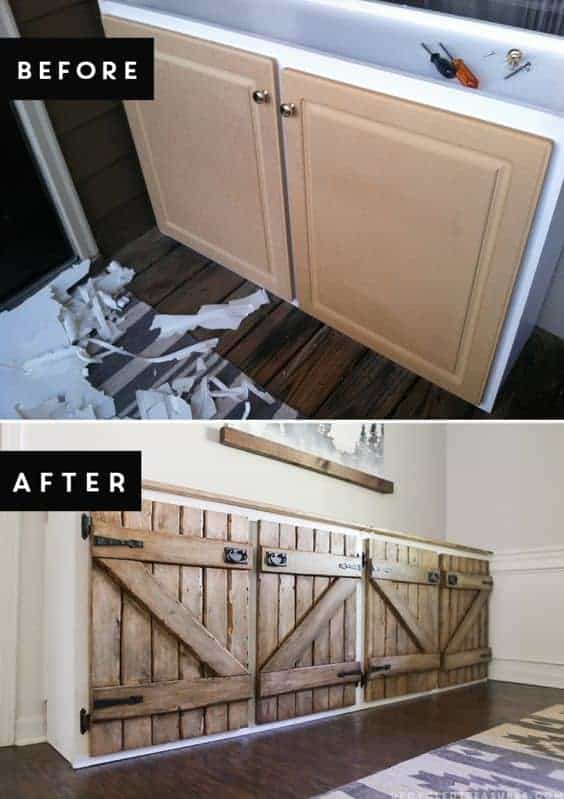
We picked up 2 matching cabinets and the white paint on the particleboard doors {I think that’s what they are made of?} was flaking off REALLY bad. I cleaned the cabinets up and peeled off the remaining paint with plans to make new tops and doors in the future. The project was then put on the back burner, but at least it stored my paint supplies for the time being.

Pretty soon after our little dumpster excursion, we moved into a rental home, and I knew that with a little bit of elbow grease these cabinets would make a perfect sofa table or sideboard.
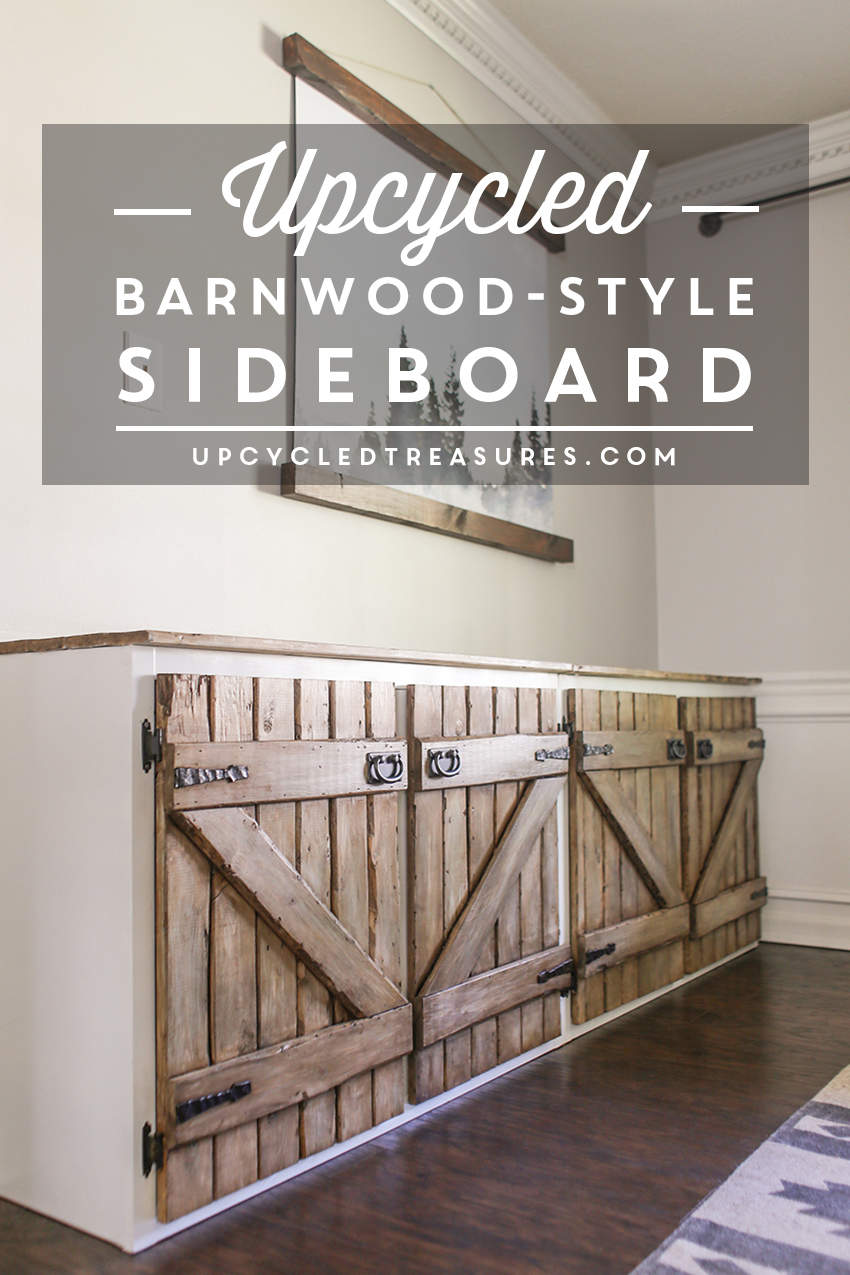
Upcycled Barnwood Style Sideboard
First off, I am super excited to FINALLY be sharing this project! Although I don’t have a step by step tutorial on how we did this since the doors were custom built to fit the cabinets, I hope you will feel inspired by the photos and the idea of re-imagining something old into something new 🙂

1 x 3 Wood Boards
Pencil
Jig Saw & Blades
Decorative Carriage House Strap Hinges
![]() The first thing we did was build the wood tops for the cabinets, which was just some 1×3’s that were Kreg-jigged together. The boards we used for the top were actually just purchased at the local hardware store. At the time I really wanted the wood to be natural, yet rustic so I picked out the straightest boards we could find that had the most character.
The first thing we did was build the wood tops for the cabinets, which was just some 1×3’s that were Kreg-jigged together. The boards we used for the top were actually just purchased at the local hardware store. At the time I really wanted the wood to be natural, yet rustic so I picked out the straightest boards we could find that had the most character.

I went back and forth trying to decide if we should attach the 2 cabinets together and make one long top, or keep them separated. In the end, I decided to keep them separate in case I ever want to move them around into different spaces.

We then attached the wood-planked tops to the cabinets using our nail gun…


I was a little impatient and we probably should have done this AFTER I re-painted the cabinets. Oops. I think it’s because I thought I could clean the cabinet bases up a bit, but then decided it would be best to go ahead and give them a fresh coat of paint.

I covered the wood top by taping down freezer paper, and then lightly sanded down the base. Afterward, I spray painted the base of the cabinets with White Appliance Epoxy Spray Paint. I had never used it before and was a little nervous, but was inspired to give it a try after coming across this beautiful dresser makeover from Homey Oh My. It worked great and turned out really well!
Onto the Barnwood-style cabinet doors
We made super simple cabinet doors using 1 x 3 boards to give the cabinet a rustic feel. We originally planned to stop here, as I thought I would like the simple yet rustic design but the doors just looked kinda funny, which may have been due to the boards going vertically rather than horizontally. Either way, we decided to create a “Z” barn-door style design to add to the front, which was attached using glue and the nail gun. This turned out to be my favorite part.
Side note: We know that the hinges don’t match up with the “Z” doors or the hardware that was later added. To be honest we hadn’t even thought of it as some of the components came after the original plan. If you plan to build something similar I would recommend keeping this in mind as you work on the design. It’s certainly something we will remember for future projects 🙂

To be honest, once the doors were finished I realized that the “natural” wood look wasn’t working out quite as I had planned. So I concocted a grey-ish weathered stain using a few random stains we had {like sun-bleached and weathered grey} and then whitewashed over the stain afterward.

I knew I wanted to add hardware but hadn’t committed to anything yet and then a happy accident occurred. I came across some old decorative carriage house hinges that were perfect! What’s funny is my sister-in-law had sent these to me a year prior and I had no idea what they were, but I had made Christmas ornaments out of them because I thought they were cool, ha.
As it turns out, some of the hinges had been spray-painted with gold glitter so I had to spray paint them all black. Once they were dry we nailed them to the new cabinet doors.

The doors were then attached to the cabinets with hinges and we were done! Or so I thought… You may have even seen some photos of these cabinets in my Fall Home Tour last year. However, I never was totally sold on the grey/whitewash stain, and that’s probably the reason I never sealed the wood either. #noncommittal
Then about 7 months ago I shared this photo on Instagram:

I decided to test going over the whitewash stain with a darker stain {provincial}, and the outcome was the perfectly-imperfect rustic brown that I LOVED! So, of course, I had to re-stain the wood, but in the end, I think it was absolutely worth it.

LOVE me some hardware!
We also recently added some gorgeous pulls to the doors thanks to the folks at Hayneedle! We picked up some of these to use on a custom RV furniture piece we plan to build, but since we had extra I decided to add them onto this piece as well. They add the perfect finishing touch, and I am pretty much obsessed with them.

The upcycled barnwood style sideboard was recently moved into the dining room to be used as a coffee/serving station. Things never can stay the same for too long around here, lol.


Here is the before and after of our upcycled barnwood style sideboard:

The cabinets on the right side look darker in the photo above but I think that’s just due to the shadows because it doesn’t seem that way in person.
You can actually spot one of the original cabinet doors that I upcycled into a chalkboard and key holder in last year’s Christmas Home Tour, or in this post where I shared some recent updates to the dining room.

The large print hung up above it is actually an engineering print, and you can find my tutorial on it HERE.
So what do you think of our upcycled barnwood style sideboard? This would have been sooooooo much easier had I decided on a different stain to begin with, and then stained the boards before creating the top or doors. And I probably should have figured out where the hinges would be and added the barn door look on top of the cabinet accordingly, along with the hardware. Woops.
However, I am actually happy with the process I went through because I’m now a huge fan of re-staining wood after white-washing over the stain. In fact, we recently used the same technique on our coffee tables. Live and learn, right? Well, hopefully you can learn from my mistakes 🙂
I hope you feel inspired to re-imagine an old or thrown out piece of furniture and transform it into something you will love and cherish for years to come.
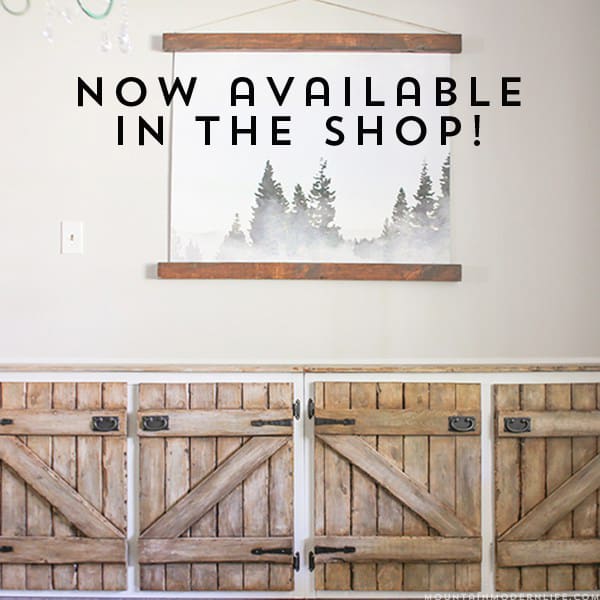
Due to the number of requests for my watercolor Lake Tahoe image, you can now download it from the shop HERE, or by clicking the image below.
![]()

Gray Wool Kilim Rug | World Market
DIY Large Scale Wall Art – you can now purchase this print from my shop
![]()
Love this barnwood sideboard and your creativity! It’s beautiful! I have to ask…did you make the wall hanging above the sideboard as well? If so, how did you do it? Thanks & blessings!
Thank you so much and yes, it was a super simple DIY project. I actually just turned one of my images from Tahoe into a watercolor image, had it printed as an engineering print at Staples and then used spray adhesive to attach it to foam board. The watercolor/engineering print process was the same as that used here:
http://upcycledtreasures.com/diy-large-scale-wall-art/
I plan to add the tutorial for this specific project next month 🙂
I love it, Katie! Thank you for the tutorial and your reply! Can’t wait to create my own artwork. Blessings!
Just amazing, Katie! What a fabulous transformation! I love, love, love it!
Thank you Alexis!
Katie….seriously….this is one of the BEST trash to treasure projects I have EVER SEEN! Amazing!!!
Awww, thank you so much Ashley! It’s funny because I had no idea just how much I would love these when we first saved them from the dumpster and now they are one of my favorite pieces in our home.
I am dying over this! Makes me want to go find an old cabinet just to recreate this! You are crazy talented girl!
Thank you Gilly, that means a lot coming from someone who creates the most amazing furniture transformations!
Um, this is seriously an INCREDIBLE trash to treasure. Wow!! Good for you guys! What a gorgeous sideboard you have now!
Thank you Krista, I’m so happy we saved these 2 pieces as they are now both pretty and functional 🙂
Hi, I’ve been following your blog for a while now and am so inspired by it! I really love these cabinets but I really really love the wall hanging above. Did you make it yourself?
Thank you so much Gemma! Yes, it was a really simple DIY that only cost about $30 to make. I plan to share it on the blog next month 🙂
it looks stunning Katie, Love It
Thank you!!
I love the idea of using old cabinets! Couple questions. ..did you sand down 1×3 first? After stain..did you seal it with anything? I can’t wait to try this!
Hi Kelly,
Yes, we lightly sanded the boards down before staining them just to smooth them out a bit and remove any splintery areas. I actually stained them a few times (in addition to a white wash) as seen in the post to create a more rustic, barn wood type feel. To be honest though I didn’t seal the wood as I wasn’t sure if I would make any changes and I didn’t care if it got a bit more dinged up. Otherwise I would recommend sealing it 🙂
Katie
Amazing results. Where does one find the sort of wood strips used for the top?
Thanks Mike! We actually just looked for the straightest yet filled with character boards that we could find at the Home Depot. We didn’t have any scrap/reclaimed wood that would work at the time so we tried to find some that could essentially feel that way.
Katie
Can I ask where you got the wall hanging? I am looking for something similar
Hi Jennifer,
It’s actually an engineering print and I just added a link to the tutorial in the post. Here it is:
https://mountainmodernlife.com/large-wall-hanging/
Hope that helps 🙂
Katie
This is a great post. I’m using it as a guide to make cabinet doors for the shelving we have in our basement. I have a question: did you stain and seal the back side of the doors as well?
Hi Ashish,
I did stain the back of the cabinet doors so that they match when you open them. 🙂
Katie
How long are the carriage house hinges, in inches? I’m going to build a base for my grill with cabinet doors this style. Looks great!
Hi Brandon,
They are 5 1/4 inches long. Hope that helps 🙂
Katie
Love the whole room! May I ask where the rug is from too?
These look wonderful! I am sharing this on Pinterest.
Hi Katie how wide was your doors?Looks lovely!!!!
I am always looking for ideas on how to use pallets and extra things I have around. I think its time for those barn style cabinet doors after seeing this! Thank you!
So you whitewash over stain and then apply stain?
Hi Joy,
This staining process was sort of a happy accident, but yes I basically stained, then whitewashed, and then stained on top of the whitewash. I did this process within a couple days so the stain stayed on top of the paint with no issues. Hope that helps 🙂
Katie
The diagonal on the “Z” brace is going the wrong direction.
Hi! I love the barn-style doors you created and would love to know more about the process of building them. I am a newbie to wood-working and would love any tips on putting them together. And any additional web-sites/blogs that you may have read to learn how to do them. Thanks for sharing your creativity, this is an amazing, inspiring project.
Thanks Laura! Honestly, we kinda get inspired by a collection of pieces/photos/projects but generally can’t find exactly what we want so we just figure things out as we go and make a lot of mistakes along the way, haha. This is an older project so the only info we have is what’s included in this post. However, if you’re looking for an awesome resource for building furniture I’d definitely check out: http://www.ana-white.com/
Good luck!
Katie
I love this! This is something I’ve been looking to doing to our buffet I’ve completely taken apart. My original idea was sliding barn doors, but I don’t have enough room for the pulleys. Are the boards you used actually 1″ thick!? I held up my 1×3 boards up as if I were going to use them as a door, and it looked so silly being that thick, how did you make it work?! Thank you!
[…] Mountain Modern Life […]
[…] and Eric from Mountain Modern Life had found a set of cabinets that were being thrown out by an apartment complex and decided to turn […]
what kind of wood did you use?? i love how imperfect it is and it looks like it has some bark on it. 🙂
It was actually wood we picked up from Home Depot. I looked for the ugliest wood I could find for a rustic look, and they just so happened to have a really good selection, haha.