UPDATE: All new featured RV tours will be posted on my other website, Wanderful RV Interiors. Existing tours will slowly be moved to the new website, and anything already moved will automatically redirect.
Disclaimer: This post may contain affiliate links, meaning, if you click through and make a purchase we (or those featured in this post) may earn a commission at no additional cost to you. View our full-disclosure here.
I don’t know about you, but I LOVE area rugs! They instantly change the way a space looks, and are an easy {and temporary} way to add color or pattern to a room.
However, if you are on a tight budget {like us} then you may quickly realize that the area rug you want is out of your price range, boooooo. But then that’s the beauty of DIY, am I right? You can find a style you like and then re-create it in a way that reflects your personality, without spending a ton of money. All it takes is a little bit of time and patience. Trust me, if I can do it, so can you!
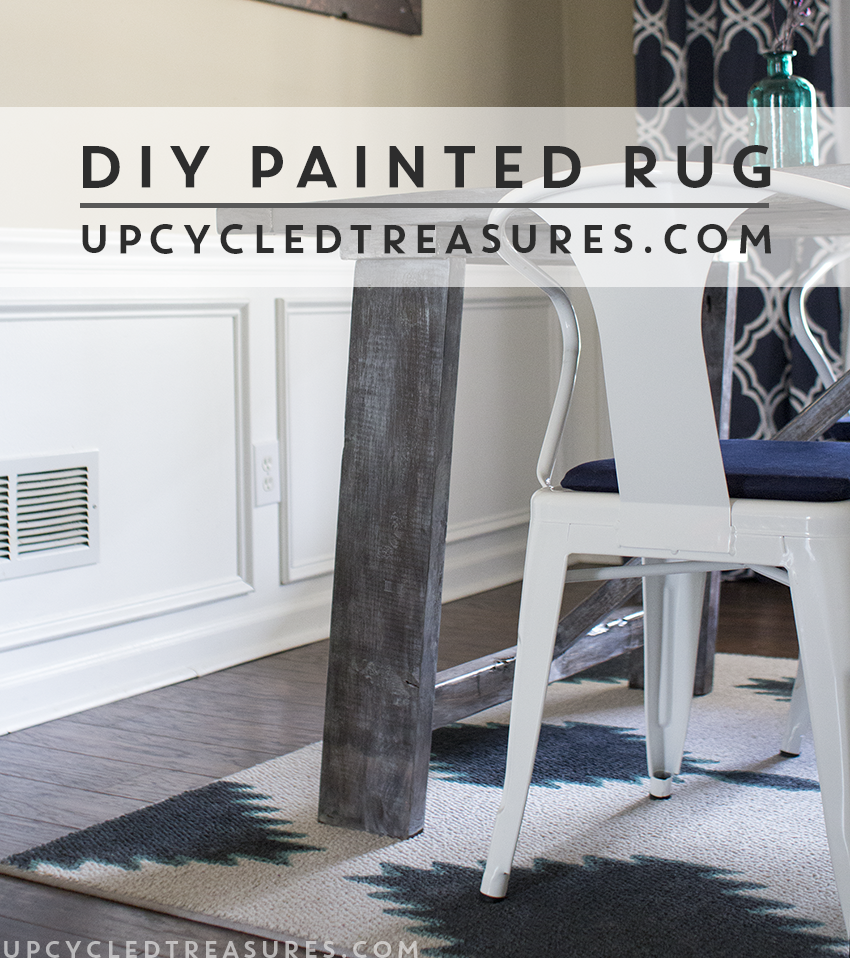
Today I am sharing how I created a DIY painted rug inspired by West Elm, for just $20!
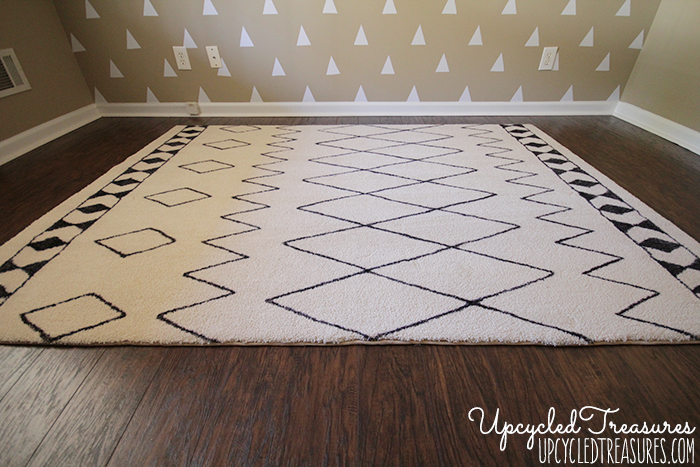
I had originally planned to paint the rug I currently have in my office/studio but after coming across a pattern I loved, I realized I could get the same look with just a sharpie. In case you missed that post or want a refresh you can see my West Elm Inspired Rug here {pictured below}. If you plan to use a design with more lines and less filled in shapes I would definitely recommend the sharpie route. It’s easy, looks great and the rug still feels super soft!
However, if you are looking to fill in patterns and shapes with more color then you may want to try out the DIY painted rug route.
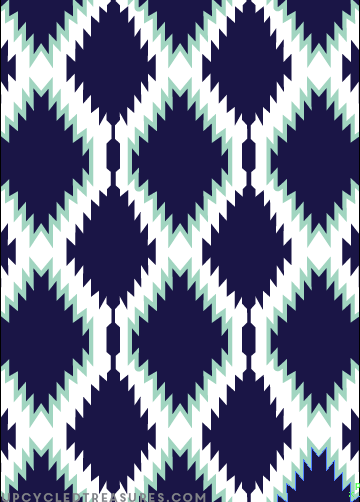
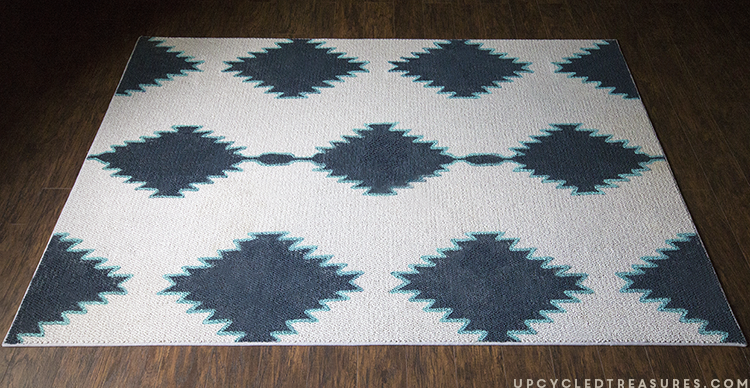
West Elm Inspired DIY Painted Rug
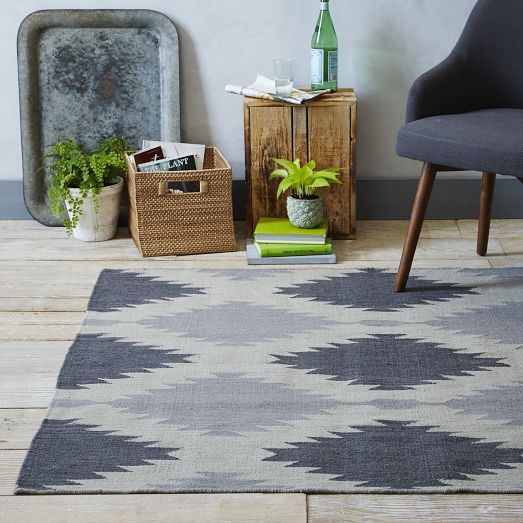
One day while browsing the West Elm website I came across the Phoenix Wool Dhurrie rug and instantly fell in love. The geometric/kilim pattern was fun, simple, classic and modern all rolled into one. It seemed perfect for our dining room!
Of course, the price tag of $350 for a 5×8 was a bit steep for us so I decided to create my own version using this design as my inspiration.
I know that one of the reasons area rugs can be expensive is because of the materials and craftsmanship involved. My DIY painted rug wouldn’t be nearly as perfect or soft, but I was okay with that. When you have $20 you can spend on a rug, you have to make do with what you have. Besides, I really enjoy all of the stories behind the DIY projects in our home, and no one has anything exactly like it 🙂
The inspiration:

Rug
Paint
Cardboard Template of shapes to use {optional}
Patience
90’s Music {optional}
![]()
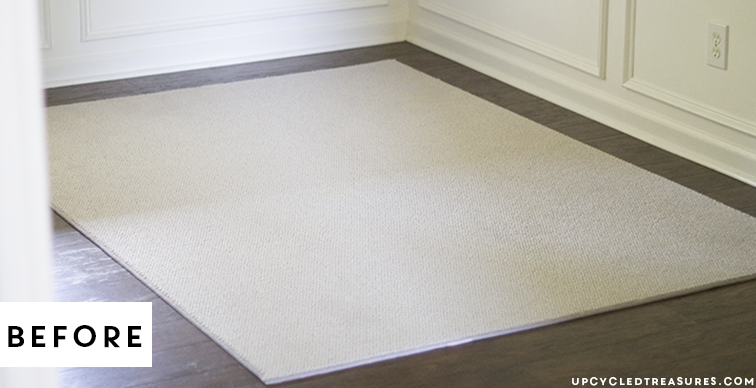
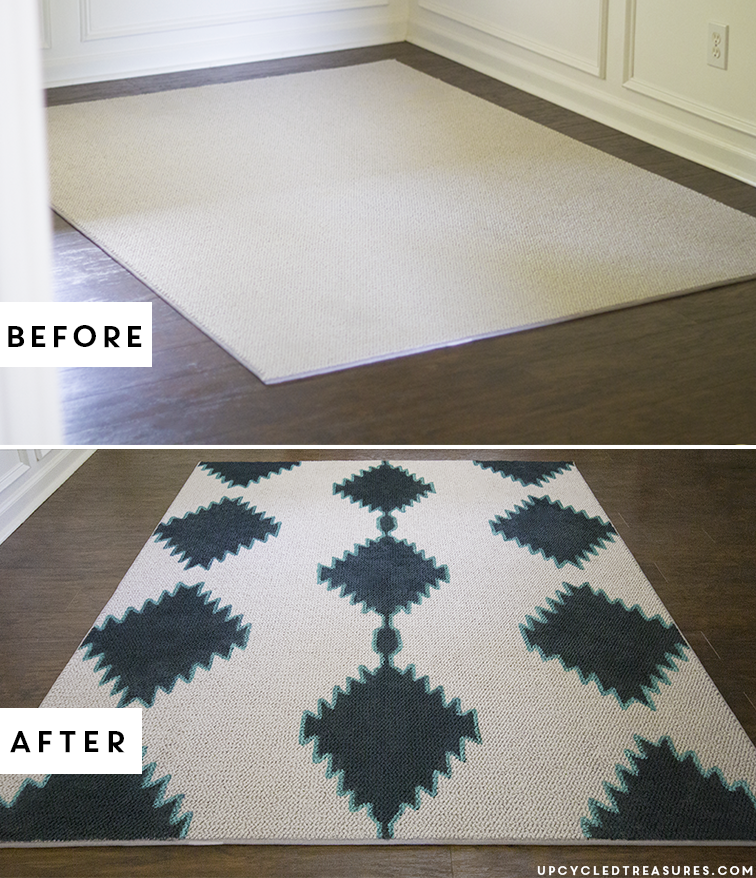
By the way, one of my favorite ways to save money on rugs is to purchase remnant rugs from Home Depot or Lowes. The rug I used in my office cost less than $30 and the one I’m sharing today was only $20! I always like to check to see what remnant rugs are in stock when I’m in there because it can be somewhat random, and you never know what you will find. I’m all about the treasure hunt so I’m okay with that 🙂 It would have been nice to get one a bit larger but I figured 5×7 would do, especially for the price!
Here is the before photo of my 5×7 Remnant Rug:
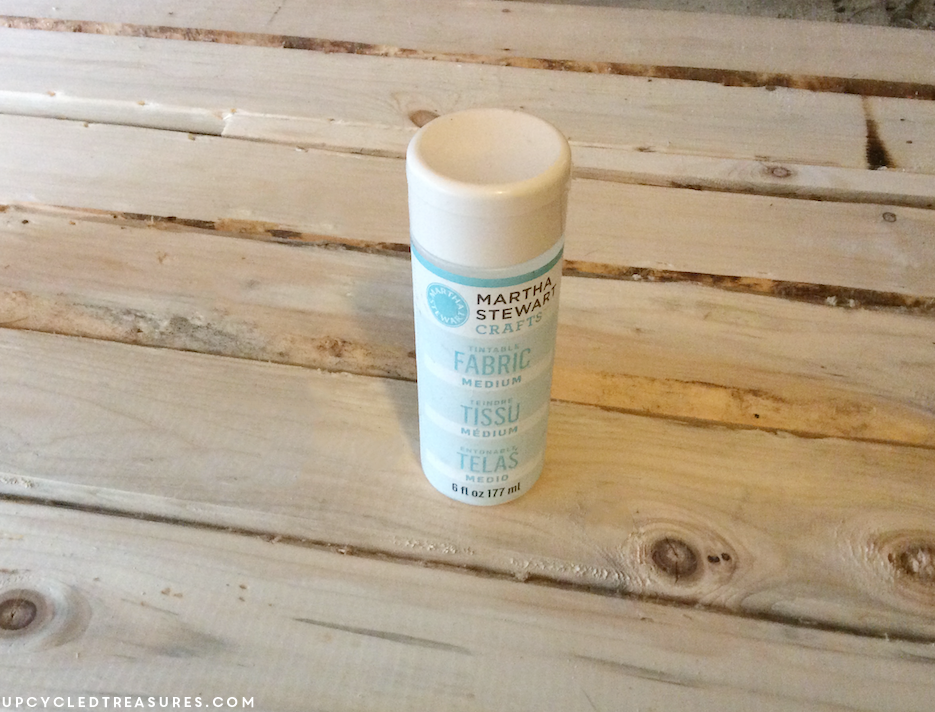
I already had the fabric medium on hand that you use to mix with your paint color since I had purchased it back when I bought the rug above, thinking I’d use it, but didn’t. I did actually use some of it on the DIY lace curtains I shared. I purchased the $20 remnant rug soon after we finished building our West Elm Inspired dining table, so I actually had everything on hand that I needed, woo-hoo! You can use acrylic or latex paint, and I just used some custom mixed navy and turquoise paint. Just make sure that if you custom mix a paint color, that you make more than enough. The last thing you want is to run out of paint before your DIY painted rug is finished.
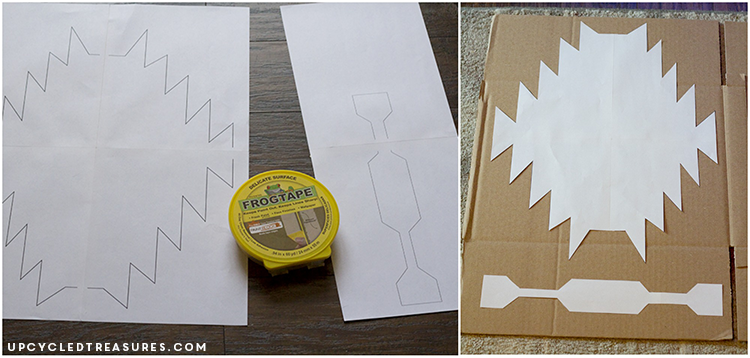
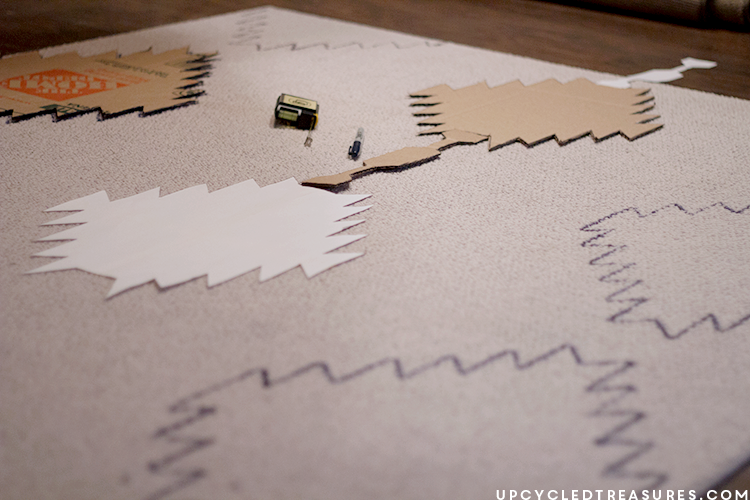
The first thing I did was create the shape templates in illustrator. I’m not gonna lie, I suck at math and am a more visual person so I thought planning it out on the computer would be easier. Plus this way I could play around with where I wanted the shapes and what color to make them too. I actually still screwed it up, but I’ll get to that a little later…
I decided to create 3 separate shapes, enlarge them, and then printed each individual shape out from my home printer. Each shape took up a few pieces of paper so I used some of the Delicate Frog Tape to tape the pieces of paper together. I actually won a bunch of Frog Tape {YAY!} when I attended Haven, and I had never used the delicate kind before. It was perfect because it didn’t tear the paper and I even had to move it around a couple of times.
After each shape was taped together I cut the shape out, then placed it on a piece of cardboard, traced it with a sharpie, and then cut out the new cardboard template. The cardboard template is what I used to “stencil” onto the rug. The photos below probably explain this better than I can.
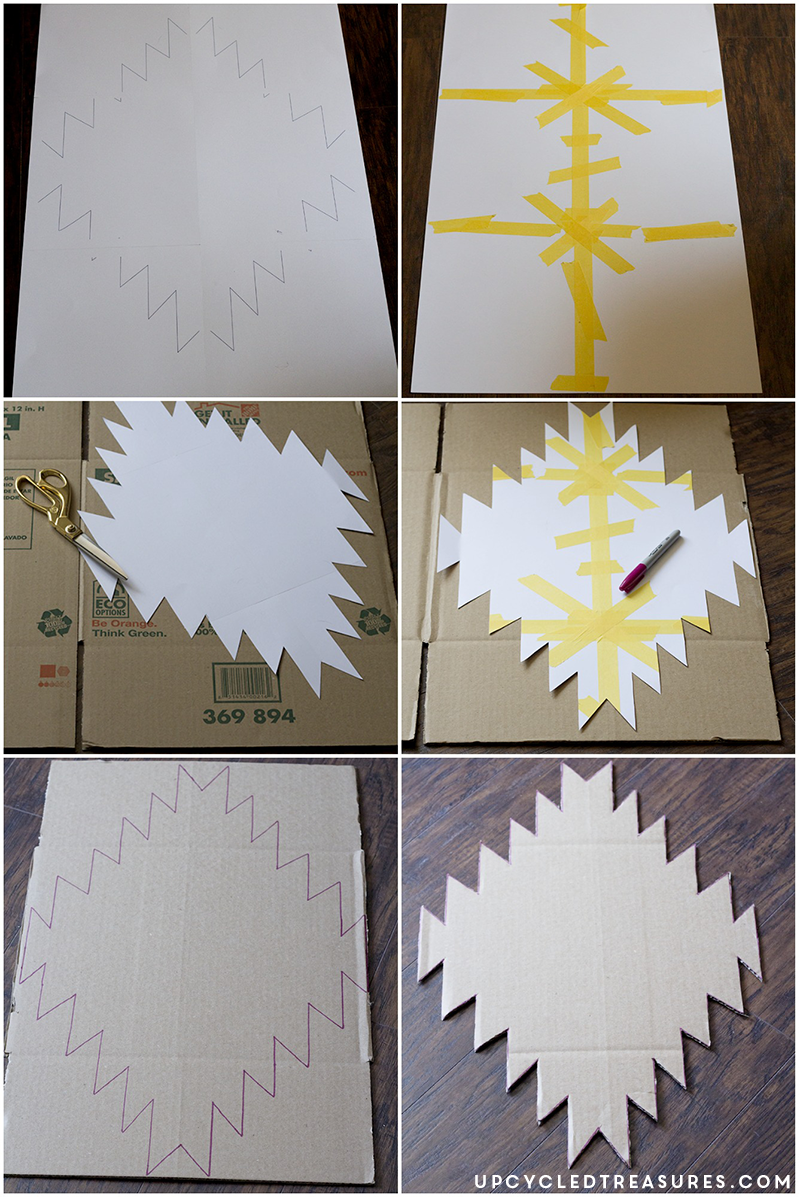
I did this for all 3 shapes until I had 3 separate templates cut out of cardboard.
After I had all of my cardboard templates printed out I started marking out my measurements onto the rug using chalk as a guide for where my templates would start. This is when I realized I totally screwed up my plan.
When I enlarged the shapes on my computer I apparently made them too large, which threw off my original design plan. Oops. I had even tested out the first template to see how it would fit along with the rug, but had only gone along the height of the rug, and not the width. This meant that I had to alter my design a bit and went with just 3 columns of vertical shapes. I considered re-printing and cutting the templates but decided just to roll with the punches instead.
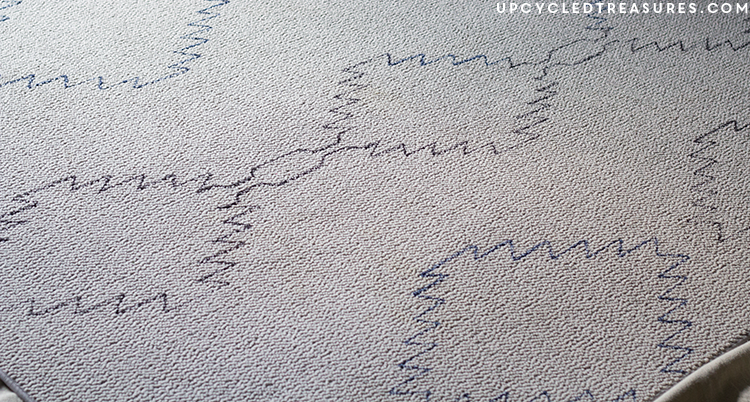
It didn’t take long to line up where the shapes would go since I lined the first column against the edge and 3.5 inches apart, and then started the middle column smack dab in the center. I also used my original printed out shapes as a guide in addition to my cardboard templates {as seen in the photo below}. Once I had my template lined up I simply traced around it using a sharpie marker. I alternated between 2 different sharpies to make it easier when one was running low on ink.
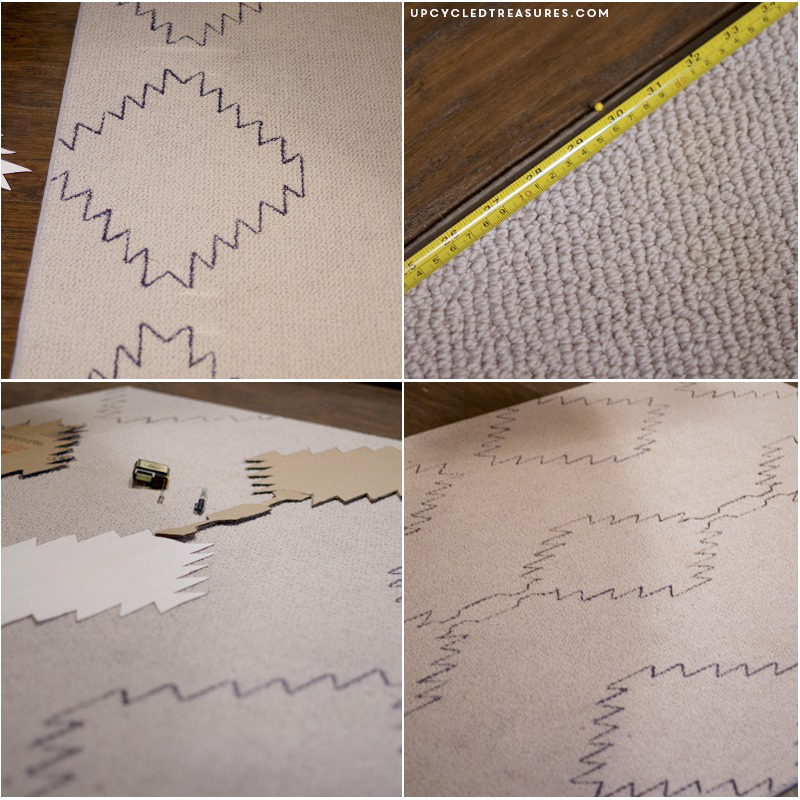
This took a bit longer than expected and it was pretty late, so after I had traced all of the shapes I decided I would do the painting part the next day.
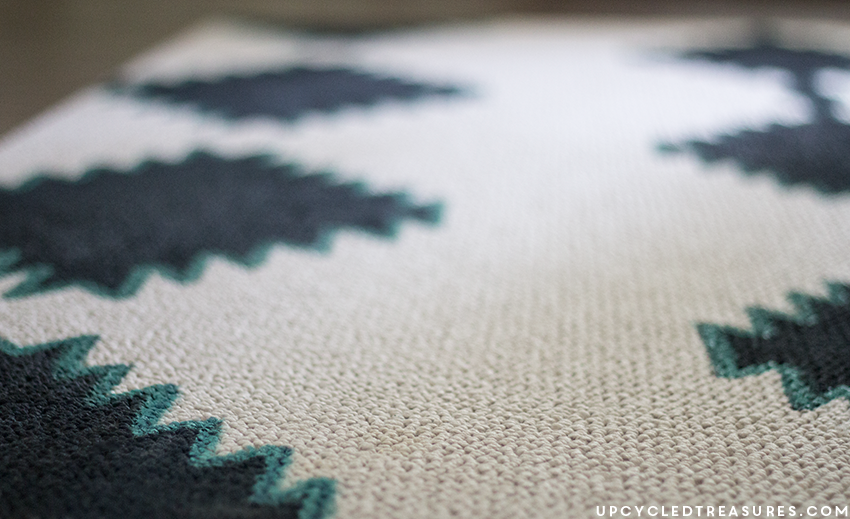
By the way, the paint dried slightly darker than it originally looked when I painted it on. Just FYI so you don’t end up with a color darker than you wanted. It’s probably best to test an area first to see if the color looks the way you want it to. I had started painting one of the patterns on my rug and then decided I wanted the color a bit lighter, so I just painted over the part I originally painted.
Before I started painting I put a couple of old tablecloths underneath the rug just to make sure no paint went through. You could use a dropcloth, newspapers, an old sheet, etc. The paint didn’t go through the rug at all actually, but better safe than sorry, right? I worked on the rug in our bedroom with the door shut so our pets wouldn’t run all over it or have their fur fly in the paint. Funny how as soon as a door shuts they freak out and wanna come in. If you have pets are yours the same way?
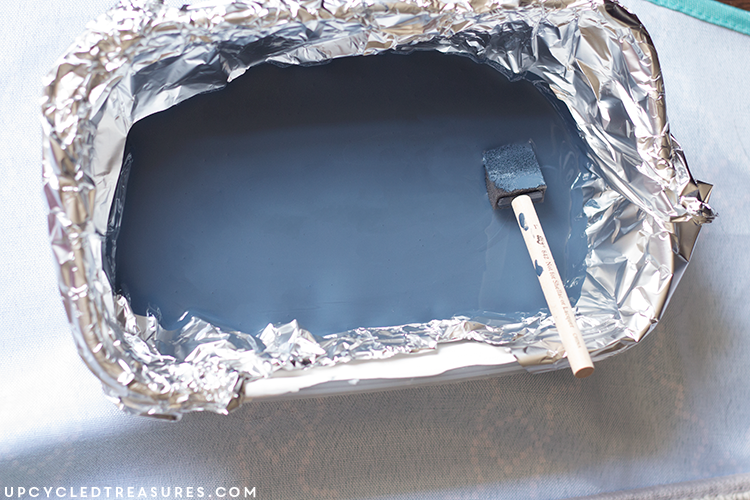
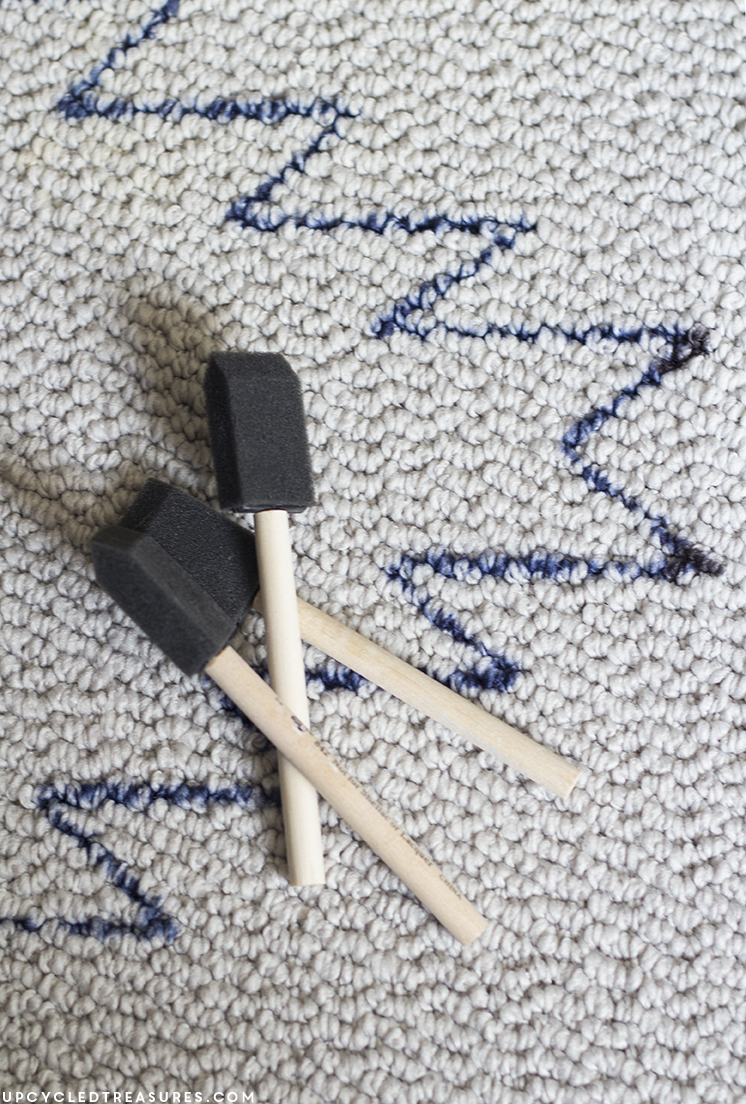
After I had my navy paint color mixed I used a foam brush {several actually} to apply the paint to the shapes on the rug. I originally tried a regular paintbrush but found that the foam brushes worked much better. If you have really large shapes or stripes you could also use a foam roller.
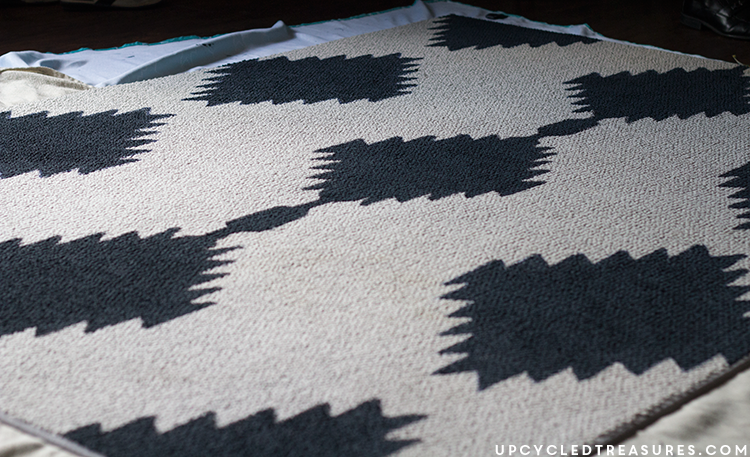
After the paint had dried I actually went around and painted over the shapes one more time. A couple of hours and many foam brushes later, my rug looked like this:
and my brushes looked like this:
Lol. Well, even when the foam part broke off I still used it to sorta squeegee the paint onto the rug. It worked surprisingly well and I wasn’t afraid to get a little messy.
I actually really liked how the rug looked with just the dark navy {it looks a bit darker in the photos then it does in person}. Our dining room doesn’t get too much light though and is super beige so I wanted to add a pop of turquoise to brighten it up a bit.
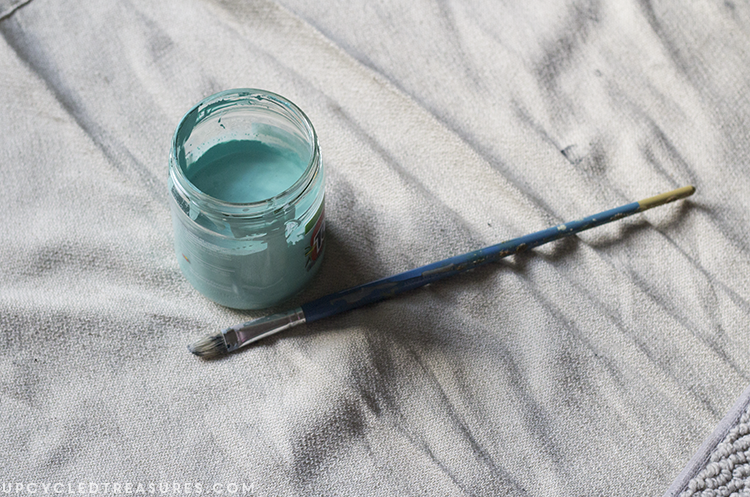
I was impatient so after a few hours, it seemed dry enough so I went ahead and started painting around the edges of the pattern using a smaller paintbrush and some custom mixed turquoise paint. Don’t you just love how the paint is in an old Tostitos jar? haha.

It was so much fun watching the rug transform before my eyes, talk about instant gratification! At first, I was bummed that I screwed up my original design plan because I really wanted to have more than 3 columns, but I still think it turned out pretty awesome. In fact, I think it worked out pretty good because now there is more contrast in the dining room with the additional white showing on the carpet.
Here is the rug all finished:
I actually want to pick up some fabric protector to spray over it just to make sure all that hard work lasts. I will probably do that next weekend.
So what do you think? Have you painted a rug before or are you considering making one? I LOVE our new DIY painted rug and I will admit that the painted areas are a bit stiff but not too terrible and since it’s in the dining room and not the bedroom I’m totally cool with that.
We hope this tutorial on our DIY Painted Rug was helpful. Do you plan to give it a try? If so we would love to hear about it below.
UPDATE – 1 Year Later:
I’ve had this rug for about a year now and still LOVE it! It seems to have gotten softer over time – although the painted areas are still crunchy and are holding up really well. I have no problems vacuuming it or doing spot cleaning. The best advice I could give is that if you create a custom color be sure to have extra set aside or know exactly how you made it. There are a few spots where my cats have scratched the rug and it could use a couple of touchups, but I don’t have the same paint so I’ll have to try to color match it.
UPDATE – 2 years later:
The rug held up much better than I expected but one of our cats ended up struvite crystals and long story short he peed on the rug… multiple times. I did spray the rug down with Scotch Guard after I painted it which I do think helped prevent stains, but I cleaned it and he’d pee on it again. Although he’s been on medicine and is better now, the rug had to go. Oh well, it was fun while it lasted. I don’t know if it’s better to buy a rug and have your cat ruin or, or spend tons of time creating a design on one and have your cat ruin it. I guess both scenario’s suck. At least the rug only cost $20, it lasted 2 years, and I really enjoyed painting it.
I love this! The navy and turquoise combo is beautiful together. Yay for working with what you’ve got! 🙂
Thanks so much Caitlin! I love navy and turquoise and those colors appear throughout our home so they seemed like the obvious choice 🙂
this is absolutely superb! !! one . question tho….what ki da paint did u use.was it acrylic or sm other kind?
OMG!!! This is an awesome job…you worth lots of congratulations!
Thanks Christina!
Gorgeous! Seriously… I love it! Pinning!
Thank you so much Ashley, and thanks for the twitter love too!
Oh my gosh I love it!! I’ve been wanting a rug for my kids room but you’re right, they’re way too expensive! This might work for me, thanks for the inspiration 🙂
Thanks Colleen, I can’t wait to see what you do for your kid’s room!
Does Home Depot bind the remnant for you ?
It was actually already bound. I find these in the same area as the decorative area rugs, sometimes one aisle over. Some days the selection is slim and other days they have more options, so you just have to keep a look out. Same with Lowes. 🙂
Looks great and will work better than a floor cloth in the spot I’m looking to place it. What kind of protectant did you use afterward? Scotchguard? Thanks!
Hi Karen,
Yes, I just sprayed it down with some Scotchguard 🙂
Amazing. It looks so professional and expensive. I really like the colour combination.
Thanks Al!
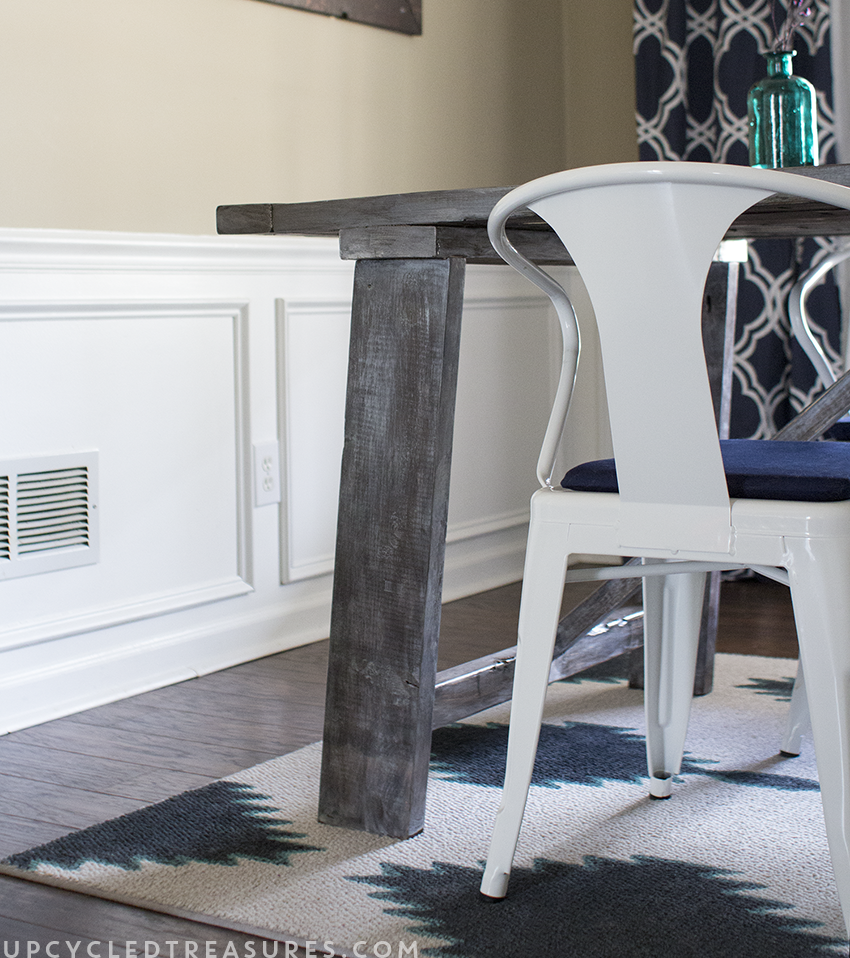
Holy moly girl. You’re blowing my mind with this rug! And then just seeing it with a small glimpse of your table and stunning white chairs…. oh my. I’ll be pinning and sharing on my FB page.
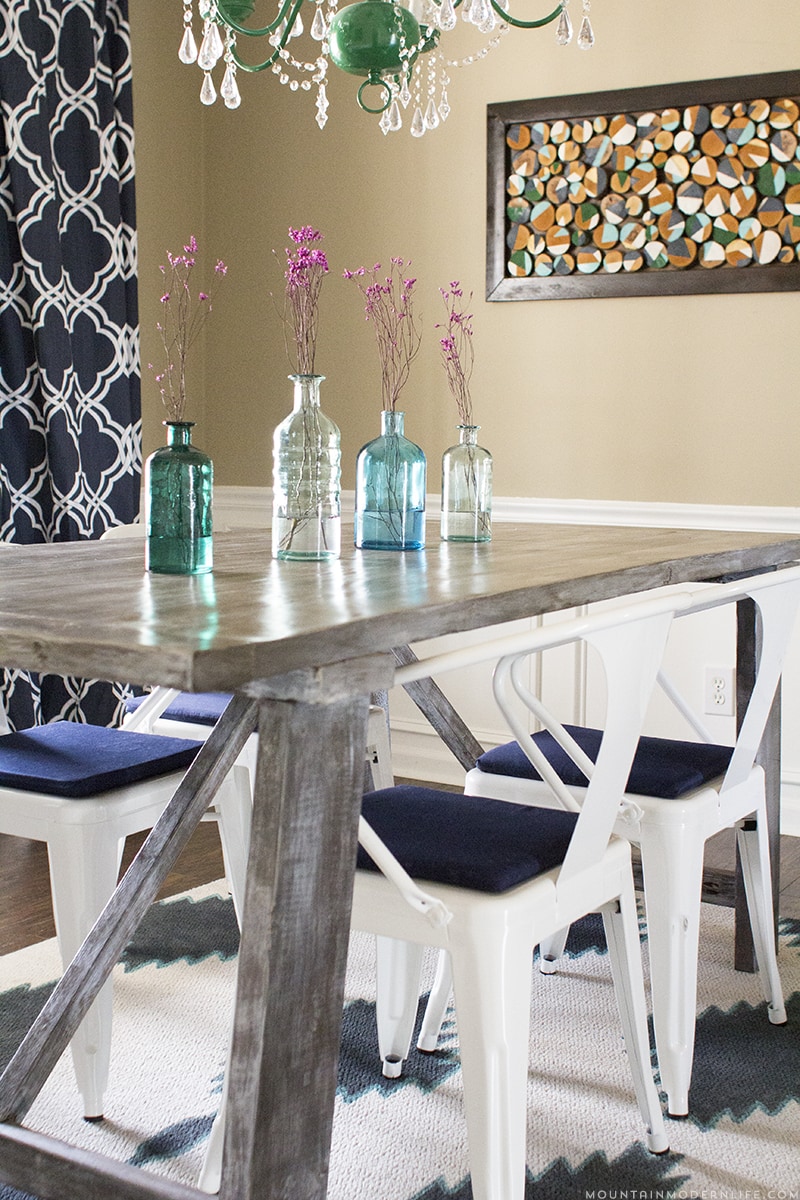
Awww, thanks Amy! Yeah I LOVE those chairs! Still gotta make some cushions and do about 23483649326348726847624 other things in that dining room but I’ll get there…someday 🙂
What an absolutely fabulous idea. I was confused while reading through your tutorial, thinking that your final rug was the inspiration rug. No one will ever know that you didn’t pay big bucks for your awesome rug.
I wish mine looked that good, lol. Thanks so much for the kind words 🙂
I love this rug! It looks absolutely amazing and you did a fabulous job! Thanks for the tip about HD – I never thought of that!
Thank you Cher! Oh yeah, I would check out HD and if they don’t have anything you can check Lowes too. I am obsessed with those rugs now, lol.
Wow, this is awesome! Looks even better than the original 🙂 Great job!
Wow, thanks Breanna! I do love this rug and it makes me happy every time I look at it 🙂
It turned out perfectly, Katie! I love it!! I have been wanting to try to paint a rug, but I couldn’t find a plain white one anywhere. Will you please tell me more about this remnant rug thing? I need to know your secret!
I find them in the same area as the decorative area rugs at HD or Lowes – sometimes 1 or 2 aisles over and some days they have white ones and other days they only have beige, brown, grey, etc. so it’s just a matter of keeping an eye out 🙂 With your painting skills I can’t wait to see what you come up with!
What a beautiful transformation! I love the pattern and color combination and especially that it didn’t cost a fortune. I’ll be featuring your rug makeover on my blog this Friday and would love for you to link up to Your Designs This Time every Monday!
Thank you so much Katie and I’ll definitely have to stop by on Monday to link up!
I love the idea of less rows it looks lovely.I also like the idea of just a touch of turquoise to bring a soft touch of color.GOOD IDEA!!
I love this, Katie! It really turned out great!
Thanks Amy!
I love this! Looks great!
Thank you Tara!
WOW this looks absolutely beautiful..The patience needed for this rug i can imagine but the result is amazing.
Thanks Anam! Oh boy am I getting a lesson on patience lately. Guess it will come in handy when we have kids, lol.
Hahahaha just today I was wondering the same thing ,that’s going to require a lot more patience though.
Yeah maybe just a tad, ha.
Both rugs look awesome! What a great way to make an inexpensive rug look custom and special.
Thank you Elizabeth!
So so so amazing Katie, and even more amazing that you’re providing a free template! Love the colors <3
Thank you Amy! Those colors always make me happy 🙂
Katie, this is absolutely amazing! I think you gave me an idea for a fall projects.
Thanks Carmody! Can’t wait to see what they are!
Katie you are a genius. This is beautiful and so smart! Love it!
Awww, thank you so much for the kind words Rachel!
WOW! I love the design, the colors, everything. I’ve never seen anyone do this, but it’s a brilliant way to save money. I love a houseful of rugs too, but they can be so expensive. Great job!
Thanks Nicki! Although it definitely takes some time and patience, the outcome is totally worth it!
skills, man. skills!
b
Thank you so much!
Fabulous project!
I have wanted to paint rugs forever! I love this tutorial! Please share this tutorial at my Show-Licious Craft & Recipe Party!
~ Ashley
Thank you so much for the invite Ashley, I just linked up! By the way, love how you used electrical conduit for curtain rods!
So gorgeous! Stop by House on the Way tonight to see it featured at the Twirl & Take a Bow party! We’d love to have you join the party this week too.
Thanks,
Leslie
Yay, thank you so much for the feature and I will head over there now 🙂
I have never heard of Home Depot having remnant rugs before…where do you ask about them?
This looks amazing. I would love a rug for my living room but I can’t find one I like for less than a hundred dollars…which is a bit steep for me. =)
You can find the remnant rugs near the decorative area rugs at Home Depot or Lowes. The selection can be random and you never know what you may find, but I would just keep an eye out whenever you are there 🙂
i LOVE it! creative, thrifty, and beautiful!
Thanks Ashley!
This is one of the best rug project I have ever seen, girl!! Just love it, so as your new site! ♥
Awww, thanks Aniko! My site is still a wip but it’s getting there. One day at a time, right? 🙂
I LOVE your painted rug too by the way!
I absolutely love it!!! You did an amazing job! You must pack a lot of patience 😉 Well done!
Thanks Fotini!
I just love the colours and pattern you used! Looks fantastic! I’d love to do something like this with two very plain rugs we already have. Feeling inspired…:)
Thanks Ann, I can’t wait to see what you do with your rugs!
Patience is right! Man, I am so impressed with all those designs and how well they line up. Congrats on your feature at this weeks From Dream to Reality hop!
Thanks so much Natasha! I am the most impatient person ever, so this definitely taught me a valuable lesson… to be patient. Ha.
I love this so much! I have been wanting to paint a rug for a year at least. Can you tell me what the fabric medium does and how much you used? I just painted stripes on a drop cloth from Lowes that I tea-stained and am upholstering an old wooden rocking chair seat. The stripes are navy and look so cool (like vintage French linens). I am afraid that they may be stiff (I did not use any fabric medium-is that what it’s for?) and I am also afraid of it wearing off or worse, getting on someone’s clothes. Will the fabric protector prevent that? Thanks for any help you can give me. Again, very cool!!
Hi Karen,
Fabric or textile medium helps soften the fabric so it’s not as stiff, and also makes it more permanent. If you heat set it afterwards {like I did with my lace curtains} then it’s also washable. It’s also supposed to help the paint bond to the fabric without cracking. Just make sure to follow the directions when mixing 🙂
You definitely could have used the fabric medium on your drop cloth so that when you wash it in the future it wouldn’t fade. If it’s dry it shouldn’t come off on anyone’s clothes though, and you can spray fabric protector on top which will make it easier to clean in the future if anything is spilled on it.
Hope this helps!
~Katie
Yep! I am totally impressed by this! You did an incredible job! Seriously, my mind is blown and inspired! lol I have seen these rugs at Home Depot and now I probably will buy one. I love area rugs, but some of the prices are just too much and sometimes ridiculously so.
Thank you so much for sharing. 😀
Thanks Julie, it definitely makes you look differently at plain, boring rugs, eh? Now I see them and think “oh the possibilities” lol.
I save all my tostitos jars too! You are not crazy they are great for all sorts of things!
Lol, yeah I save just about every jar and can in our house. Hoarder much? 🙂
MIND BLOWN! Absolutely gorgeous! It looks even better than the West Elm rug! Great job!
Aww, thank you so much Vivian!
This is, wow, what do I say? Awesome, and that’s not enough! I’ve needed an inexpensive rug for our basement because it can flood there. I’m going to look for a beige nubby carpet remnant at Home Depot and try this. I have tons of acrylic paints, fabric medium and stencils. You’ve totally inspired me to try this!
Oh boy, water in the basement can be such a pain, so I can see why you would want to spruce up the space without spending a lot. I can’t wait to see what you do!
This is insane! Great job Katie! I’m so jealous – I doubt our city Home Depot has such great rug remnant deals (though I will definitely keep an eye out now that you’ve tipped me off to it!)
Thanks Meg! You can check out Home Depot, Ikea, Lowes, Target, Walmart, etc. for affordable plain area rugs 🙂 Best of luck and keep me posted if you paint one!
loved your rug. I’m redoing my bedroom in dark blues and white, but I haven’t been able to find a rug that I liked that didn’t cost a small fortune. I also like to make most of my own things, so thanks for the idea.
Katie, you amaze me! I am so inspired to paint my own rug now! I just wanted you to know that I am featuring your rug in my Friday Favorites this week! You can see it here: http://www.thedomesticheart.com/friday-favorites-ed-4/
Also, I’m now co-hosting On Display Thursday and I’d love to have you share this, cause its awesome! Hope to see you Thursday!
Yay, thank you so much Shelly!
This came out amazing, I like it better than the West Elm one! I didn’t know Home Depot had rug remnants, I’ll be checking that often!
I have been looking for an inexpensive way to do a custom rug for our living room. Thank you for the tips! Just curious has the rug held up this long?
I honestly LOVE this rug! It was in our dining room for the last 7 months, which doesn’t get a ton of traffic, and I actually just moved it into our living room. The painted areas are a bit more crunchy than the non-painted areas, but they have softened over time and the color is still really good. I definitely say go for it! 🙂
This is awesome! So glad I came across your blog. I’ve been trying to find a cheap alternative to a PB Teen rug for my daughter’s room. My only concern is whether painting an entire rug will make it too “crunchy”. Do you think if I add enough fabric medium it will help soften the paint so that it’s not too hard for my daughter to sit and play on?
I’ve had this rug now for about 9 months and the painted areas have definitely softened over time, although they are a bit crunchier than the non-painted areas. We don’t have kids, and this rug is currently in our living room. I don’t know if it would be too crunchy for your daughter to play on or not, so you may want to test it on something first, or if you are really concerned you could always create a sharpie rug, mine is still soft as ever. Hope that helps 🙂
http://upcycledtreasures.com/2014/02/diy-sharpie-rug-west-elm-rug-knockoff/
~Katie
Seriously amazing! You are very talented. I love that you provided the stencil template and I just may have to use it for a furniture DIY I have in the works.
Thanks Kerry and that’s such a great idea! I plan to use a similar design on some pillows here soon 🙂
It’s days like this, when I find a project like yours, that I’m SO happy we live in a pinterest time! I’ve been drooling over a similar rug, but didn’t want to shell out the cash for it. Can’t wait to try this!
Haha, thanks Elise! If you make one I’d love to see it!
WOW! Amazing and so pretty. Could you make one for me and send it over? 🙂
Sure, I’ll get on that right away! lol.
Now that time has passed, could you please let us know how durable it turned out to be? did the design rub or flake off? fade in trafficed part? tia
Hi Nancy, I recently posted this year update to the bottom of the post:
UPDATE: I’ve had this rug for about a year now and still LOVE it! It seems to have gotten softer over time {although the painted areas are still crunchy} and is holding up really well. I have no problems vacuuming it or doing spot cleaning. The best advice I could give is that if you create a custom color be sure to have extra set aside, or know exactly how you made it. There are a few spots where my cats have scratched the rug and it could use a couple touchups, but I don’t have the same paint so I’ll have to try to color match it.
Hii Katie, this is absolutely superb one..
what kind of paint did you use. .? is it acrylic or some other kind?
Hi Elhouzz,
I actually used a mixture of leftover oops/wall paint but either should work just fine 🙂
~Katie
Lovely rug! Tip: whenever you need your painters tape to be a little less tacky (more easily removed from delicate surfaces) press the sticky side into your shirt or pant leg and remove before applying to your surface. It will pick up a small amount of lint from the fabrics, so it is not quite so sticky. Just don’t use an angora sweater lol
I think your rugs look nicer than the expensive ones. And with 2 little kids and a puppy I wouldn’t buy an expensive rug.
I was just thinking that my area rug really needed to be replaced, with all the spots/stains it has. Then I thought; Can I paint it? Wow! Thanks for sharing this! I’m going to try it. You mentioned adding a medium to the paint. What exactly is that? Where do I get it? About how much will it cost? And about how much will I need? My rug is about 5’x7.5′. Thanks again and God Bless????
I don’t see what kind of paint you used and amounts. It’s beautiful and I would like to to try it.
Thanks Jane! I actually used random latex paint that I had leftover from random projects and then mixed that with the fabric medium. You just want to follow the directions on the back of the fabric medium for the amount to mix.
Beautifully Creative! Not that there will be a next time….but Kleen Green Naturally Enzymes I poured straight from the bottle, undiluted onto a oriental rug to remove urine saturation, worked withour any color changes. Then I placed a towel over the area and walked on it. When it was dry, the stain was gone and only slight odor so I treated it again over night and then did the towel thing…..no odor! Never has left any paint damage….wonderful with clothes…..especially that towel! Normally I dilute it and use a sprayer. Perhaps you will have fun with your art again?
[…] Tutorial located from:.mountainmodernlife. […]
Can you paint over a colOr design on a rug and just change the color rather than make a design? Would i use the same mixture of fabric medium and latex paint? Keeping same design just different colOr?
You should be able to, but I only recommend painting a rug if it’s a last resort. Ours held up decent for a while, but there are so many budget-friendly options available and it can be a tedious job.
You inspired me. Thanks.
I LOVE this! My husband and I recently bought an outdoor store/bike/ski shop in an OLD building. The carpet is grey, old, and stained which gives the store a dingy, dirty look. I can’t afford to replace the carpet. Recently my mom gave me the idea of painting it, and while searching for articles about painting carpets I found this wonderful tutorial! I’m inspired to do this, even if it only lasts a year, I might be able to afford new flooring then haha 🤞🏼.
Thank you!