UPDATE: All new featured RV tours will be posted on my other website, Wanderful RV Interiors. Existing tours will slowly be moved to the new website, and anything already moved will automatically redirect.
Disclaimer: This post may contain affiliate links, meaning, if you click through and make a purchase we (or those featured in this post) may earn a commission at no additional cost to you. View our full-disclosure here.
Let me start this off by saying the books used for this project were on their way to be tossed into the dumpster, so I asked if I could take them instead. Some people are upset that I used books for this project {and yes you could use phonebooks instead}, but since they were about to be thrown out, I decided they would make better pumpkins than trash so I rescued them. They make me smile every time I look at them.

DIY Paper Book Pumpkins
No, this is nothing new, but I like to think the stem on my pumpkins is different than those I’ve seen and if I make these again I will make the stems even longer and curlier. I could be wrong but was too scared to search Pinterest or google to find out otherwise, lol. I first came across this idea via Creations by Kara and she has a really great tutorial that you can check out.

- Book – each pumpkin is an entire book
- Scissors
- Exacto Knife -this is optional but I would recommend it
- Piece of paper
- Pencil
- Glue Gun and Glue stick (not pictured)
Here is a photo of the steps and then I will quickly explain them:
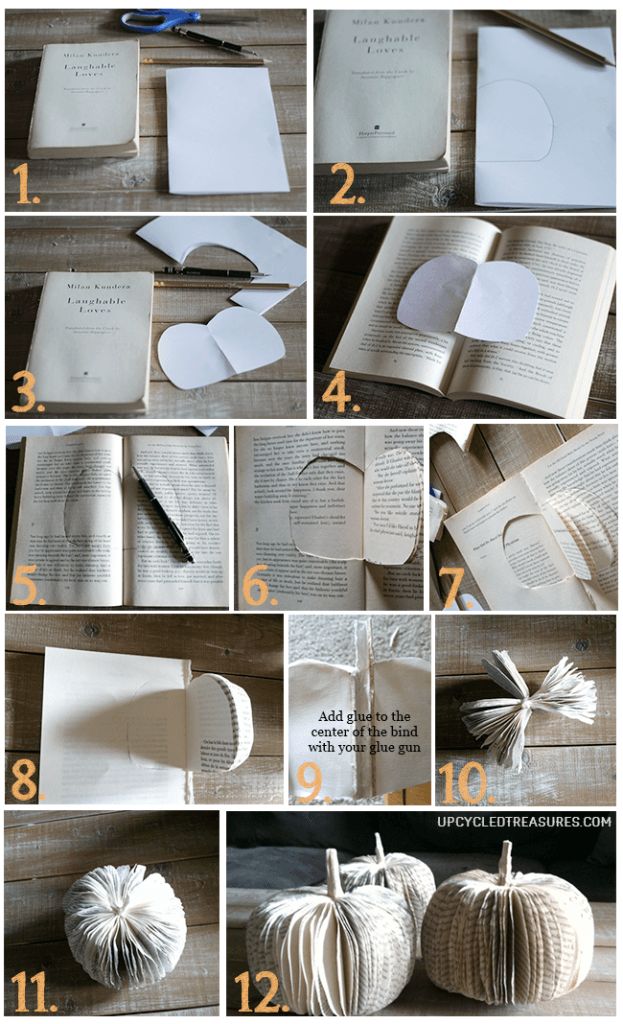
Step 1:
Gather all of your materials and remove the front and back cover from the book.
Step 2:
Take your blank piece of paper and fold it in half. Then draw half of a pumpkin shape using the edge of the creased line.
Step 3:
Cut out your pumpkin shape from the piece of paper. This is the template you will use to create the pumpkin shape out of your book. Make sure to keep in mind the size of the book you will be using. No it doesn’t need to be perfect – pumpkins aren’t perfect anyway. You will want to keep the bottom line more straight though so that it can sit on a table.
Step 4:
Open the book about halfway and place your paper template on top with the center of the pumpkin matching up to the center binding of the book. I placed mine somewhat towards the top, where I would have enough of the book bind left behind to be the “stem” of the pumpkin.
Step 5:
Trace around the pumpkin template with your pencil
Step 6:
Using your exacto knife, begin cutting around the edge of your outline. I would “carve” out one section of the book before moving on to the other side.
Step 7:
You will probably have to cut through a few pages at a time, so this will take some patience. You could also use scissors but I found the exacto knife to be easier and less messy. Towards the last couple pages I would use my scissors to cut the edges and make whatever tweaks I wanted, making sure to leave the book bind at the top so it could become the pumpkin stem. I would also tear out the pages as I went along to make it easier and to get a little instant gratification knowing I was getting through the book. You can see a page I moved to the side in the photo of step 7.
Step 8:
Once you have one side of the book completely cut out, it’s time to start on the other side. My photo steps may seem a little confusing because I made 4 of these book pumpkins and did each one a little differently to see what I liked best. So the photos I used are a mixture of the different book pumpkins. {As you can see from the photo of step 7, I had started carving out the left side first and the photo of step 8 is vice versa}.
Step 9:
Once your pumpkin is all cut out then you will need to add glue down the center of the book bind with your glue gun {it’s hard to see the glue in my photo}. Then close the 2 halves together to make the pumpkin shape as seen in step 10.
Step 10:
Don’t freak out when you place your pumpkin down on the table and it looks all awkward, it just needs some fluffing. I went through each page and crinkled it just a tad to help keep it separated from the other pages. In the photo of step 10 you can see that I started fluffing up a couple sections.
Step 11:
Continue fluffing until you have gone around the entire book and achieve the look you want.
Step 12:
Enjoy your freakin’ adorable paper book pumpkin!
I made 4 of these cuties in a couple hours and was sorta in a rush when I made them because I had to head over to my sisters for some B-day celebrations, and to put together my fall tablescape. So… my living room may have looked like this for a little bit, but hey I’ve admitted that I can be a messy crafter!

Don’t worry though, it’s been cleaned up. Gotta love my coffee cup sitting amongst the chaos.
Here is a close up shot of one of the pumpkins from my fall tablescape:


I knew I wanted my table to be a little more monochromatic with just a little pop of green here and there so I opted to leave my book pumpkin the way it was. However, you could definitely add some color to it with an orange ink pad or some acrylic paint. You could also use a twig for the stem and add ribbon or burlap. The options are endless.
So what do you think?
Very cute.
Thanks Jae!
I LOVE this idea!!! I’m going to try this out tomorrow! Thanks for the inspiration!!!
Yay! You are welcome and I’m so excited that you are going to make some too!
LOVE this so so much. I will be stealing this idea =) Pin’d!
No worries Marcy, I sorta stole the idea from Creations by Kara 🙂 I love these pumpkins and am so happy you do too!
Love these pumpkins! Great fall decorations. Pinned this one to try myself. Thanks for the great tutorial too!
Thank you so much Ellora!
How beautiful! I’ve seen them before on Pinterest, but not with the detailed instructions. I think I can do this. Thanks for taking the time to share all the steps.
If I can do it, anyone can that’s for sure! And probably with at least half the mess, lol.
I have seen these floating around pinterest for a few years and I have always wanted to try them out! I am going to pin it, and make a point to actually make them this year! Thanks for sharing!
That’s awesome! I have been wanting to try out some book page crafts and am so happy I finally did! I see book page flowers in my near future 🙂
Hi Katie, these turned out really nice! I love book page crafts. There’s just something about old book pages to me. And my coffee cup is always sitting amongst the chaos as well. 😉
Thanks Kristen! I love them too, although this was my first attempt at actually doing one. These books were going to be thrown away so I’m so happy to have been able to rescue them and make them into something oh-so-pretty 🙂 The old age definitely gives them character and a hint of color too. Thanks for stopping by!
Love, love, love this! I’ve been wanting to make these! Thanks for sharing your tutorial 🙂
Thank you Emily! I’m so happy you like them and I hope the tutorial makes sense 🙂
This is amazing! Can hardly wait to see your table! ox
Thanks Robin! Me too and the other tables turned out fabulous, plus we all have different styles so it’s fun to see how different they are 🙂
Fabulous tutorial. I love it. Thanks tons for joining Inspire Me. Hugs, Marty
Thank you Marty! I never know if my tutorials make sense but hopefully you found it useful 🙂 Thanks for stopping by and I hope you have a great week!
This is great! Thank you for the tutorial, I especially liked # 7″s encouragement 🙂
Thanks Carmen! Yeah well like I’ve said, I can be super impatient so seeing that I’m making progress gives me some satisfaction, lol.
I was just thinking I need to somehow turn loose of Summer and just embrace the inevitable arrival of Fall. I am hoping that throwing myself headlong into decorating for it will help. 🙂 Thanks for the tute, I was just going to try to find one of these!
I know what you mean. It’s crazy because summer hasn’t even ended but I am LOVING all of the fall projects I’m seeing on Pinterest. Plus I <3 fall 🙂
Love this! It’s great! We made Christmas trees from books and magazines as kids but I never thought to make pumpkins. Thanks for sharing! Stop by my Friday’s Five Features and link up this post (and others)! http://diy-vintage-chic.blogspot.com
What a neat idea, I never even thought about making trees from books but I will definitely have to try that out! Thanks for stopping by and I would love to link up at your party, thanks for the invite 🙂
~Katie
Thanks for stopping by DIY Vintage Chic’s Friday’s Five Features and Fun Festivities. Don’t forget to stop back by this Friday!
Wow, just wow! These are so understated and gorgeous! I am pinning this now so I can get the supplies and try it. I’m visiting from the Brag About It link party.
Christy @ Creating a Beautiful Life
Thank you so much Christy! I’m so happy you love them as much as I do and can’t wait to see how yours turn out 🙂
This is so cute! I plan on following your tutorial to make a few. Thanks for sharing. Love your blog!
Hi Rita! That’s awesome! Let me know if you have any questions 🙂
~Katie
I love the pumpkins! You’re still making me nervous having fall stuff done so early, though…I feel so far behind! 🙂 Super cute pumpkins, though!
Thanks Brooke and no way are you behind, it’s not even September yet! The weather this summer has been really confusing though these last couple of weeks – it’s been feeling like a combo between Spring and Fall, lol. I do love fall though, it’s my favorite time of the year, and also my favorite time to order the vanilla soy chai latte from Starbucks 🙂
Very cute! Thanks for showing us how you did it too 🙂
Thanks Denise!
Love this idea. I can’t wait to try it!
Thanks Kathy! I wound up giving these to my sister so I will definitely need to make some more before Halloween. Thanks for stopping by!
This is so incredibly cute! I love it! I would never have thought to use book pages to make a pumpkin. Pinned! I popped over from A Bowl Full of Lemons–thanks for sharing!
~Abby =)
Thank you Abby! I saw similar ones on Pinterest but didn’t realize how much I loved them until I held one in my hand. They are just so stinkin’ cute! Thanks for popping over to check them out 🙂
~Katie
Suzanne of Simply Suzannes at Home
Hi Katie!
Oh my gosh!! I LOVE LOVE LOVE these pumpkins!
I know it’s early, but I’m going to start making them now. I have the perfect place for them come late September!
Thanks so much for sharing!
Have a great week,
Suzanne
Thanks Suzanne!
This is adorable. Looking forward to seeing your tablescape next week. I am so ready for fall!
Love your blog, nominated you for a Liebster award. http://www.creativeramblingsblog.com/a-liebster-award/
I’ve made Christmas trees out of old books, but never thought of doing something like a pumpkin. Great step by step tutorial. Thanks for the idea.
This is an adorable idea. I am going to make some as soon as I can find some old books. Pinned.
Thanks for sharing.
Visiting from A Stroll Thru Life linky party
Sue
Ooooh…those turned out so cute!
Thanks so much for sharing this tutorial with us. Would you be able to share a pdf or jpg of the template you used for your pumpkin? Thanks in advance.
Hi Jackie – I sorta just drew half of a pumpkin shape on a folded up piece of paper so that when I cut it both sides would be even and then made sure the bottom was more straight so that the pumpkin would sit when on the table. You can google pumpkin images to get an idea of what you want but pumpkins aren’t perfect and some are fat and others are tall and skinny so it just depends on what you want. It will also depend on the size of your book because that is what you want to base your template on – you want to make sure your template is smaller than the book. Hope this helps!
~Katie
Thanks!
Okay Katie, these are seriously about the more adorable fall craft I have seen in a long time. LOVE I have seen Christmas trees done like this but pumpkins! Awesome! I would be over-the-moon if you would share this or any of your amazing fabulous projects at our new mega-party Work it Wednesday if you haven’t already. Each link will be shown on 4 blogs! The Happy Housie, The Blissful Bee, The Turquoise Home, and My Place for Taste:) Work it Wednesday. Hope to see ya!!
– Krista @ the happy housie
Thanks for sharing these Katie! I am sharing it on my Facebook page this week – love it!
Thank you so much Krista – I LOVE your post on rustic wedding decor!
These are great and I LOVE pumpkins of any sort. Any idea how many pages, on average, you used to make such a nice shape?
Each pumpkin is actually an entire book – not exactly sure how many pages they had because they were all a little different and the way I cut them cut out the page number, but I think it was about 300. If you look at the photo of the book in the tutorial that should give you an idea of how thick the book was. Hope this helps!
~Katie
Great tutorial! I did a bunch of these, but int he shape of Christmas Tree’s last Christmas. I dipped the edges in glitter for “sparkle”! I’ll give these a go & dip the edges in orange glitter!!! Found you through the pin it party, love your site!
What a great idea! I can’t wait to make some some this Christmas 🙂
Katie I love this project! thanx for sharing the tutorial over at THT.
Thanks for hosting and for stopping by 🙂
I loved your book pumpkin so much I picked it for my showcase this week for DIY Weekend on my blog!
http://mrandmrswinslett.blogspot.com/2013/08/diy-weekend-829.html
Feel free to link up every Thursday. I’d love to have you and your beautiful projects! – Miranda
Yay, thanks Miranda!
This is certainly new to me! I absolutely love these! We have a bit of a bookpage craft obsession around our house. Thanks for sharing this!
Kylie
Lol, I have started my own book page craft obsession as well. In fact, I just used book pages in the boutonnieres for our wedding 🙂 I tried lots of different fabrics and papers but the book pages just gave the rosettes character that the other materials couldn’t compete with 🙂
These are going to be all the rage this Fall. Jus’ Sayin’
I hope to make a few of these. There are so many great Fall ideas, but this one I really REALLY want to make!
Well this isn’t anything new, I found the general idea via Pinterest, but I definitely think they are an awesome fall craft that everyone will enjoy making! Thank you so much for stopping by to check them out 🙂
Fabulous idea! They’re so fun and friendly! Thanks for sharing at Whatever Goes Wednesday. We’ll be featuring your pumpkins at Someday Crafts tomorrow 🙂
Thank you so much for the feature!
It’s not only cute, seasonal, trendy….but it looks FUN to make! Can’t wait!
I would have to agree with you – it is and it definitely was 🙂 I can’t wait to make more!
These are so adorable! I love them and have pinned this post. I have tons of old books and just have to do this with a few. Thanks so much for the tutorial!
Saw you sharing at Pretty Handy Girl’s Before & After contest. Good luck!
Debbie 🙂
Thank you so much for popping over to check them out 🙂
Super cute and a great tutorial!
Thanks Sharon!
I featured your cute pumpkins today on Mod Mix Monday at ModVintageLife!
Thank you so much for the feature Nita!
I loved this project, Katie! You Were Featured TODAY on VMG206 ~ Brag About It Tuesday’s Link Party from last week! Stop by and grab a Feature Button and Link something new; the party is LIVE Now. I’ve also pinned this to my Brag About It Features Board on Pinterest. I can’t wait to see what you’ve been working on this week!
~ Megin of VMG206
http://www.vmg206.com/2013/09/BragAboutItLinkParty.html
I have been wanting to make one of these for a while. I have pinned your tutorial. I will be featuring this tonight at my Sizzle into Summer party that opens at 8pm EST. Please stop by and pick up an I’ve Been Featured button. Thanks. http://diybydesign.blogspot.com
Thank you so much for the feature, that’s awesome!
Love this idea! And so well executed.
I host a weekly link party called Seasonal Sundays. I’d love to have you link.
– The Tablescaper
Thank you so much for the invite, I would love to link up!
THis is sooo stinkin’ adorable! I’m pinning it for a Halloween craft idea with the kids. Thanks for linking up to the Before & After contest.
Thank you so much Brittany! I’m so excited that you stopped by to check them out 🙂
These are adorable! I definitely want to give these a try this year. Pinning 🙂
PS I found you through This Sarah Loves and I’m looking forward to looking around your blog more 🙂
Thank you Steph! These pumpkins were fun and easy to make, plus they are freaking adorable and everyone that sees them loves the fact that they were made of books. Thanks for stopping by!
~Katie
I just came across a huge stash of books in a dumpster and next to a dumpster. I couldn’t believe it when I saw this at Elizabeth and Company!! Pinning and hopefully making some tonight. If you have a moment tomorrow afternoon, I would love for you to stop by Redouxinteriors to share this awesome tutorial. Thanks!
O.K. diregard my dumb comment earlier. You linked it up!!! I was wondering how I missed it the first time around. Must have been during my bout with stomach flu. Anywho…..I am featuring at my party tomorrow, starts at 5:00 EST. Thanks!
Haha, I was just like “Wait, I didn’t link up to Redoux Interiors?!?” And trying to figure out how I missed it. Yay for the feature, thank you!!! Hope you are feeling much better 🙂
~Katie
Wow! 85 comments! Clearly I’m not the only one who thought these little pumpkins were fabulous! Thanks so much for linking them up to our All Things Thursday Blog Hop last week. They were one of my picks for features today. I hope you’ll be by again tonight to link up more great projects!
Blessings,
Nici
Hi Nici,
Lol, yeah the number of comments has definitely surprised me too, but I’m so happy that everyone love them as much as I do 🙂
Thank you so much for the feature, I appreciate it!
~Katie
LOVED this so much! Featuring this Saturday on our DIY Saturday Favorites post for the past weeks DIY Sunday Showcase! Thanks for sharing 🙂
Yay!!!! Thank you so much Jennifer!
Yours are so cute too!! Thank you for checking mine out as well. I do like the book ‘stem’ on yours. I definitely need to make some more this year now that my hand has recovered from all of that cutting!!!!
PS I couldn’t reply to your comment directly via email because you come up as a “no reply blogger” (not sure if you were aware of that). 🙂
Hi Heather! I have heard of that “no reply blogger” thing but thought it only applied to those using blogger and Google +? I’m on wordpress but will definitely have to look into it so thank you for letting me know!
I gave these little pumpkins to my sister so I will definitely need to make some more – and next time I want to try and make the “stems” longer and see if I can curl them a bit. Thank you so much for stopping by!
~Katie
Thanks for sharing that great project!
I featured your project on my Weekend DIY http://craftsmitherz.blogspot.de/2013/10/weekend-diy-pumpkins.html
I have a lot of old books and I will make some pumpkins!
I recommend making the pumpkins a tad smaller, so that you can get 2 out of one book. Less waste 🙂
I love this tutorial. I even mentioned it in my blog. http://savingstostayhome.blogspot.com/2015/09/my-passion.html
Such a great craft and so easy! Thanks for the step by step guide super helpful!
[…] DIY Paper Book Pumpkins | Mountain Modern Life […]
[…] DIY Paper Book Pumpkins from mountainmodernlife.com […]