UPDATE: All new featured RV tours will be posted on my other website, Wanderful RV Interiors. Existing tours will slowly be moved to the new website, and anything already moved will automatically redirect.
Disclaimer: This post may contain affiliate links, meaning, if you click through and make a purchase we (or those featured in this post) may earn a commission at no additional cost to you. View our full-disclosure here.
Are you renovating your bathroom or looking for simple ways to add character without busting your budget? I have to admit that this rustic toilet paper holder was so easy that I can’t believe I didn’t make it sooner. Seriously.
It’s no secret that I have an obsession with pipe projects, but I’ve worked primarily with copper pipes over the last couple of years. I love me some copper, but it can’t be threaded so you have to use some sort of glue, like epoxy, to attach the pipes to one another. The great thing about galvanized or black iron pipes is that you can easily screw the pipe fittings into one another.
I thought about making one of these in our last house, but we were renting and the bathroom was one of the rooms that we never really got around to. However, we pretty much gutted our RV bathroom so I decided now was the perfect opportunity to make a new toilet paper holder out of black iron pipes.

We created our first pipe project 2 years ago and I still enjoy working with them. However, it seems that industrial pipe products can now be purchased for a lot less money than they could a few years ago, so it’s always a good idea to price out buying Vs. DIYing and see what’s best for you.
We love how our rustic toilet paper holder turned out, and the best part is it took less than 5 minutes to put together once we had all of the fittings. If you’re thinking about making one yourself, I hope this post will help guide you along the way.
DIY Rustic Toilet Paper Holder
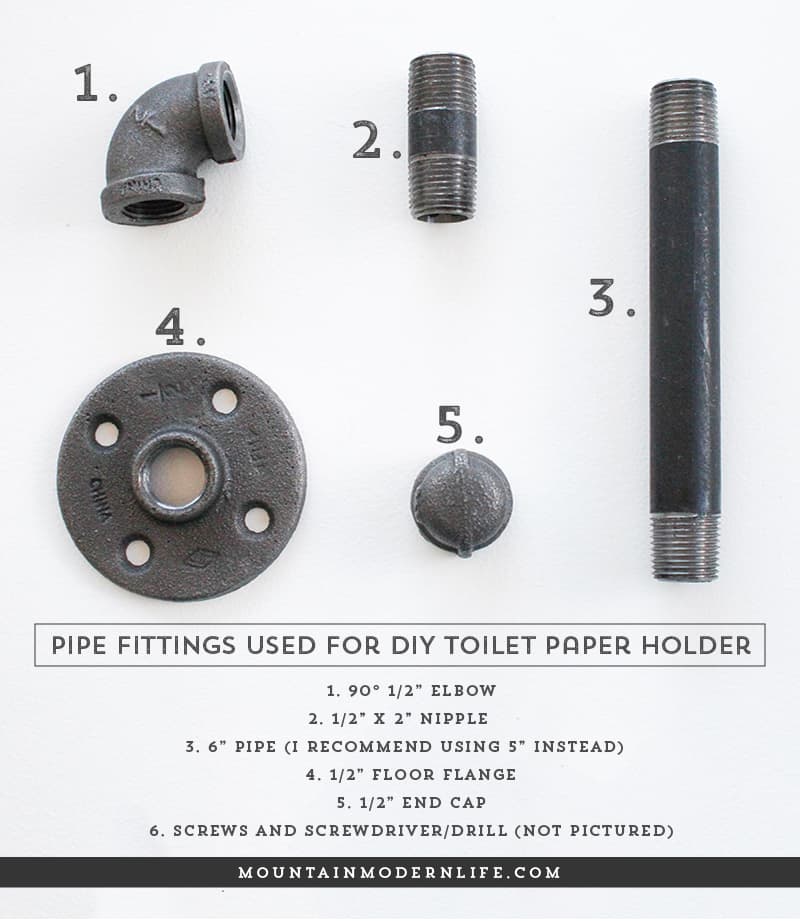
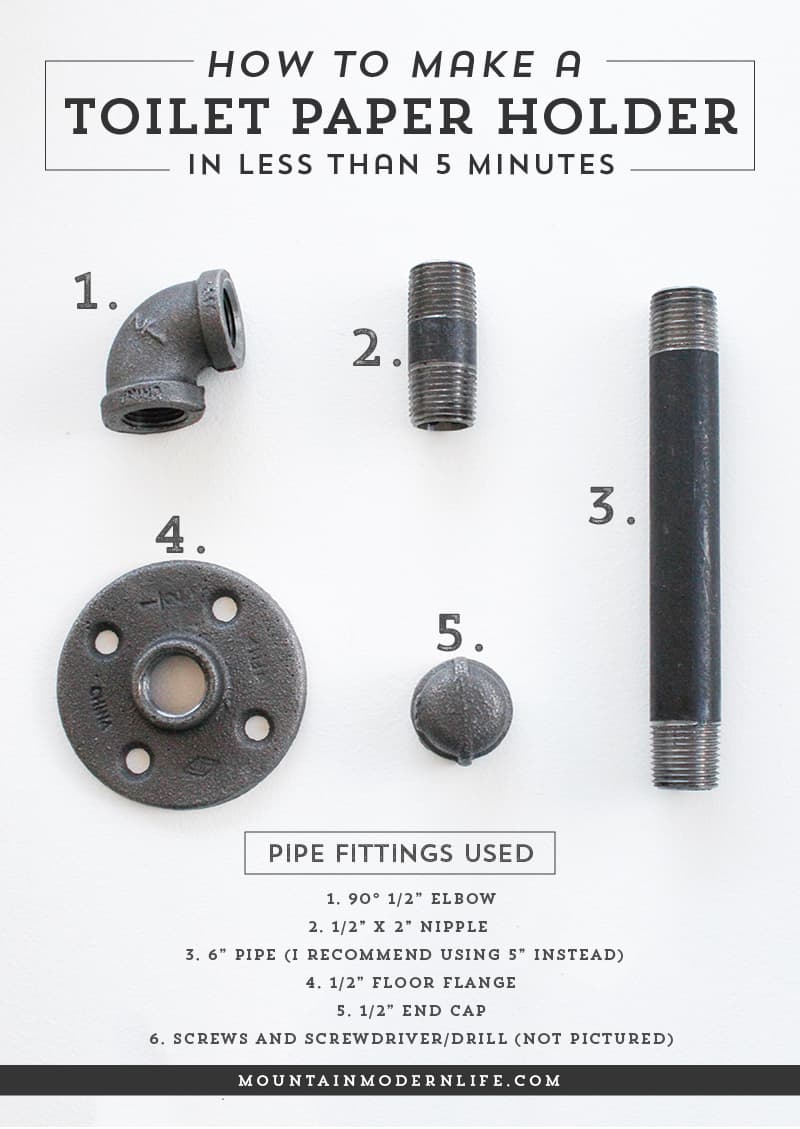
Grab your supplies of pipe fittings as well as mounting screws and wall anchors. I already had a 1/2″ floor flange from when I bought a crazy bulk pack a couple of years ago for previous projects, and I picked up the rest of the pipe fittings at a local hardware store. All in all this project cost me less than $8, but it will depend on what supplies you have, and where you purchase the pipe fittings you need.
You’ll also need a screwdriver or drill. We used black iron pipe fittings, but you can use a galvanized pipe as well. You could also use copper but copper can’t be threaded so you would need to epoxy the pipe fittings to one another as I did for our copper desk or tray. However, if you stick to threaded pipes as I did for this post, you can easily screw all of the pieces together. I’ll list the items we used below.

- 90° 1/2” Elbow
- 1/2” x 2” Nipple
- 6” Pipe (I recommend using 5” instead)
- 1/2” Floor Flange
- 1/2” end Cap
- Mounting Screws/Anchors and screwdriver/drill
- Rust-Oleum Crystal Clear Enamel Spray Paint (I prefer Satin)
Prefer to Buy? Here are some similar options ready to go!
Now that you have your supplies ready this should take you less than 5 minutes to put together, it’s that easy!
Ready? You can reference the photo below for the labels of the pipe fittings.
Note: Our pipes were already pretty clean, but if yours are greasy you’ll want to clean them first.
Step 1:
Screw the steel pipe Nipple (labeled #2 in the photo above) into the Floor Flange (labeled #4)
Step 2:
Screw the Elbow (#1) into the Nipple (#2).

Step 3:
Screw the 5″ Pipe (#3) into the Elbow (#1). Note: I actually used a 6″ pipe for our toilet paper holder, but it’s just a tad long so I think a 5″ pipe would look better.
Step 4:
Screw the End Cap (#5) onto the end of the Pipe (#3). Once you’ve done this your rustic toilet paper holder is finished, woo-hoo! All that’s left is to attach it to the wall. Actually you could spray some clear coat on it now help prevent it from rusting in the future.

Step 5:
Use mounting screws (and anchors may also be a good idea) to attach your pipe toilet paper holder to the wall. You could also attach it to a rustic piece of wood and then attach the piece of wood to your wall.
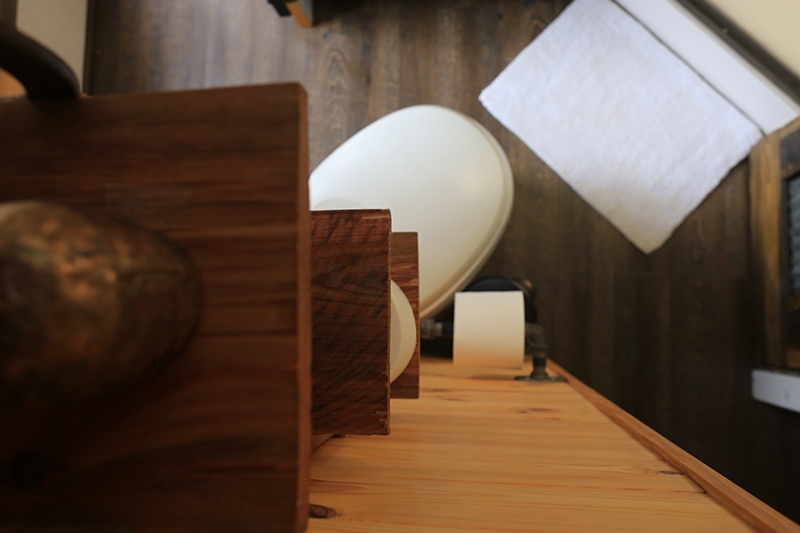
This is what ours looks like installed in the bathroom of our RV.


We actually just used screws we had on hand, but I’m thinking black ones may look better.

If you’re new to pipe projects you’ll see how easy it is to customize the fittings for different projects. We love how easy this project was, and that it adds a more industrial touch to our rustic bathroom.
Have you created any pipe projects? We’d love to hear about it in the comments below.
I love doing pipe projects as well! We’ve done an entertainment center and kitchen shelf. Thanks for the detailed tutorial, I’ll be doing this next!
Haha, yes pipe projects can certainly become a little addicting 🙂
These tutorials are so helpful. I LOVE RUST & PIPE PROJECTS. What I did just learn is that Simple Green is good to use to clean the pipes with before your projects, if they’re oily.
That’s such a great tip, thanks for sharing!
What clear coat did you use to prevent from rusting?
I believe it was Rust-oleum Crystal Clear Enamel, but any clear protective spray that prevents rust should work.