UPDATE: All new featured RV tours will be posted on my other website, Wanderful RV Interiors. Existing tours will slowly be moved to the new website, and anything already moved will automatically redirect.
Disclaimer: This post may contain affiliate links, meaning, if you click through and make a purchase we (or those featured in this post) may earn a commission at no additional cost to you. View our full-disclosure here.
I seem to receive emails daily asking how to add text to my free DIY invitation templates. While I offer editable PDF templates in the shop, most of my free files are set up as PNG or JPGs.
Of course, you can open these templates with a program like Photoshop to add or edit text, but if you’re looking for an alternative you may want to consider PicMonkey, an online image editing website that has tons of features.
Not only is PicMonkey user friendly, but there’s no software to download.
Update: PicMonkey offered a free membership back when I created this post, but they no longer include this option. However, they do offer a free 7-day trial and have subscription options available for $4.99/month or $33/year.
This is a looooong post and very photo heavy, so be sure to have some coffee or your favorite beverage handy. Don’t let the number of photos in this post intimidate you, because I’m sure once you start playing around with it, you’ll get the hang of it. Take a deep breath, you can do this!
How to Add Text to DIY Invitations with PicMonkey
For this example, I will be opening up the FREE DIY invitation template available here, and you can reference all of the free fonts I use here.
If you would like to use the same free fonts I did on our invites, then I would recommend downloading and installing those fonts first.
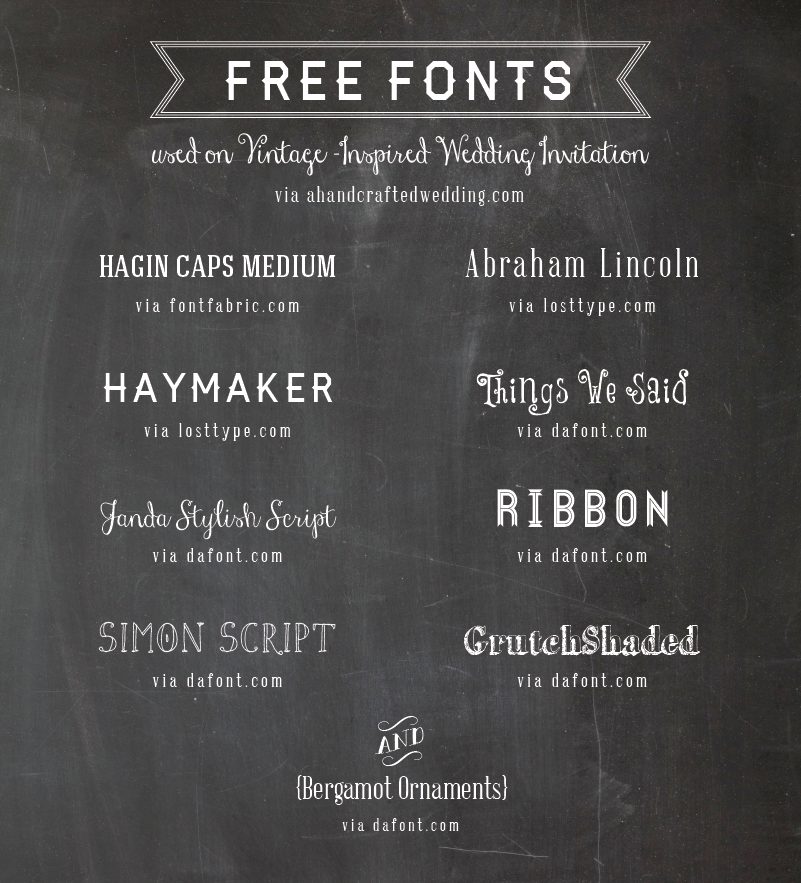
This way you will be able to access the fonts from PicMonkey once you open up the template.
First Navigate your browser to PicMonkey.com

Click on Edit and locate the file you want to open from your computer.


Here is what your screen will look like if you open up my free invitation template, which is in PNG format. From this screen, you can also open a different file by clicking on “Open” at the top.

You will then want to navigate to the “Tt” icon {Text} on the far left side of the toolbar.

From the text menu, you will see two tab options, “Ours” and “Yours”. This means you can either access the fonts available on PicMonkey or access your own.

If you want to add one of the fonts available for free from the “ours” section, simply select the font you want to use and then click on the “Add Text” button. You can also just click the “Add Text” button and then select the font you want to use.


This will bring up a text box on the center of the file you are editing.

For this example I selected the “Sacramento” font, just to show you one of their free fonts available. Type whatever you want inside the box and then use the corner or side cursor to re-size the text box.

You can also use the text toolbox in the top right side of your screen to change the color, size, alignment, etc. of the text.

If you click outside of the text box you will see a Move cursor show up if you hover over the text. This cursor allows you to move the text around the page, and position it where you want. From there you can still resize the text how you want.

If you want to change the text to a font you have on your computer, just navigate to the “Yours” tab on the text menu.

If you downloaded and installed the free fonts I mentioned at the beginning of the post, then you will see the font “Hagin Caps Medium” in your text library.

If you have your text box selected and click on the “Hagin Caps Medium” font, you will see it change on your template. You can then re-size and re-position it how you want.


Now let’s say you want to go back to using one of the fonts offered by PicMonkey. You will notice that the premium fonts have an orange crown next to them, meaning they are a Royale feature and you must upgrade to use them. This is where you can choose upgrade and pay $4.99/month, $33/year, or just exit out of the upgrade box and stick to the free fonts, or your own.

You will notice in the photo above that the Janda Stylish Script is a premium font. However, if you downloaded and installed the free version first, you will be able to access it from the “Yours” text tab.
I do have a premium account so I can access it from either. In the image below you will notice that I’m signed in as Katie and that the “Ours” text tab is highlighted blue. I then selected the Janda Stylish Script and began typing in the names on the invitation.


Remember that you can resize the text boxes with the cursor arrows on the corner or sides, or you can change it from the text toolbar in the top right-hand side of your screen.

However, I can also toggle to the “Yours” text tab to access my own fonts, and you will also see Janda Stylish Script listed there as well, this time with no orange crown next to it.

You can use the text toolbar to resize the font, change the color or align it as left-aligned, centered, or right-aligned. Although you can use one text box for multiple lines of text as seen above, you won’t be able to alter the space between the lines.

For this reason, I sometimes prefer to add two separate text boxes for text I want on top of each other. For the date I wanted more space between the month and the year so I created 2 separate text boxes. I also changed the year to be in the font “Haymaker”, which was under the “Yours” text tab since it’s installed on my computer.

I then tweaked the size and re-positioned it underneath the month where I wanted it.

You can then simply repeat the process adding the text you want to the template, re-positioning it where you want and re-sizing it where necessary. You really just have to eyeball it to get the text where you want it.

You can see that for the venue location I wanted more space between the venue name and the address so I created 2 textboxes for this section as well. Again, you can use just one text box and center all of the text if you want, but you can also create separate text boxes if you want more gaps of space between each line of text.

If you want to add the “Dinner and Merriment to Follow” the way I did you will first want to add a text box and type “Dinner y Merriment to Follow”. I know you’re probably wondering why there is a “y” instead of “and” but you’ll see why I did in the photos that follow.
You will want to type this out in the “Things We Said” font, or select this font after you have typed it out on the template. Again, this free font will show up under the “Yours” tab if you downloaded and installed it prior to opening up this template. It is also available as a premium font under the “ours” tab.

So your text will now look like this:

You will then highlight ONLY the “y” and then go back to the “Yours” tab and click on the “Bergamot Ornaments” font, which you will notice is just a bunch of ornaments. Once you select it you will notice that the “y” is now an “and”.

So you can now re-size and re-position this line of text where you want it on the template.

Once the first side of the template is filled out you will want to look everything over and make sure it’s exactly how you want it. You can then use the shortcuts on your keyboard to copy and paste the text boxes from one side onto the second template. To Copy it should be Ctrl/c (PC) or Cmd/c (Mac), and to Paste it should be Ctrl/v (PC) or Cmd/v (Mac).
Tip: To undo the last thing you did you can use the shortcut Ctrl/z (PC) or Cmd/z (mac) on your keyboard.
Another way to duplicate the text boxes is to hover over the text box and right-click with your mouse. You will then see a box appear with the option to “Duplicate text” You can select this and will see the text box duplicated on your screen. You can then move the box over onto the second template and position it where you want. Repeat this process until the 2nd template is filled out.
Side Note: If you purchased one of my templates and are using the single template you will be finished and just need to save and print!

If you want to make sure all the boxes are lined up properly you can always use a geometric box. I don’t know if there is a better way, but if there is be sure to let me know in the comments.
You will need to navigate to the butterfly icon {overlays} over on the left toolbar. From there you can select the rectangle box under the Geometric tab.

You can then re-size the rectangle to be super long and skinny so that it will fit across your template horizontally. You can then down each line of text and see if they are lined up on each template. If you need to move your text up or down a smidge you can always use the arrow keys on your keyboard. You can see me looking at the alignment of the last line of text in the image below.

Afterward, be sure to delete the box and then give your file one more look over before saving. Once your file is saved and you’ve closed out of PicMonkey, you won’t be able to make any edits – unless you delete items and then re-add them back. So be sure to make sure everything is good to go.
When you are finished hit “Save” and save the file to your computer in PNG or JPG format. You can always save it as both if you are not sure which file type you will need. If you are printing from home then PNG should be fine, but some print shops require the file to be in JPG format.
I would recommend renaming the file so that you can still access the original file if need be.

You may notice a few different saving options. If you plan to print then I’d recommend using at least the “Bubbles” option, which is good for prints up to 8×10.

If the file you are using is “PNG” then I would change the file type to “JPG”.

Afterward, you can open the file back up on your computer to preview (and print) it. This is what mine looked like:
 Side Note about Saving with PicMonkey:
 Side Note about Saving with PicMonkey:
Make sure that if you edit the template with PicMonkey that you SAVE the file and do not “Share” it. I received an email from someone that was having issues saving the template with PicMonkey so she “shared” it with herself via email, which wound up compressing the file thus resulting in a smaller, lower-resolution template. In other words, she had to re-edit the original template so that she could get it printed in high resolution. You shouldn’t have issues saving the files, but PicMonkey can sometimes act wonky with certain browsers.
Afterward, you can open the file back up on your computer to preview {and print} it. This is what mine looked like:

How to delete items with PicMonkey
You may also enjoy these additional tips from PicMonkey:
I hope this tutorial on how to add text to DIY invitations with PicMonkey was helpful and just remember to play around and have fun with it. If you are not so computer savvy or are short on time, you can always ask (very sweetly) if a friend or family member to do this for you.
Otherwise, I do offer templates in my shop that are editable with the latest version of Adobe Reader/Acrobat. You can watch my video on editing PDF templates here.
Thank you so much! I’ll try this and I’ll let you know how it went.
Hi, love the template. Is there any way of deleting the -IN THE- section as i have a few venues to try to fit in.. .thanks!
Hi Shereen,
You could use the eraser tool with programs like Photoshop, but if you are using PicMonkey then you can follow the tutorial on the post below:
http://ahandcraftedwedding.com/how-to-erase-items-using-picmonkey/
Hope that helps 🙂
~Katie
I love these invitations! they are so cute thank you for sharing! I am having a problem opening the template and saving to my computer so I can edit it. Where is the link for the template? thanks again!!
Hi Justine,
You can download the free invitation template at the bottom of this post:
http://ahandcraftedwedding.com/free-wedding-invitation-template/
Enjoy your weekend!
~Katie
Thank you so much!! I have enjoyed making my invitation with your awesome template. The only question I have is what the color name is for the mint green. I am getting married in May and the word “May” is just so tiny that it looks lonesome all by itself. I went into the overlay settings and was planning on putting a flourish at each side but I just can’t seem to match the color. Any ideas to make May look prettier by itself, or what to add to each side? Thanks!!
Hi Trish,
The color code is #96c9af. I don’t know of a specific flourish you can use but you could also just make the month font a little larger. I’m sure it will look great whatever you do 🙂
Katie
Thanks Katie! May was just too short even in a big font size. I stumbled upon a feature in pic monkey that actually let me hover over the other colors with an eye dropper and then color the fourishes I used!! Woohoo! It turned out absolutely adorable thanks to you. 🙂 now to just get my inserts and programs made…. I can do this!!! 😉
Hi, I was wondering if there is any way to change the green color in the template to a different one?
Hi Erica,
You’re unable to change the color but I do have additional color options over in my shop:
https://mountainmodernlife.com/shop/
Katie
Great step by step help thank you!