UPDATE: All new featured RV tours will be posted on my other website, Wanderful RV Interiors. Existing tours will slowly be moved to the new website, and anything already moved will automatically redirect.
Disclaimer: This post may contain affiliate links, meaning, if you click through and make a purchase we (or those featured in this post) may earn a commission at no additional cost to you. View our full-disclosure here.
Note: This post was originally published in 2014. I no longer sell editable templates or offer customizations, and have closed my membership.
Designing your own wedding invitations can be a great way to start your wedding journey. Not only did we save money by creating our own invitations, but it also added a personal touch to our wedding. Sure it may have been a bit stressful, but it was also tons of fun and totally worth it!
Tips on Designing Your Own Wedding Invitations:
I will be the first to admit that my invitations are far from perfect. In fact, I cringe when I think about some mistakes I made but didn’t realize until AFTER the invitations were put together. Luckily, no one seemed to notice….or care. I did fix some of the blunders and now have my invitation template available to download for FREE over on this post.
I already knew how I wanted the invitations to be packaged because I sorta figured that out when I made our wood slice save the date magnets. I had also purchased sample envelopes to play around with beforehand.
Tip 1:
Research wedding invitation styles and figure out what you like. Pinterest is perfect for this because you can create a board specifically for wedding invitations and stationery inspiration. Don’t forget to utilize the Pinterest Secret boards either. You could also create a folder on your computer or in your bookmarks and save images there. I’m not gonna lie, when it came to the actual invitation design, the first thing I did was spend wayyyyy too much time looking at various examples on sites like Pinterest Minted, Love vs. Design, Etsy, etc. The style I wanted was a mixture of vintage and rustic for a feeling of understated elegance.
Tip 2:
Decide on how you want to word your invitations – After checking out tons of examples I sorta mixed and matched the wording to find what I felt worked best. You can also click here for more examples on how to word your invitations.
Tip 3:
Download whatever fonts or vector/image files you plan to use. I have links to each free font and vector I used in our invitations here in case you want to incorporate them into yours. A couple other great resources for vectors or fonts {that you will need to pay for} is on Etsy or The Creative Market.
Tip 4:
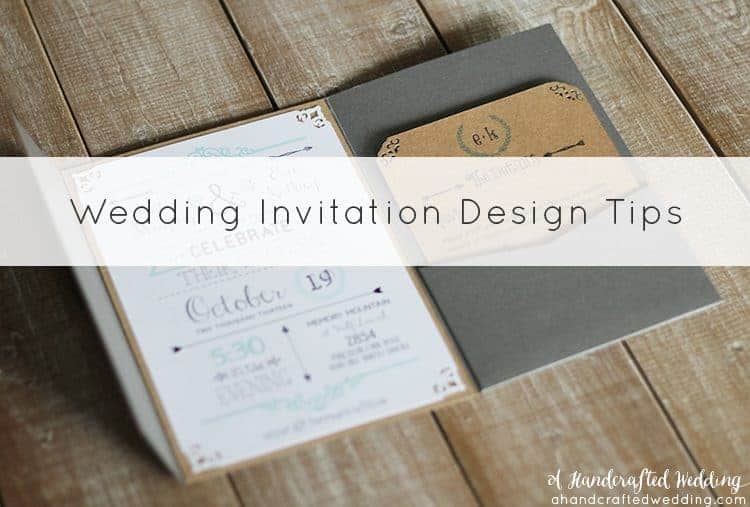
Decide what size you want your invitations to be. I knew I wanted our invitations to fit inside a pocketfold envelope so I ordered samples and then made our invitations a little less than 5×7. I also knew we would be using a craft punch on the corners and glue the invitations onto 5×7 kraft paper that would then be glued to the inside of the pocketfold envelope. Make sense? If you are planning on making a simple invitation to fit inside an A7 envelope then you would want your invitation size to be 5×7.
Tip 5:
Play around with various images and fonts until you achieve the look you want! I used illustrator but you could use photoshop, any other photo editing software, or even PicMonkey.com. {View my tutorial on adding text to templates with PicMonkey here}.
Tip 6:
Make sure you buy quality paper and that your printer is all set. I purchased white 110 lb cardstock to print on and it turned out beautifully. You will also want to make sure you have enough ink and that your printer is set to the correct printing setting. For example, if you purchase 8.5 x 11 cardstock paper you should be able to get {2} 4.75 x 6.75 sheets of paper from it. You can then cut your paper to size and when your design is ready you can set up your printer to print onto that size paper. You could also print 2 designs on one sheet of paper and then cut it afterward, whatever works best for you. We printed from home mainly because I’m impatient and decided to print at 1 in the morning, but you can also price out online and retail printing shops, which could end up being less expensive than buying the ink and printing yourself.
Tip 7:
Have fun! Wedding planning can be super stressful but it should also be fun! I enjoyed working on all of our wedding projects but there were some details that had to get thrown out the window due to time or budget constraints. Do the best you can with what you have and remember the reason you are getting married in the first place. I get email’s all the time from girls that are designing the invitation for their friend who is getting married. So if you’re not computer savvy don’t forget you can always ask for help.
If you are going to be designing your own wedding invitations it is important to look for inspiration. Here are a few examples of invitations I was inspired by:

Cheerful Celebrations Wedding Invitations via Love vs Design

A Blessed Union Wedding Invitations via Minted
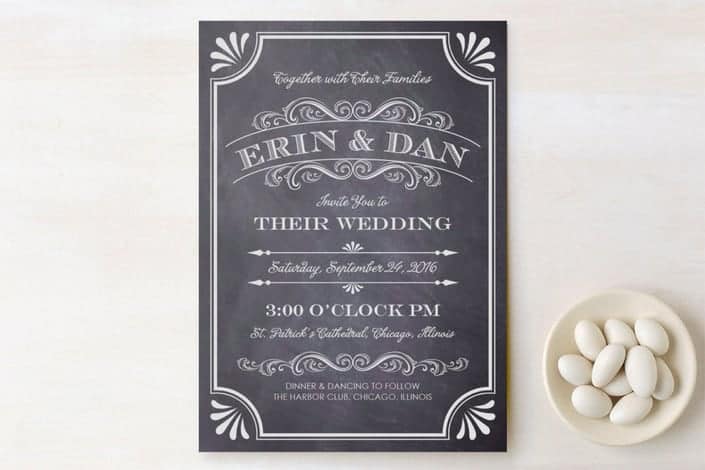
A Chalkboard Marriage Wedding Invitations via Minted
Here is a list of all the materials we used to make the invitations just to give you an idea. Most of this stuff we already had, and everything else I either bought online or at craft stores with coupons.
Our Wedding Invitation Materials List:
- InkJet Printer {or you can print from a local/online print shop}
- A7 Peach Metallic Square Flap Envelopes
- A7 Steel Gray Himalaya Pocket Invitations
- Brown Kraft Cardstock #70lb
- White Cardstock Paper
- Jute Twine
- Narrow Sheer Pink Ribbon
- Buttons
- 2 Sewing Straight Pins
- 2″scalloped lace
- Fiskars Corner Punch: Romantique
- Paper Trimmer
- CraftBond Repositionable Glue Sticks
- Scissors
- Avery 2″ Clear Round Labels
I hope you found this post at least a little useful. If all else I hope that by seeing these you are encouraged and inspired to move forward with designing your own wedding invitations.
Have you considered designing your own wedding invitations? If so, I would love to see them.
Of course, you can always download my FREE Wedding Invitation Template from this post!
Hi Katie,
I posted this on your other page just a couple of days ago so think I caught you as you were moving stuff around 🙂
First just wanted to say I really love this invite and am actually in the process of playing around with it in Illustrator right now. I have 2 quick questions – I noticed the colour on the invite template is actually a dark grey rather than black, is this what you used on the whole invite? (I figure I’ll print and play around with what looks best but just curious). The other question is whch font did you use for the text on your details card (not the headings)?
Thank you from Australia.
Lisa.
Hi Lisa! Yeah things have been a little crazy as I try to move everything over and update the posts a bit. You are my first comment on here, yay! Yes, I made the color a dark grey because the black printed out just a tad stark for what I wanted. It’s a subtle change but one I felt made a difference when I printed it. You can definitely change the colors in Adobe Illustrator though.
Also, the font I used on the wording of the details card was Abadi MT Condensed Light. I can’t remember which site I got it from originally just just searched it and this is one site that has it available:
http://www.fontyukle.net/en/DownLoad-Abadi+MT+Condensed+Light.ttf
Hope this helps!
~Katie
Hi Katie,
Question for you…I started editing this template on Illustrator because I absolutely love it :), but am hesitant on downloading some of these vectors and fonts. I wanted to check with you before I did and make sure that they are safe and didn’t harm your computer. I started to download one of them and quickly stopped because it became a process. This computer is my Fiance’s work computer and has all of his business stuff on it. Just being cautious! Please let me know!
Thank you!!
Hi Tarah! Downloading free fonts and vectors can sometimes turn into a headache with all the pop ups and fake “download” buttons so I totally get where you are coming from.I guess that’s the price you pay for them to be “free”. Ha. I am on a mac and so when I was downloading the files I just closed any extra pop ups that may have opened up. I didn’t get any viruses and I still have the files on my computer—which were downloaded over 10 months ago. So although I can’t take responsibility if anything happens to his work computer, I can say that I didn’t have any issues 🙂
Oh yeah, and if you just download my invitation template, the vectors are already on there so all you would need to do is download any fonts you want to use for your personalized info.
Hope this helps!
~Katie
Thank you Katie!
I kept all the vectors – you did an awesome job with this invite! My fiancé loves it too! I went ahead and downloaded some of the fonts so far. I found downloading the fonts from the dafont.com site is pretty easy so I’m trying to find a few similar ones to the ones you used off this site that way I’m not downloading from all over the place!
Thanks again,
Tarah!
Hi Katie!
I was following your other page as I love these invitations (all your other crafts are so cute and creative too!). I have purchased most of the materials except for the envelopes, brown card stock, and pocket envelopes. The new format on here doesn’t link the materials with their site for purchase – anyway you could comment back with the links for those 3 items? Thanks so much 🙂
Cheers,
Monica
Hi Monica! I removed most of the links when I transferred it over, but kept the paper and more links on my free invitation template page. The cardstock and envelopes were purchased from Paper and More and I highly recommend them 🙂
~Katie
Hi Katie ~ I just finished producing my cousin’s wedding invitations, based off your template. It helped tremendously! THANK YOU so much for sharing.
That’s awesome and how sweet of you to help your cousin out. Thank you so much for the kind words 🙂
Would you please be able to tell us what size fonts were used? The listing of the fonts is helpful but the font size would be even more helpful. Thanks
Hi Tina,
Unfortunately, I don’t remember what font size I used and I often times will turn the fonts into vector images anyway and then resize them. I also do a lot of kerning and tracking with fonts to get them to look the way I want.
As for the personalized info…. I can tell you that after customizing these invites for other brides I often have to change the size of the letters for each bride depending on the length of their names, venue, etc. I think eyeballing it until you get it to look how you want is all that really matters anyway 🙂
~Katie
Also do you have a matching program for this invitation?
Hi Tina, I just responded to this from my email account 🙂
Hi again Katie,
I was wondering if you possibly had the RSVP template to go along with the invite & details page?
I am having some trouble trying to make one on my own.
Please let me know!
Thank you again,
Tarah P.
Hi Tarah,
I just sent you an email with more info 🙂
~Katie
Oh please do it for me I love your work and I am just not creative like you.
Lol, I’m sure you’re more creative than you realize 🙂 I’d be happy to customize the invitation for you and you can visit this link in my shop for more details.
http://ahandcraftedwedding.com/shop/products/customized-mint-wedding-invitation-template/
Thanks!
~Katie
You used to have a link to the assembly of these invites, is that still available?
Thanks, I absolutely LOVE these!
Hi Marina, you can see how I put the invitations together on this post,
http://ahandcraftedwedding.com/free-wedding-invitation-template/
Hope this helps and that you are having a great weekend!
~Katie
Hi Katie,
Thanks so much for the post! We used your template and almost have the invitations done! 🙂
We’re working on printing address labels though and were wondering if you have an image we could download of the symbol you made under the addresses. I tried print screening it and it was too small.
And we were also wondering about the possibility of matching programs.
Thanks so much, LOVE the new website!!
Michelle
Yay, I’m so excited for your invitations! Isn’t it fun to see the the end result after putting all that time and effort into them. Totally makes them worth it, right?
I just emailed you back directly with info on matching programs and the arrow/heart image.
Thanks!
~Katie
Hi Katie,
Thanks so much for the post!. Can you tell me which program I can use to edit the invitations, please?!!! I’m trying with inkscape but not success….
Thanks
Tania
Hi Tania,
I used illustrator to edit my invitation but you should be able to use some versions of Adobe Reader, like I mention in this post:
http://ahandcraftedwedding.com/free-wedding-invitation-template/
Hope this helps!
~Katie
Hi Kate,
I just wanted to know that you wedding templates (Invites and RSVP cards) are these downloadable once purchased for my own personal use e.g. to type into or is it that you will only fill in the information and send back as a pdf to print?
Hi Simone,
Yes, the DIY versions you can download {instantly after purchase} and then add text to with programs like adobe reader, photoshop, illustrator, etc. You can also purchase custom listings if you prefer to have me fill them out 🙂
Hi Katie
I absolutely LOVE your invites and would love to use the template, but for some reason, when I click on the free template download, it just opens up on a blank page in safari and there is no way for me to edit it. I have a Mac, and am not that savvy at using it yet. I really really really want to figure out how to download the template to a place where I can edit it ( I did download the Adobe Illustrator program). Could you please help me with this. I only have two months to plan this entire wedding. YIKES!!! Yup, I love him, but he certainly didn’t give me much time….lol.
Thanks so much,
Renee
Hi Renee,
I’m not really sure what’s happening so I’ll go ahead and email the templates to you. You should receive them shortly but let me know if you don’t.
Thanks and 2 have fun planning {and not sleeping} for the next 2 months! lol 🙂
~Katie
Is it possible to buy a details card for download in the dusty rose and brown colors to match the invitation I’d like to purchase?
Hi Lorraine,
Absolutely! I have actually made the details cards in all the other colors to match the DIY invites, but just haven’t uploaded them to the shop yet. I don’t think I will get to that until this weekend so if you want I can create a quick custom listing for you and them email the templates over to you. Just let me know 🙂
Thanks!
~Katie
I was wondering how much your invitations costed you to print them your self. Like the cost of paper and envelopes. Thanks 🙂
Hi Rebecca, I give the rundown of what I paid in this post: http://ahandcraftedwedding.com/are-diy-wedding-invitations-worth-it/
Hope it helps 🙂
~Katie
Hi Katie, we are almost completely finished our invites thanks to your fab template. had almost given up on possibility of making our own til I found your template. Thank you so much!
I’m also interested in how to add the heart and arrows to the address labels if you don’t mind sharing?
Thank you !
Hi Grace, Yay, I’m so happy you found the template helpful! I just uploaded the image of the heart and arrows I used on the envelopes. You can access it here:
http://ahandcraftedwedding.com/wp-content/uploads/2014/07/arrows-and-heart-ahandcraftedwedding.png
Hope that helps 🙂
Thanks!
~Katie
You may have literally saved me so much trouble for My invitations! I couldn’t find anything I adored. With this I can do it how I want! Thank you so much for sharing!
Yay, I’m so glad you like them Katarina!
Hi,
Could you tell me how I could get a “details card” template in red?
I found the invitation template in red but need the details template to go with it.
Thanks!
Hi Gabby,
I have slowly been adding the other colors to my shop, but if you tell
me which details card you want {the one with the laurel wreath, the
banner or the banner and border} I can create a custom listing and then
attach the file in there since I won’t have time to create the full
listing today.
Thanks!
~Katie
I am in LOVE with your template for wedding invitations, I downloaded one last night and for the life of me cannot figure out how to add wording and text to it, I dont want to give up because these match my theme and color scheme of my wedding perfectly!
It’s important to make sure that the font isn’t too overwhelming or overcrowding all of the space available. Especially for the older people who will be reading your invite, make sure it’s readable! Thanks for sharing!
Great tips! I tried making it in Adobe Photoshop, I already downloaded new fonts, images and designs. Thanks for these awesome tips. I applied all of it while doing it. Thanks for the inspiration.
Love this, love this, love this!!!!
I am searching for the “retro vintage design elements vector” but the link is broken! I have all the vectors and fonts but this last one!! I’ve searched elsewhere for the vector but can’t find it. 🙁
Hi Devon,
I just checked the link referenced above in the post and it goes directly to the link for the “Retro Vintage Design Elements Vectors”. Just click on the download button below the image to download the zip file with the vectors. I am including the link below as well:
http://www.flowervector.com/retro-vintage-design-elements-vector-set-447.html
Hope that helps!
~Katie
These are AMAZING! I wish I would have seen that you had templates, because I just spent two hours trying to replicate the look. Either way, SPECTACULAR source of information – elegant, beautiful, and fun design. It’s amazing. You did great work!
Thank you so much Genay, and although you didn’t use my template I’m happy that you were able to use some of the info to create your own. I’m sure it’s that much more special now 🙂
~Katie
Hi Katie-
I love love love love your invites and your instructions were very clear and helpful. My invites came out better than I ever dreamed of. I designed an image I would like to use with the invites however I am having a hard time matching the color to the color on the templates. (I am using pic monkey). Is there a way to find out the color code of the original so I can match my new image?
Hi Rebecca,
Yay, I’m so happy to hear that! The color code is #95c9ad.
Hope that helps 🙂
~Katie
You really have the taste of designing! My sister asked me a favor about designing their wedding invitations! I really don’t know what comes up with my mind that she let me do this kind of stuff! She could hire a designer or whatsoever to do this! and now I am searching for templates for this! You’ve helped me a lot! Thanks!
Hi Taylor,
I’m so happy you’ve found my site helpful and thank you so much for the sweet comment 🙂
~Katie
Thanks for tip 6. Knowing exactly what to do when you are trying to print your invitations is very helpful. Something that can easily be overlooked.
I love the vintage styles of the invitations on this page! For really high quality printing you might want to try a commercial printer instead of printing from home.
Hi there Katie, I have really enjoyed reading through your golden DIY invitation tips. I also look out for Pinterest for most of my inspirations and also love reading tips like yours to help me get creative and come up with great stationery. Thanks a lot for the share.
Cindy