UPDATE: All new featured RV tours will be posted on my other website, Wanderful RV Interiors. Existing tours will slowly be moved to the new website, and anything already moved will automatically redirect.
Disclaimer: This post may contain affiliate links, meaning, if you click through and make a purchase we (or those featured in this post) may earn a commission at no additional cost to you. View our full-disclosure here.
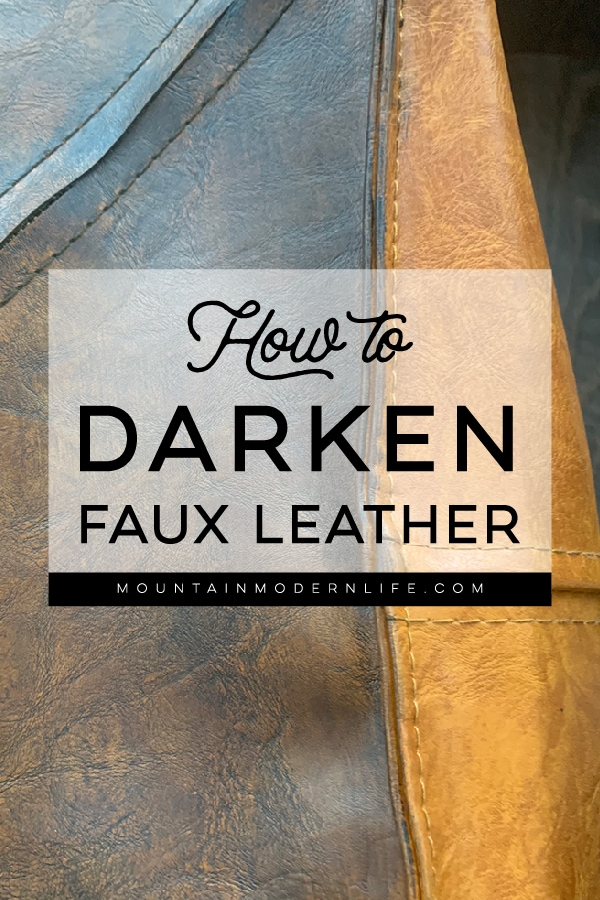
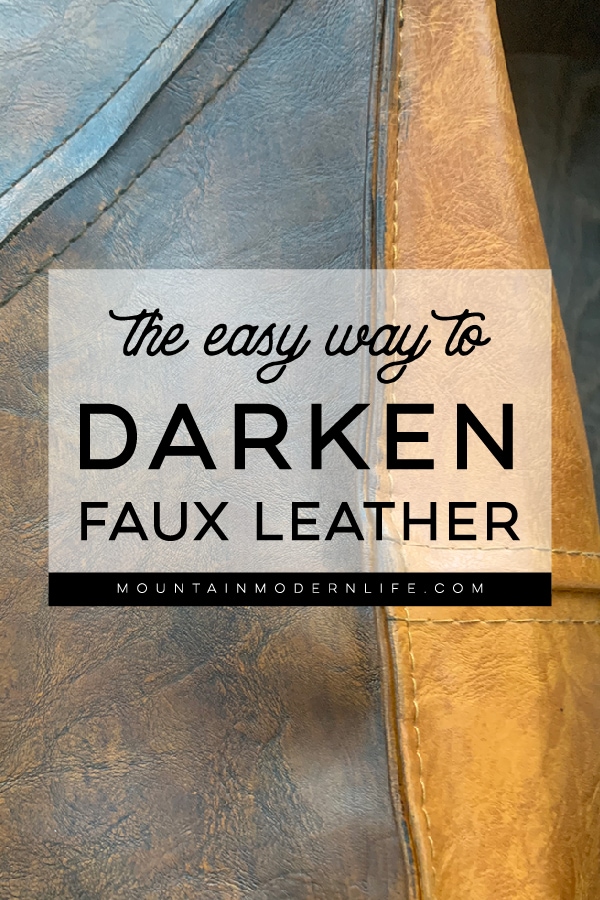
Despite all the things at the top of my to-do list, ya know like finishing my book or getting ready for the holidays, I recently decided to ditch my list and darken faux leather poufs instead.
In my defense, this is a project I’ve wanted to tackle for a while, as the orange-plasticy color just wasn’t working.
Besides, it was cold and dreary outside and I was itching to get my hands dirty.

How to darken faux leather
I’m happy to report the method I used was ridiculously easy, cost-effective, and quick. Not to mention, the results turned out better than I expected!
I did learn a thing or two along the way, so hopefully, you can learn from my mistakes.
If you have any fake leather decor or accessories you want to darken, I hope this post will help guide you in the right direction.
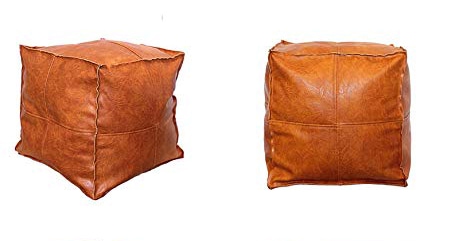
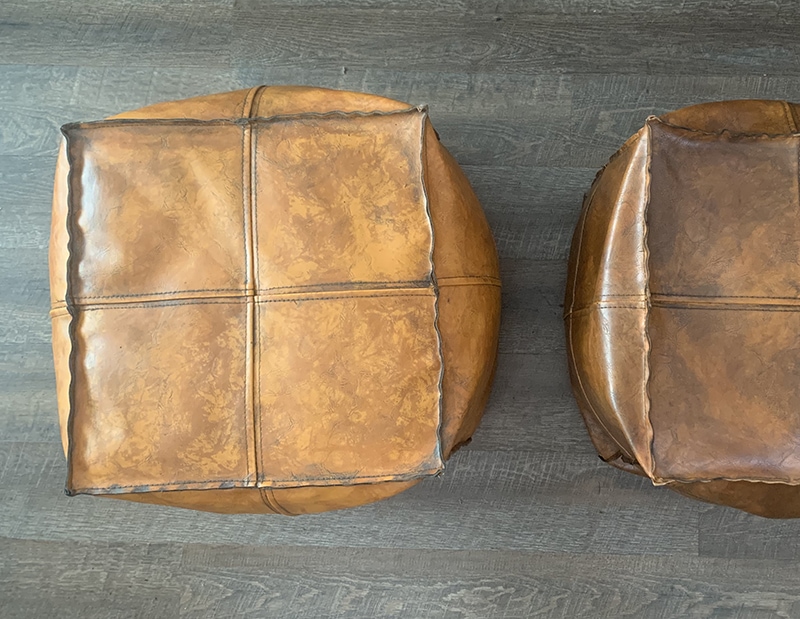
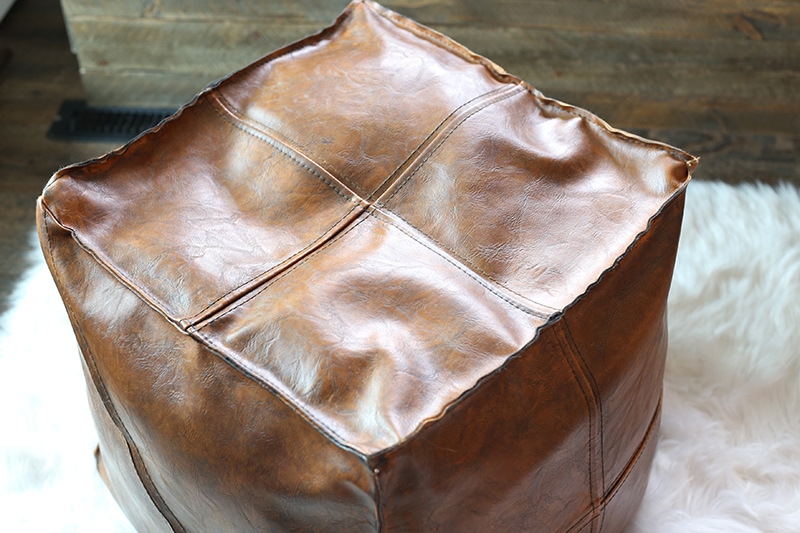
The faux leather poufs I purchased weren’t terrible, but they were much brighter than I had hoped. On sunny days they felt bright orange.
This process should also work on real leather, but I haven’t tried it so I can’t say for sure.
I’ve been working on purchasing better materials when it comes to our tiny home on wheels, and while synthetic leather is far from “natural”, I try to avoid real leather. I’m a vegetarian that eats mostly plant-based and while I love the look of leather (and the fact it gets better with age), it’s not something I’m comfortable purchasing. We do use wool in our home but look for products that are ethically made so the sheep aren’t harmed in the process.
I’m not here to judge, so you do you, but I wanted to mention why I purchased fake leather poufs, to begin with.
I bought these roughly 5 months ago and they’ve held up great, but you may want to look at other options, such as those on Etsy.
With that said, I’m really happy with how these pouf ottomans turned out.
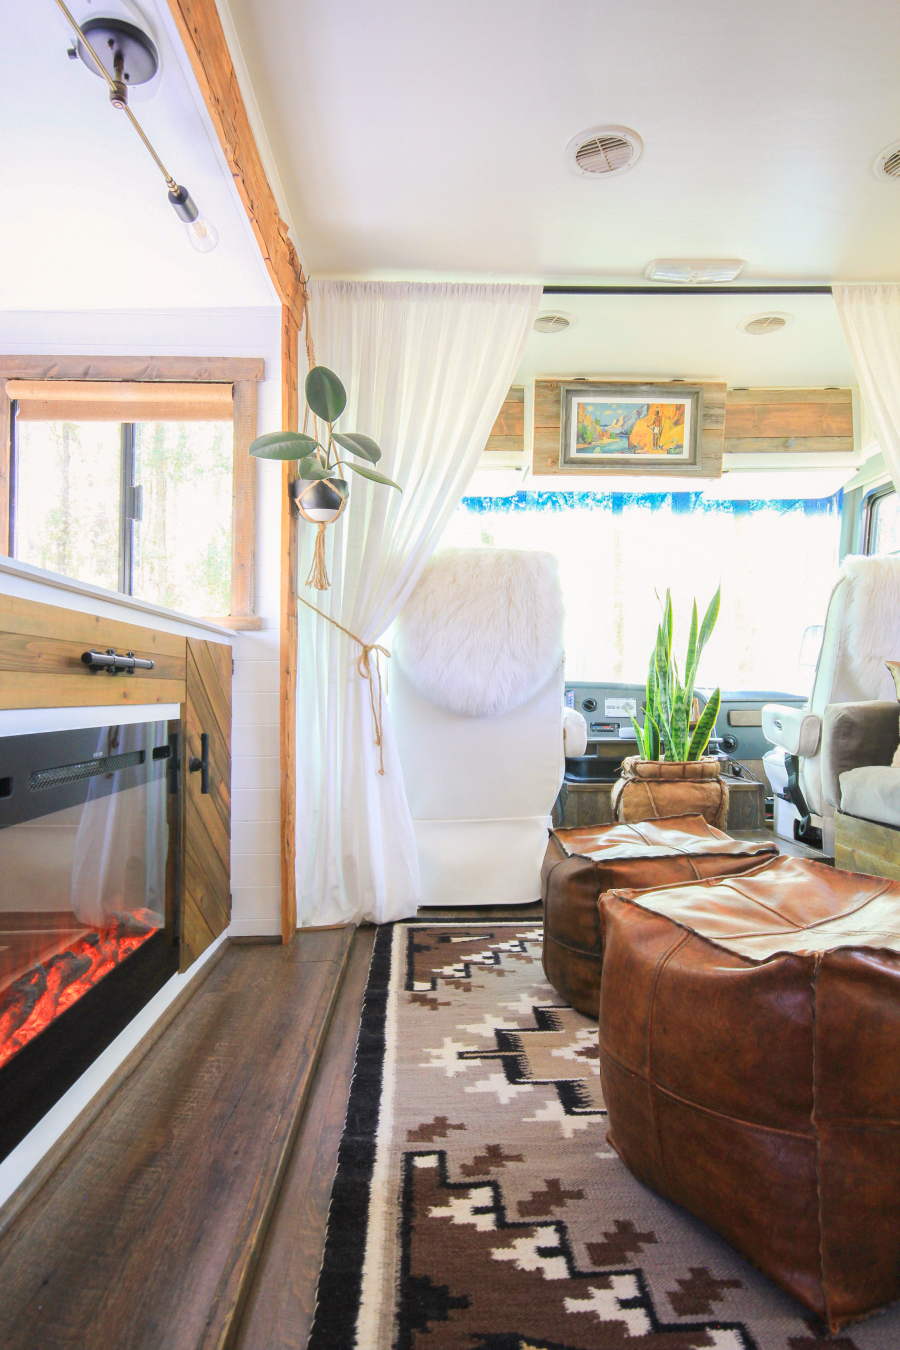
The evolution of our RV living room
When we first hit the road we had a couple folding ottomans that could be used as extra seating and storage. We also enjoyed propping up our feet when lounging on the sofa.
This was back in 2015 when stylish, collapsible furniture was a challenge to find.
They may not have been my style, but I figured they would be functional and I could upgrade them later. So I covered them with a throw blanket and called it a day.

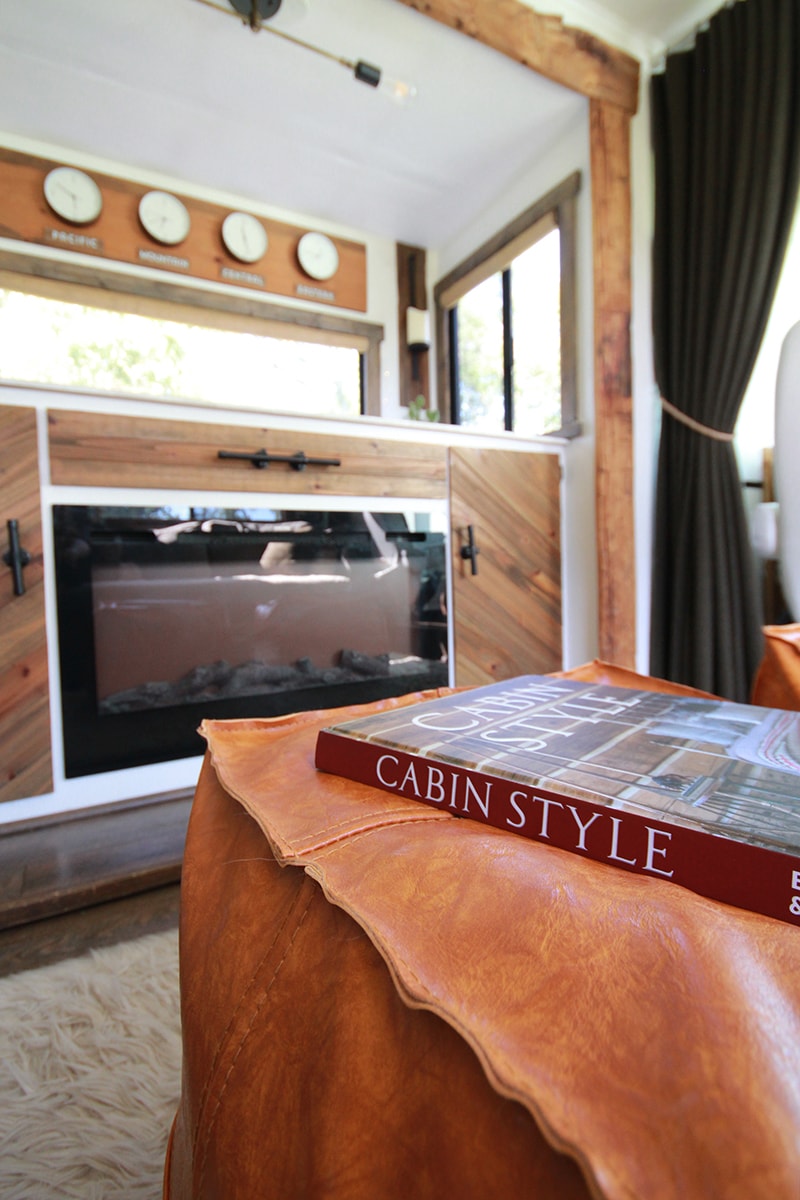
They were later replaced with a folding coffee table I absolutely loved! It was stylish, fairly lightweight, and was easy to fold and tuck away.
Side note: we still have those folding ottomans (the bottom anyway) and use them to store items on travel days.
However, I later realized the coffee table wasn’t serving our needs.
Sure it was nice to have a table to display books or set down my cup of coffee in the morning, but the truth is, I rarely actually set my coffee on it. Instead, it became a piece of furniture I had to constantly move or clean. As much as I enjoyed having it out, the space it used wasn’t earning its keep.
If I’ve learned anything from #RVlife it’s to keep things convenient so they are easy to use and maintain.
Without a place to prop our feet, that coffee table made it difficult to cozy up on the sofa. I was tired of throwing pillows on top of it just to use it.
Yup, it was time to replace the coffee table with something more functional for our tiny space. I wasn’t ready to get rid of it, so we folded it up and stored it behind our sofa.
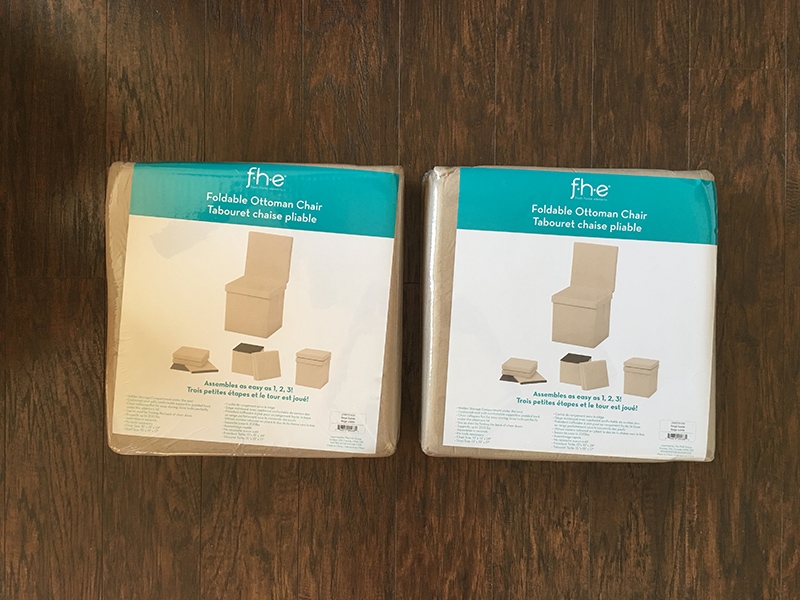
I’ve been eyeing poufs over the years but never found something I was quite ready to purchase. Then about 5 months ago I came across these poufs on Amazon.
You can find handmade faux leather poufs on Etsy, but I wanted something I could get in two days and could easily return if they didn’t work out. (Amazon Prime is a blessing and a curse).
I like how they came unstuffed, so I could keep them a little more “green” by filling them with seasonal clothes, pillows, or blankets. If you’re handy with a sewing machine you can probably just make some yourself.
Anyway, I bought them and right away knew they were a better fit for our living room and what we needed from the space.
I wasn’t thrilled with the color but loved the style and function so I decided to research ways to darken them. I’m always up for a good challenge.

Supplies needed to darken faux leather:
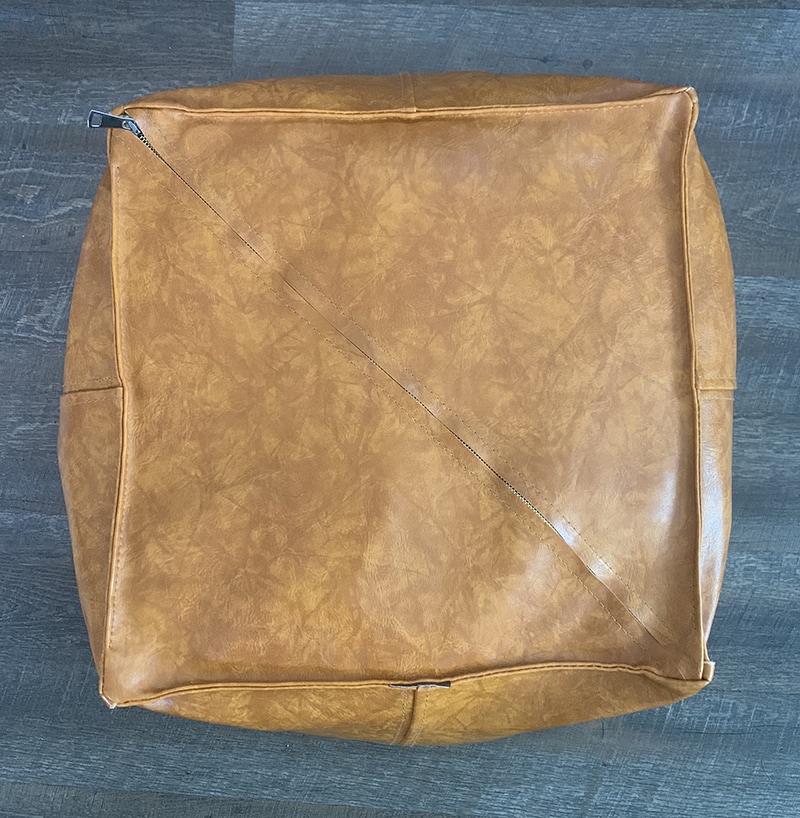
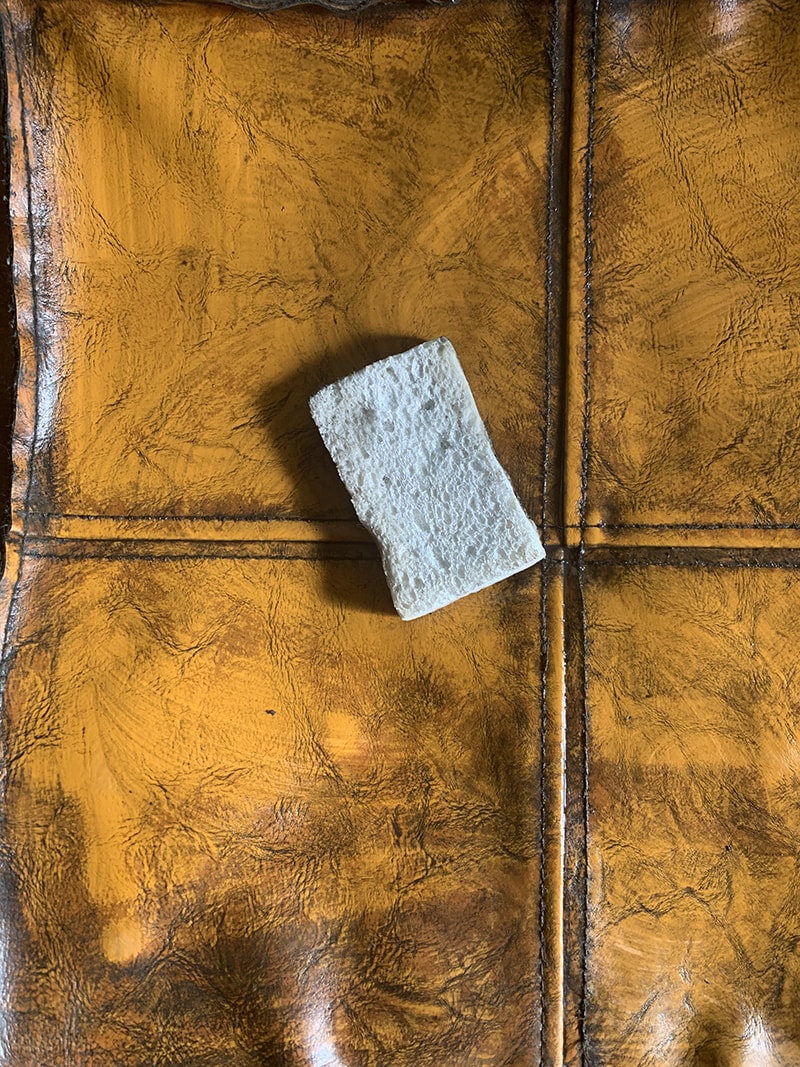
– Faux Leather (these are the poufs I used)
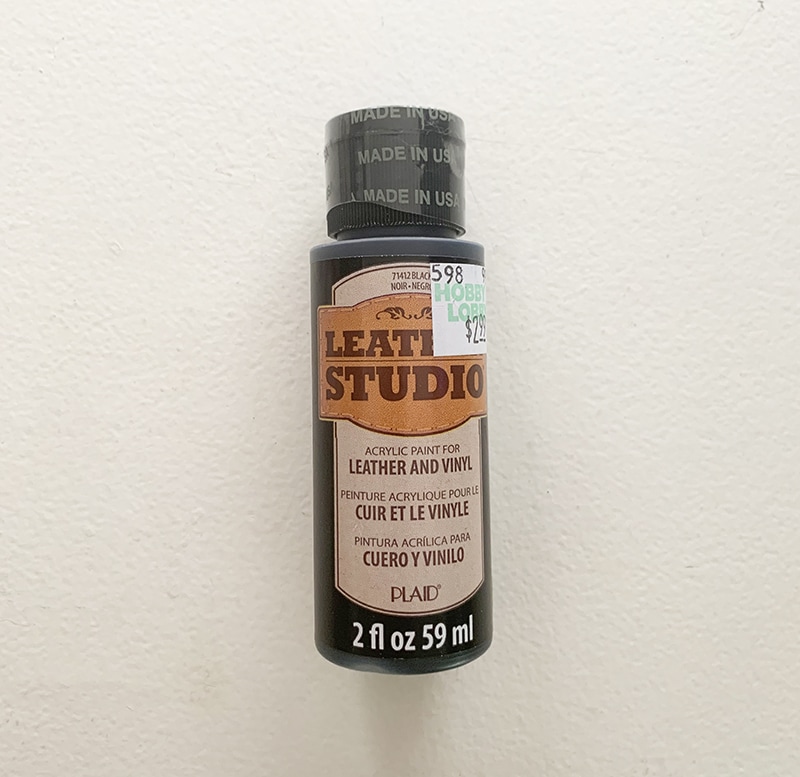
– Leather Studio Acrylic Paint (I used black)
– Rags/Paper Towels
– Paint Brush/Sponge (optional)
– Acetone (or nail polish remover)
– Dropcloth or something to protect the surface you are working on
I had everything on hand except for the leather paint, which cost $3 per bottle at Hobby Lobby. I picked up a few bottles but ended up only using 1 for both of my poufs. You may need more depending on the size of your project and the look you want to achieve. This project cost me about $10 but really could have cost as little as $3.
Regardless of the material you try this on, it’s at your own risk so I recommend testing on a small or inconspicuous area first.
How to darken Faux Leather
While there are various methods to darken faux leather, I chose the method I felt would be easy to tackle inside our RV: leather acrylic paint. I like acrylic paints because they are water-based, which means they don’t stink and are super easy to clean up.
It was snowy outside so I did this in our tiny living room. And while I moved everything out of the way, including our rug, I didn’t bother “unstuffing” my poufs. However, I did check them periodically to make sure the paint didn’t seep through (it didn’t). Maybe not the smartest idea, but it made it easy for me to flip the poufs over as each side dried so I could paint the next section. Do what works best for you and the item you’re painting.
I didn’t want to completely change the color of my faux leather so I approached this process as more of a wash vs actual painting. However, you may find a different process, or using much more paint works better for your situation.
In my opinion, there is no right or wrong way to do this, just whatever feels right for you. I had a podcast playing in the background while I painted my poufs and really enjoyed the process. It was fun and therapeutic. Eric walked in at one point and laughed at the mess I had created. I love our RV to be clean and organized but when I’m working on a creative project, all bets are off. I was covered in paint and loving every minute of it.
Step 1:
Prep: Protect the area with a dropcloth. Wipe down the item with soapy water to remove any dirt or grime before painting. If there are any areas you don’t want to accidentally paint, be sure to tape those sections off. (I didn’t do any of this, but I guess I like to live life on the wild side).
 Step 2:
 Step 2:
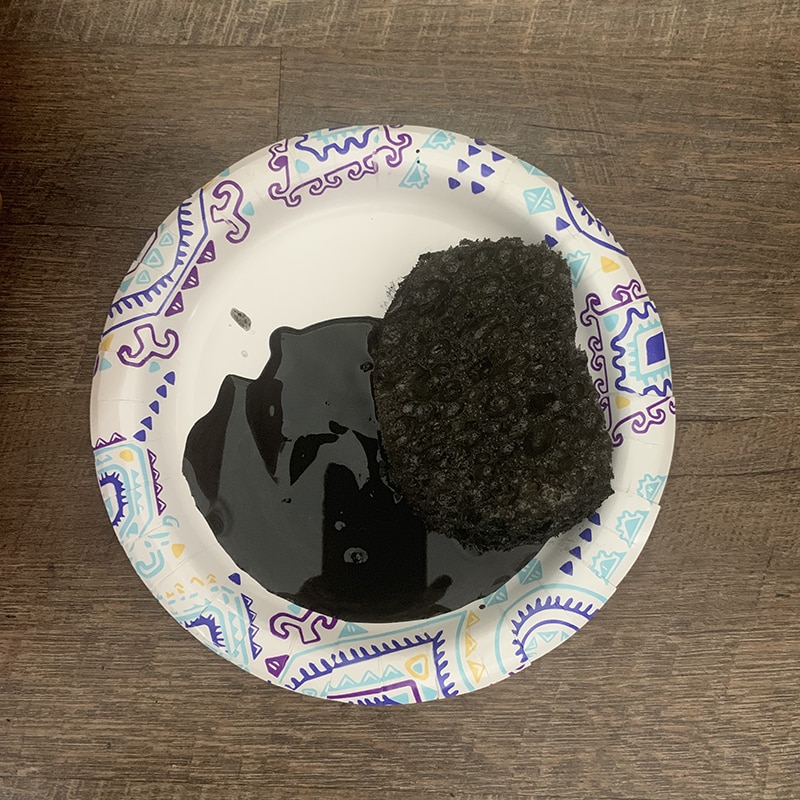
Add a small amount of leather paint to a plate or paint palette. Then add a few drops of water or acetone to the paint which will help thin it out even more (optional). Acrylic paints dry quickly which is why I recommend using a small amount at a time and working in sections.
You should be able to use any acrylic paint but I decided to use a paint made specifically for faux leather/leather projects.
Step 3:
Dip a rag, brush, or paper towel into the paint and then wipe it onto the surface of the item you want to darken.
Step 4:
Wait 10-20 seconds and then wipe the entire surface with a clean rag or paper towels. This is where you may want to play around with it. You can wipe it off immediately, or wait even longer. The longer it sits, the darker it will be because it will absorb the paint more. Remember it’s easier to add more paint then take some away.
Step 5:
Wait 15 minutes for the section to dry, then repeat as necessary.
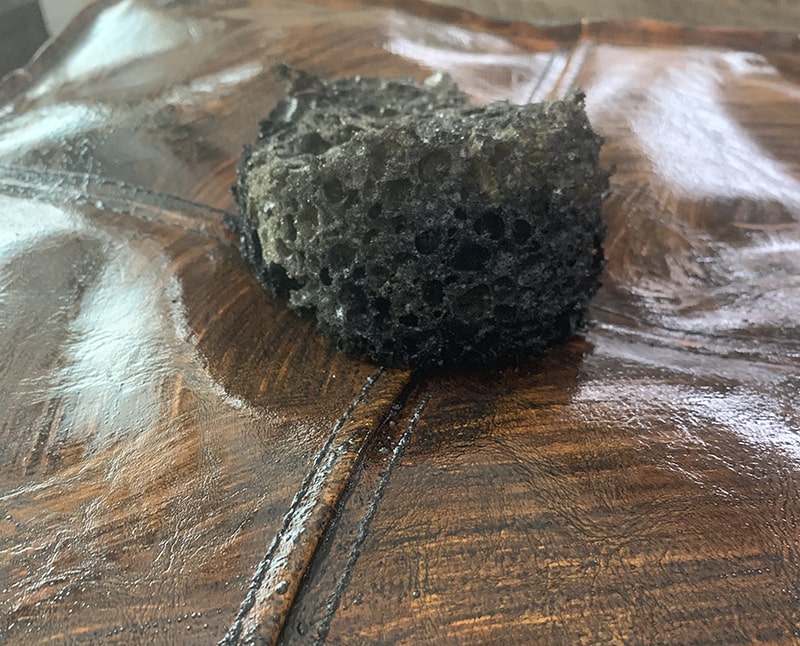
Tip: If you accidentally add too much paint you can remove it with acetone. Acetone can also remove some of the shininess in fake leather. This stuff is filled with chemicals and smelly so be sure to open windows if you’re doing this indoors.
That’s it. Easy, huh? Of course, I realized this method worked best AND looked the best after I painted the first pouf.
Lessons Learned (what not to do)
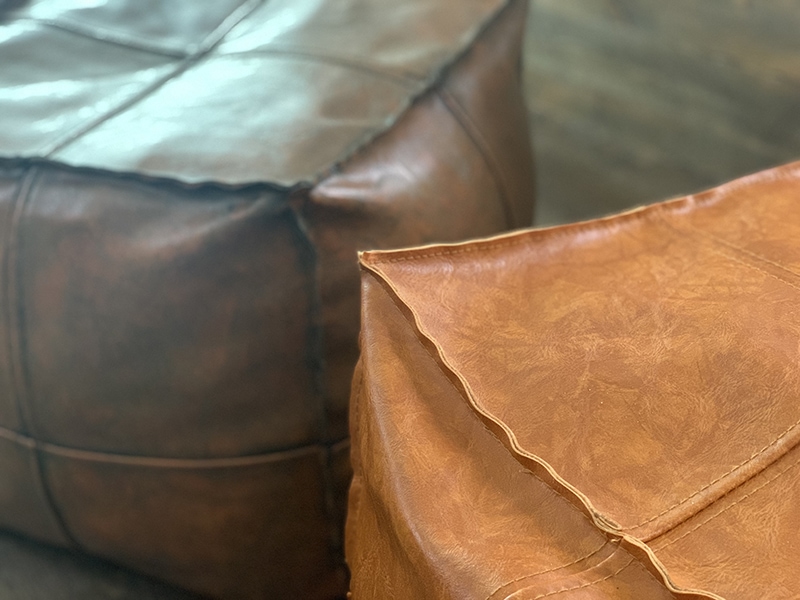
Okay so the method above is what I used to on the second pouf and it worked great! It was super quick and darkened the pouf just enough so it felt more “cognac” than orange, yet wasn’t a dark brown.
I first tested this process on the bottom section of the first pouf before moving on, but then I got a little carried away…
After painting the bottom and wiping it off I started experimenting with my artist sponge. In an effort to create texture and depth, I dabbed the sponge into the paint and then sponge painted it onto my pouf.
The problem is my poufs already have a leather texture so by using the sponge I darkened all of the crevices and grooves, which gave it more of a marbled, snakeskin effect.
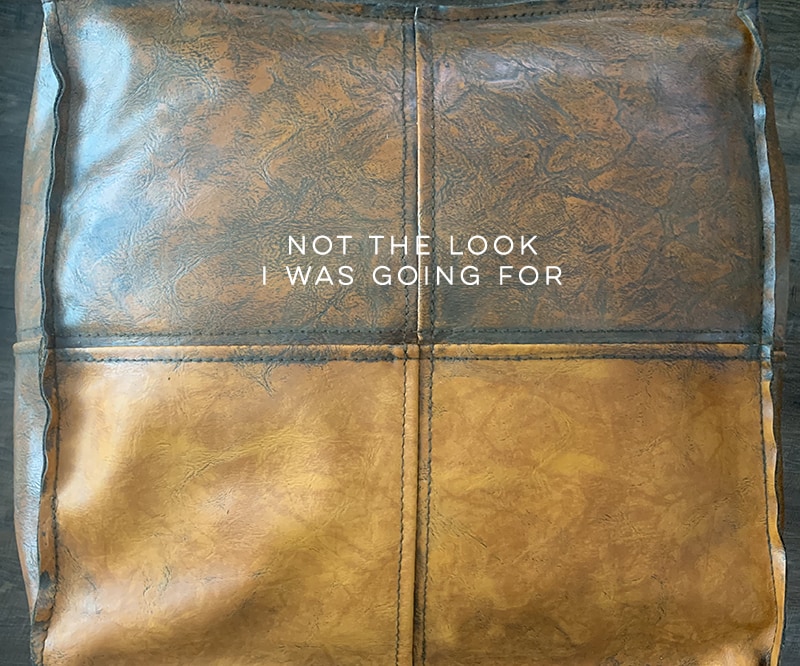
Not exactly what I was going for.
That’s when I tried the steps above on the second pouf: Wipe on paint, wipe off, repeat.
If only I had stuck to my original plan, my poufs would have been finished and looked identical.
But no, I had to go and make things more difficult.
Live and learn, right?
I ended up wiping off the first pouf with acetone and using a sponge and old toothbrush to get into the grain.
The acetone worked better than expected. It practically gave me a blank slate.
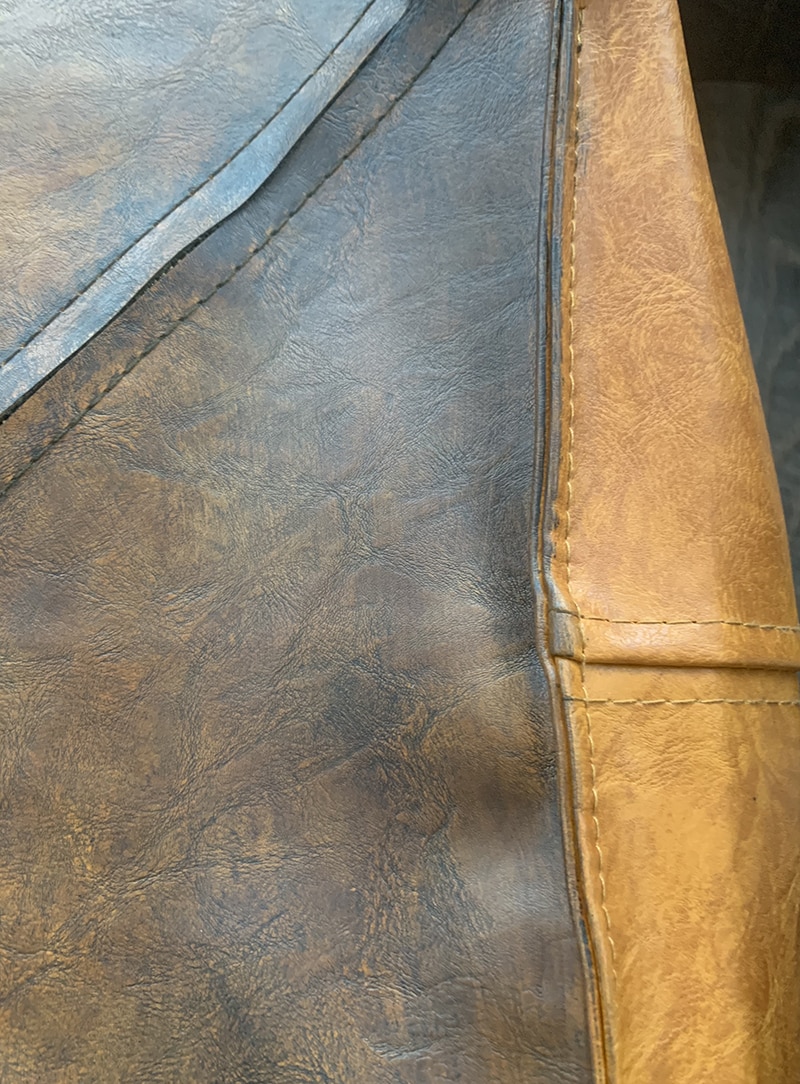
The top section was the only area where the color was more yellow vs orange after I used the acetone. However, I used nail polish remover on the top and then switched to actual acetone because I ran out. So it could be that I used two different solutions, or that I used it a few too many times.
Anyway, no matter how many times I “erased” the paint on the top section and then re-painted it, the color didn’t match the rest of the pouf or my second pouf. Booooo. I finally decided it was good enough, especially since I normally have a fur rug or blanket draped across it. You can avoid this by using the process I outlined above.
So my advice to you is to figure out your method, then try to avoid switching it up. If your material already has a faux leather grain then I would avoid using an artist sponge, and simply wipe the paint on and then wipe it off. I did use an artist sponge to apply the paint, but I didn’t actually use it as a “sponge” or dab the paint on for a textured effect.
If you have to use acetone, stick to one brand/type.
The Results
As you can see, this is a super-easy way to darken faux leather. Before you replace your faux leather with something else, you may want to consider updating it instead.
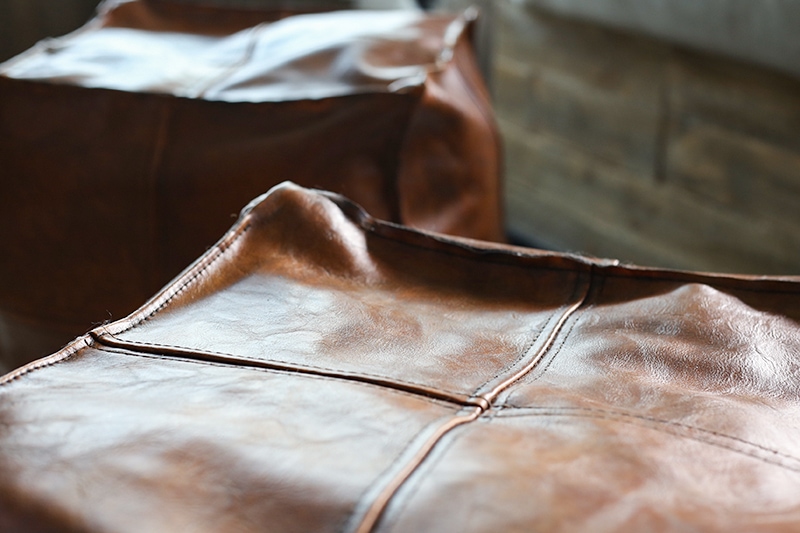
In the end, I love how our poufs turned out, and so does Eric! They now match the faux leather pillow on our sofa, which is what I wanted.
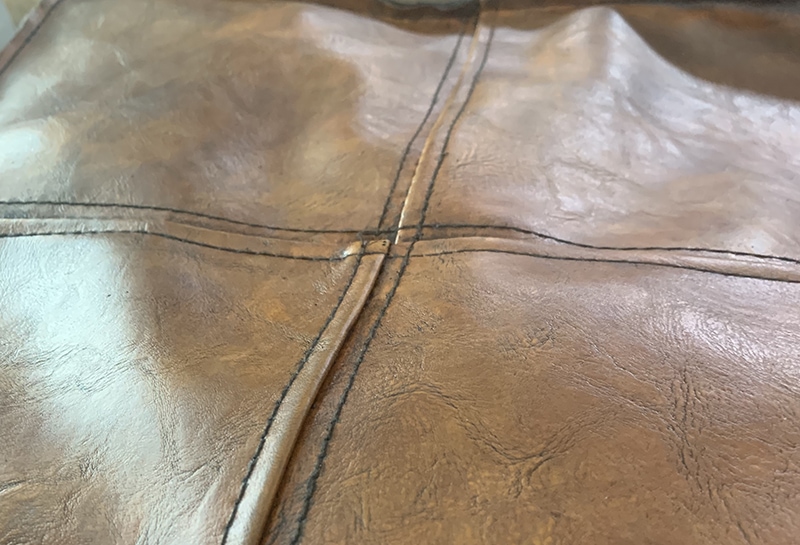
One side is slightly darker on the first pouf I painted (it’s the top but I had it flipped on the side to the right in the image below so you can see it), but overall they look pretty consistant. I may move that pouf to be closer to the dashboard and flip it so it’s less obvious.
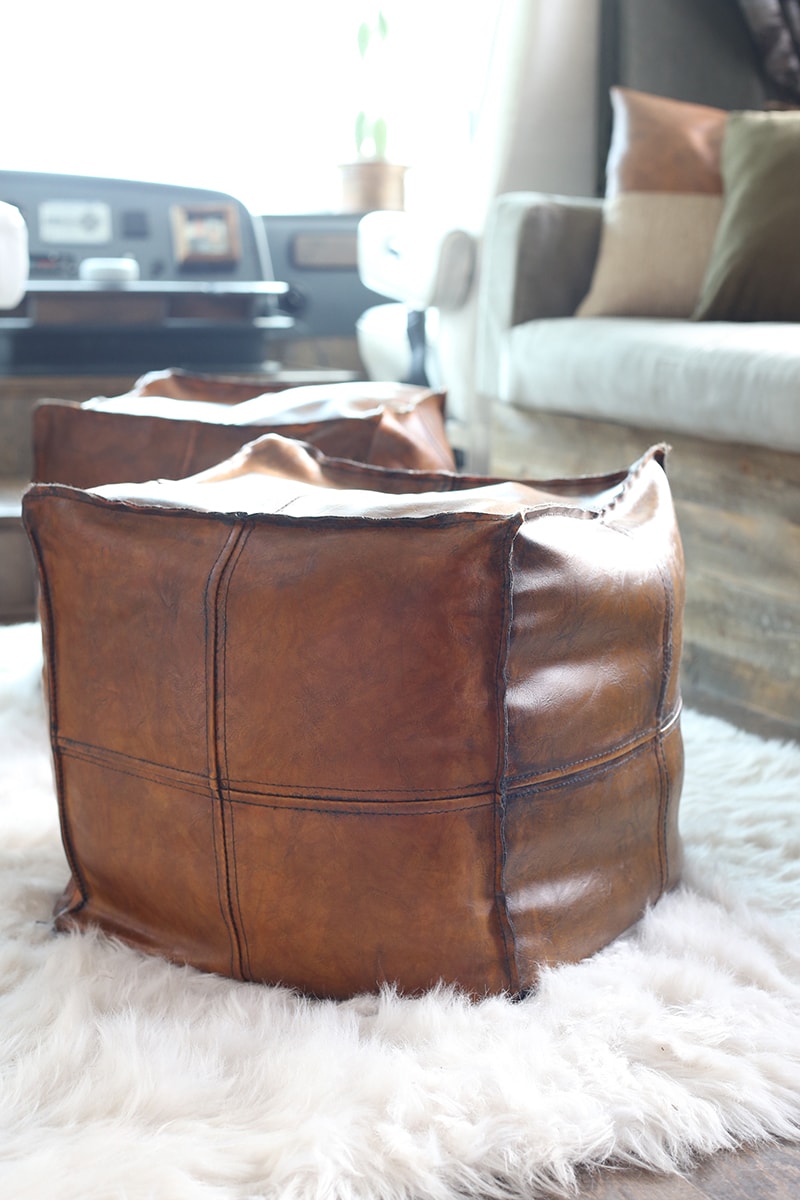
Our poufs now read more as a neutral vs. a bright orange color. This makes both my eyes and my heart happy when I see them.
If you’re looking for an easy way to darken faux leather, I definitely recommend testing this method out. And if you do, let us know how it goes!

Tips on how to Clean Faux Leather | RedHanger
How to Paint Faux Leather | Wikihow
Using Acetone to remove shininess from faux leather | Hunker
Love the tutorial! Especially the “what not to do” – so helpful!
Haha, we generally have more tips on what “not to do” then what to do, but at least it helps us later on in the next project!
Love this! I’ve been wanting a Moroccan leather pouf for our living room. Funny thing is, I actually bought one for myself once…in Morocco! But, I ended up giving it to my brother as a gift because the gift I brought him was not nearly as cool as the gift I bought for my other brother. I keep telling him if he ever decides he no longer wants it, I’ll take it back, but so far he hasn’t been willing to part with it, haha!
First off, that’s awesome that you’ve been to Morocco and too funny about the pouf… Although I don’t blame him for holding onto it!
Love this idea and got so excited BUT…………I have a faux sofabed that is 9 years old and the FAUX is FLAKING!! Don’t think I could do this but I would love to try….GREAT JOB!!
Boooo, don’t know if it would help the flaking but you may be able to find another fix for that. I wonder if something like mod podge would work since it’s faux leather?
I just bought this SAME pouf, but got it and also hated the color. So I’ve been scouring the web trying to find how to fix it instead of sending it back. Thanks so much for sharing!! Soooo doing this.
That’s awesome, let me know how it turns out!
Thanks, this worked great for some faux leather chair cushions that were too orange. I really wanted them to be dark brown so I followed your tutorial but did about 4-5 coats. They were slightly darker after each coat. I worried about using black paint to make the cushions look brown but they look awesome!
Yay, that’s so awesome to hear! I was really impressed by the results too!
This post was the biggest waste of time and is written like a drunken rambling. You literally used a leather paint in the exact way it is intended to be used. Why write this stupid story about your, life, your vegetarianism, views on leather, the fact you did it inside your RV because it was snowing. I legitimately only read this to laugh at you. Get a life.
Yup, I did and I shared it in hopes of inspiring someone considering using this type of product. When I was doing research I couldn’t find any examples of this paint being used on a piece of furniture or something similar. The whole point of this post was to share my experience and what I learned through trial and error. That’s actually the point of this website. I don’t know why you felt the need to take time out of your busy day to be a sarcastic jerk, but even so, it made me laugh out loud. So thanks for that.
I’m thinking of trying this technique on counter stools. Will the paint rub off easily once dried?
Ours hasn’t rubbed off at all, so I think it should be good once dry 🙂
When you “wipe off” are you wiping with a dry or wet cloth? I have a chair that is more orange than brown and I want to give it a more old world feel.
Thank you!!
What a great idea! It was with a dry cloth – though you can experiment and can always mist the chair down with a spray bottle if you need to add a little more water back in.
I love this. I have faux leather chair I want darker. Mine isn’t shiney tho. Do you think this would work on more like a matte ish leather ?
I would definitely think so – the sheen shouldn’t matter so much. If you try it let me know how it goes!