UPDATE: All new featured RV tours will be posted on my other website, Wanderful RV Interiors. Existing tours will slowly be moved to the new website, and anything already moved will automatically redirect.
Disclaimer: This post may contain affiliate links, meaning, if you click through and make a purchase we (or those featured in this post) may earn a commission at no additional cost to you. View our full-disclosure here.
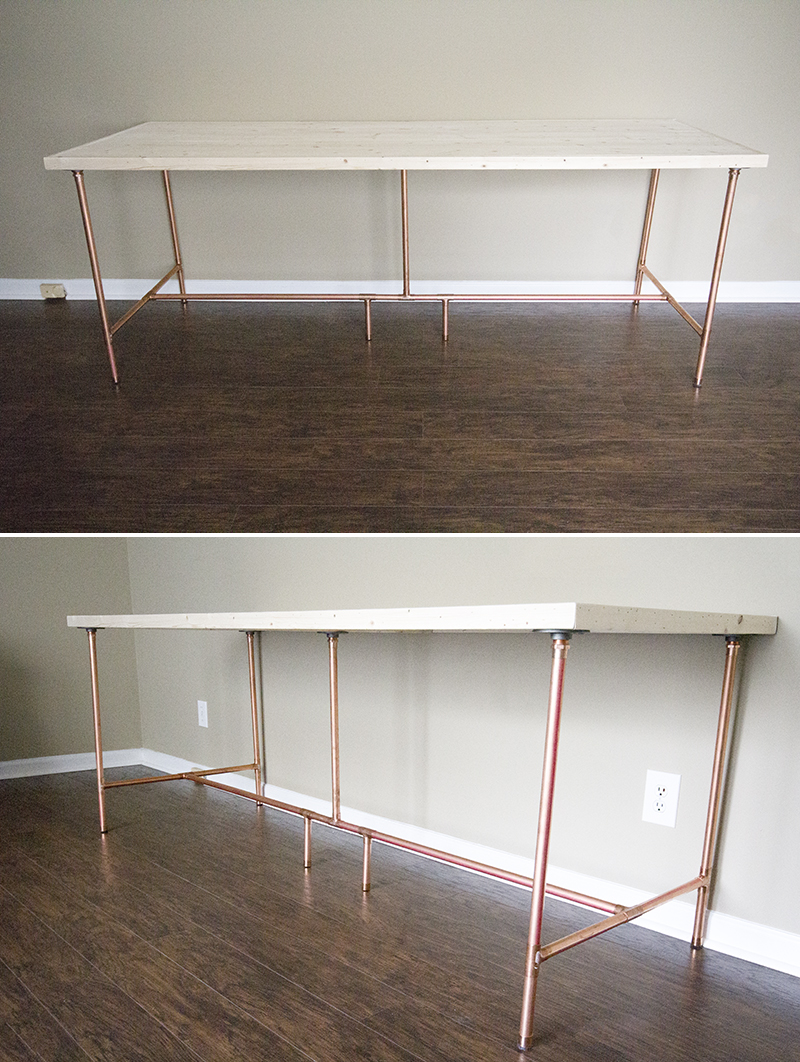
As you may know, Eric mostly builds the furniture projects in our home and I am his handy dandy assistant. Today, however, I’m sharing a DIY copper pipe desk that was built entirely by me. I’m slowly learning how to be more comfortable with power tools, and it’s amazing how empowering it can be once you know how to use them properly. Not to mention seeing the results of your hard work. It’s not perfect, but it’s not too shabby and overall I’m very proud of the outcome.
Impatience is what made me take the leap. Eric was traveling for work and I couldn’t wait to get started.
Not gonna lie, I was nervous about making a desk out of copper pipe since it can be expensive, and it’s also the weakest type of pipe compared to galvanized or black steel pipe. Plus I wasn’t able to find any other tutorials showing the steps, which meant I’d have to figure it all out from scratch. However, I really wanted a copper pipe desk to match our copper and navy dresser, and was excited about the challenge.
I’m happy to report this thing is sturdy and only costs about $150! It has both of our computers on it and is very solid. Not to mention beautiful. I love the raw wood look, especially against the copper. What do you think?
DIY Copper Pipe Desk
I actually made some changes along the way for this desk (to make it sturdier), so in an effort to prevent confusion I won’t be sharing any of the building stages of this desk, instead, I will share labeled photos of it mostly complete.
Basically, I had taken some photos of all the materials needed but wound up going back out for more materials afterward so those photos are no longer accurate. Annoying, I know.
Sometimes things don’t go according to plan and you have to make decisions on the fly. Oh well, that’s life, right?
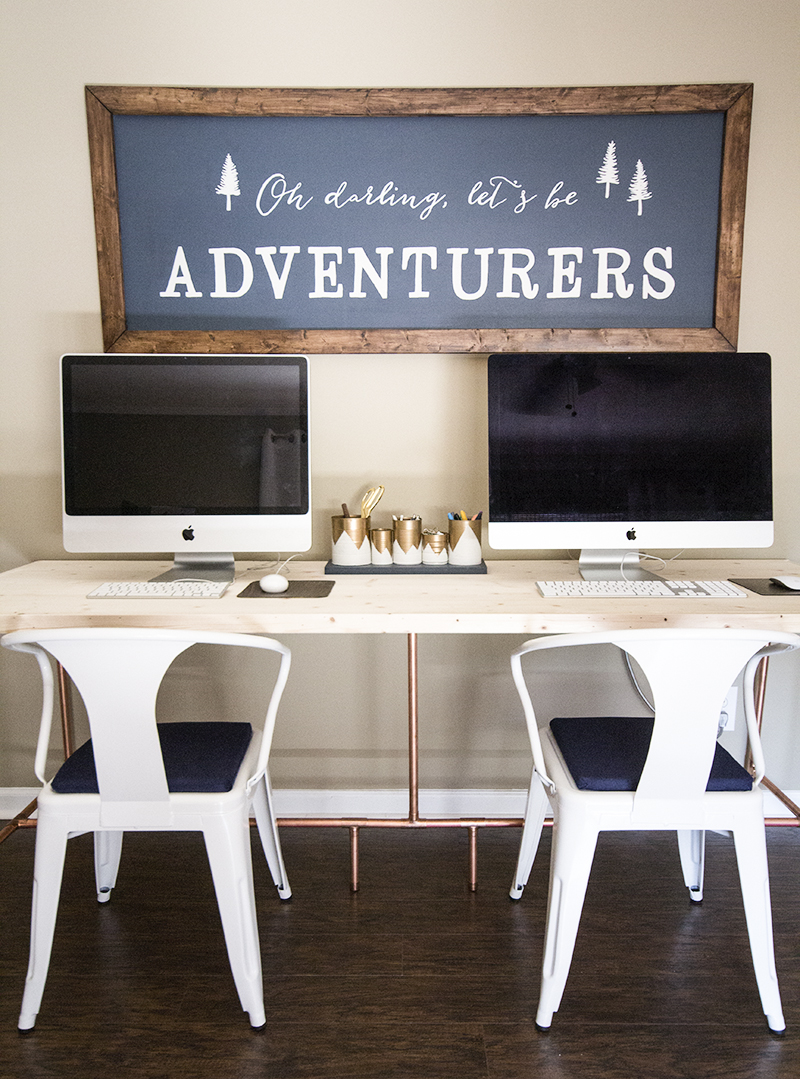
I’m happy to report that’s it’s been about a month now and I LOVE our new desk. Not to mention it works perfectly as a double desk that both my husband and I can use, woo-hoo!
The final dimensions of our desk are 80″ x 28.5″ x 30″, including the 1″ frame around the top. Of course, the great thing about pipe projects is that they are super easy to customize to fit your space and needs.
So although I’m showing how we created a double desk, you could tweak this to create a single desk instead, or dining table, or coffee table, or nightstand. Oh, the possibilities…
Most of the items listed were purchased from Home Depot, but you could also purchase them online. I will also say that although I used the 3/4″ Copper Type M, I later realized that Home Depot also carries a 3/4 inch Type L which is stronger than the Type M and is only about $10 more per 10 ft. pipe. So you may want to go that route or see if you can find some 1-inch pipe.
Again, our copper pipe desk is sturdy and good so as long as your top doesn’t weigh a ton you should be good. As far as tools go, the only thing you need for the copper pipe base is a pipe cutter, unless you kindly ask an employee to cut it for you. I’m sharing the materials used for the top of our desk, but you could use other materials or tools if you don’t have the ones mentioned below.

Tools Used:
- Kreg Jig (for building desk top)
- Ryobi Drill
- Ryobi Airstrike (for attaching the frame to the top of wood desk)
- Ryobi Belt Sander (or sanding wood top)
- Pipe Cutter (or have one of the employees cut the pipe for you)
Materials Needed for the base:
- (2) 3/4 in. x 10 ft. Copper Pipe
- (6) 3/4 in. Copper Tube Cap
- (9) 3/4 in. Copper Tee
- (5) 3/4 in. Copper Male Adapter
- (6) 3/4 in. Black Malleable Iron Threaded Floor Flange
- Epoxy
Materials for Desk Top:
- (5) 1 in. x 6 in. x 8 ft. Common Board
- (3) Common 1×2 Furring Strip Board
- (3) pieces of wood that are the width of the table for support underneath, that you can also screw the flanges into (I used some scrap wood)
- Wood Glue
- Danish Oil (or any stain/sealer combo you want)
Copper Pipe Cut List
- (2) 31.5″
- (5) 20″
- (4) 11.5
- (6) 6″
- (2) 5″
Total Cost: Roughly $150 (not including tools, other than the pipe cutter)
The first thing you will want to do when you get your pipe home is clean it up. Steel wool works great for getting the stickers off and you can use high acetone nail polish remover to get rid of the red or blue markings on it.
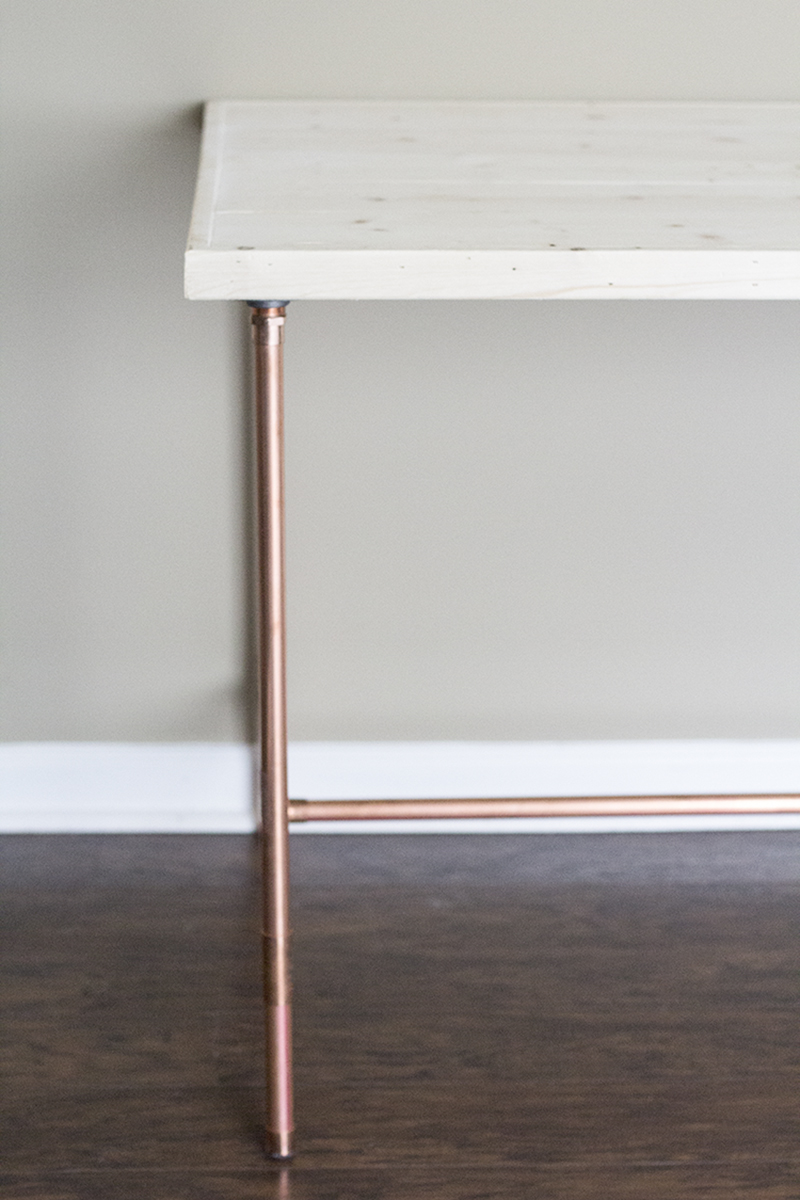
If you are not familiar with copper pipe, you should know that it cannot be threaded the way that galvanized steel or black iron pipe can. For this reason, you will want to use Epoxy to securely attach the copper pipe into the pipe fittings.
I had made a drawing of what I wanted the copper pipe desk to look like before I went and purchased my materials, then laid everything out on the ground and slowly started assembling the pieces. You could build your desk first and then go back and add the epoxy later once you know everything is perfect, but you may need help standing it up and secure while you put the other pieces in place. Once you add epoxy be sure to wait a good 30 minutes or so before moving it around so that it has time to set. I assembled one side, then the other and then attached both to the center last.
Here is a photo of the base of the desk before I added the male adapters & flanges to the top.

Here is the same photo labeled, and don’t worry it’s a lot easier than it looks.

And here is a photo showing the male adapters and flanges at the top. The male adapters basically slide onto the pipe (make sure to add epoxy to the inside) and then you are able to screw those into the flanges. I used black iron flanges and actually like that they don’t perfectly match, not that you can really see them much anyway.

Once the base was built I started working on the top of the desk. I didn’t want anything too heavy so I created a top using (5) 1 x 6 boards that were cut to 80″ long each. Make sure you pick out straight boards as that can really affect the outcome of your desktop.

I cut the boards with our Ryobi Miter saw, and also cut 3 pieces of scrap wood to be 28.5″ long. These 3 pieces were to go underneath the table to create more support, and also so that I could screw the flanges into them.

I also cut some 1 x 2 fir strips so that I could frame the desktop with them. After everything was cut to size I used the Kreg Jig to attach the 1×6 pieces to one another.


Once the top was built I used our Ryobi Airstrike to attach the 3 wood supports to the bottom and also to attach the framed edges around the top.


I then sanded the whole thing down with a belt sander.

I really liked how the raw wood looked against the copper, which is why I decided not to stain it. I still plan to go over it with some Danish Oil though. Of course, you can paint, stain and seal yours at this point if you would like.
Here is the copper pipe desktop all finished:

And here is our copper pipe desk all finished, woo-hoo!
So what do you think of our copper pipe desk? I love how it turned out and it was so much fun to make! Have you created any pipe or copper projects? If so be sure to leave a link in the comments so I can check it out!
Update: The desk has been moved into my office/craft room:

Your desk is amazing!!! I can’t wait for the tutorial!!
Thanks so much Selene!
love the desk, the copper is brilliant. looks fab – well done you 🙂
Sarah @ EDEA Smith
http://www.edea-smith.co.uk
Thanks so much Sarah, I definitely love how it turned out and it was so easy!
Love it! I could totally see this modified just a bit to make a super cool sofa table as well! Have fun with the family!
Absolutely! Coffee tables, end tables, nightstands, dining tables, oh the possibilities, lol.
I think the desk looks fantastic! I love the industrial look so to me it’s perfect exactly how it is.
Thanks Jenise! I love how the raw wood looks against the copper 🙂
Katie, this is the prettiest and coolest looking desk I have seen in a long, long while! I love those elegant copper legs (makes me want to copper-ize pretty much everything in my house :). You are so clever!
Love this!! Can’t wait to read the full tutorial. Totally digging the raw wood too!
So cool! Love the raw wood/copper combo!
This is really cute, and the design is versatile enough for any home. I could totally see the tabletop being a salvaged door or even an old sign or something, although the wood looks beautiful, too.
This turned out absolutely beautiful! Great job with the power tools!
Have you shared the tutorial yet? I’ve been stalking your site for a little while now waiting for it, lol. But I’m a little internet-clueless so I might be missing it!
Lol June. Actually I’ve just been super terrible at getting projects posted because things have been extra cray cray around here! I’ll have it up by Monday 🙂
Awesome, thanks! 🙂
Hi,
Any luck posting this yet? We’re really keen to make one too! 🙂
Thanks
Hi Jane, I actually added a link to the bottom of the post and you can also see it here:
http://upcycledtreasures.com/2014/09/how-to-build-a-copper-pipe-desk/
Thanks!
~Katie