UPDATE: All new featured RV tours will be posted on my other website, Wanderful RV Interiors. Existing tours will slowly be moved to the new website, and anything already moved will automatically redirect.
Disclaimer: This post may contain affiliate links, meaning, if you click through and make a purchase we (or those featured in this post) may earn a commission at no additional cost to you. View our full-disclosure here.
Have you ever thought about making your own light fixtures? Maybe you want to create something custom for your home or RV because you can’t find exactly what you have in mind, or maybe you’re looking to save money because a fixture you love is out of the budget.
Either way, we hope our post and video on this DIY mason jar light fixture will help inspire you, and show you that making your own lighting doesn’t have to be complicated!
Disclaimer: We’re not electricians and anything we’ve learned about light fixtures has been found online or through experience. Please use your best judgment when dealing with electricity, or if you’re unsure of something please consult with an electrician.
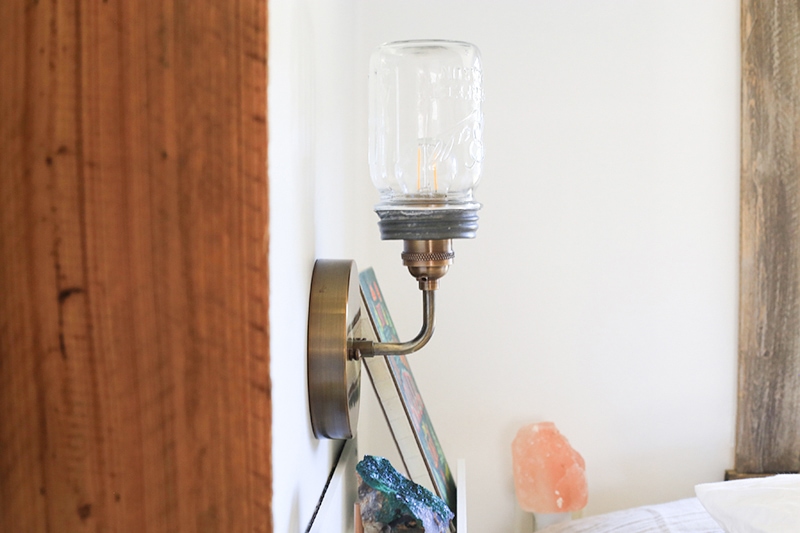
DIY Mason Jar Light Fixture
The light fixtures that came in our RV definitely left much to be desired, which is why we ended up creating custom light fixtures throughout. Here’s a flashback:
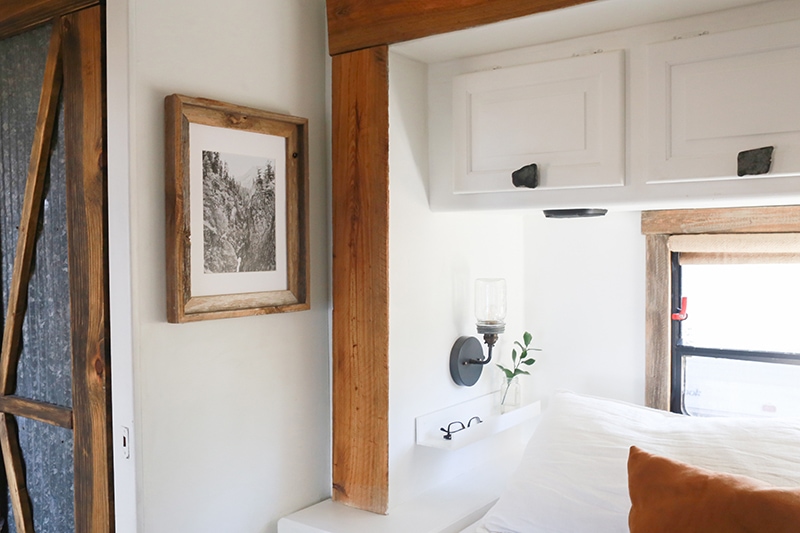
I’ve gotten a ton of questions over the past couple years about the mason jar lights in our RV bedroom, but to be honest they were sorta Frankensteined out of leftover parts from our other lighting projects, along with parts I took out of old fixtures I had on hand.
I love how they look and they’ve served us well, but I didn’t know how to easily share how I made them and link to specific parts so someone with no knowledge could replicate them. And to be honest, I wanted to make some updates anyway, mainly add a dimmer. We also didn’t care for the swivel, because we noticed during bumpy road trips it could sometimes become loose.
I had to spray paint all the parts since I couldn’t find everything in matte black (there are more options now) and all I’m gonna say is if you can use a patina solution that’s gonna be better, but if you have to spray paint, make sure not to spray the threads of any pipes – tape them off first. 
For this project, I’ve tried to keep it simple so you can recreate the same mason jar light fixture, or at least gain basic knowledge to then go create your own custom lighting. And while we’ve added a dimmer switch (which was much easier than we anticipated), that’s a step you can skip altogether if you don’t want one.
Can this light fixture be used in a Home or an RV?
It can be used in both! You can easily tweak it to work in your RV simply by making sure you use the correct bulb, that matches the power supply in your RV.
We did use a dimmer switch made specifically for 12v, along with a 12v LED light bulb. So if you’re in a sticks and bricks home with 120v light fixtures, you’ll want a dimmer switch for 120v and a 120v light bulb.
If you’re in an RV and have 12v lights, you’ll want to use 12v light bulbs and the 12v dimmer (if adding a dimmer anyway. If you just need a toggle switch you can use any kind, and if you’re confused about how to switch up your light fixtures, we do go into more detail over on this lighting post.
Video: DIY Mason Jar Light Fixture with Dimmer
We put together a video you can watch over on Youtube or below that shows how easy the process is, but will also share the steps and link to all of the supplies used below.
How to Make a Mason Jar Light Fixture
I apparently have a thing for mason jars lights considering I made a mason jar chandelier for our wedding reception back in 2013, then later created another mason jar chandelier but ended up removing the jars but keeping the lids. With that said, I’ve gotta admit these mason jar light fixtures are my favorite!
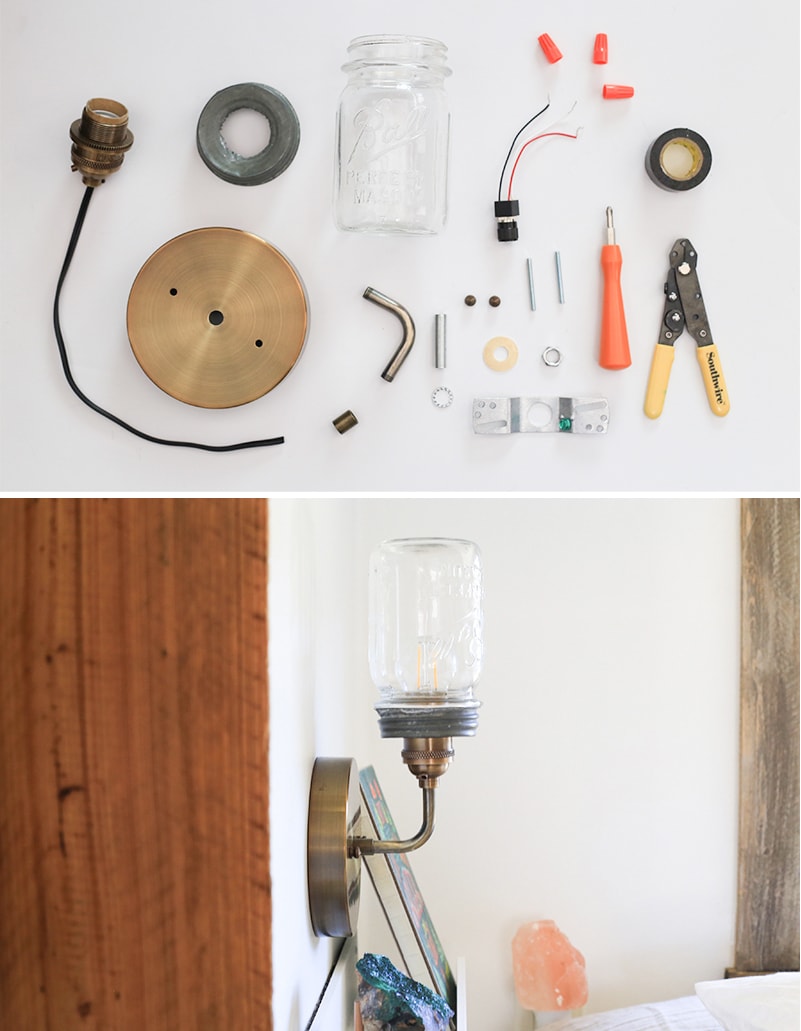
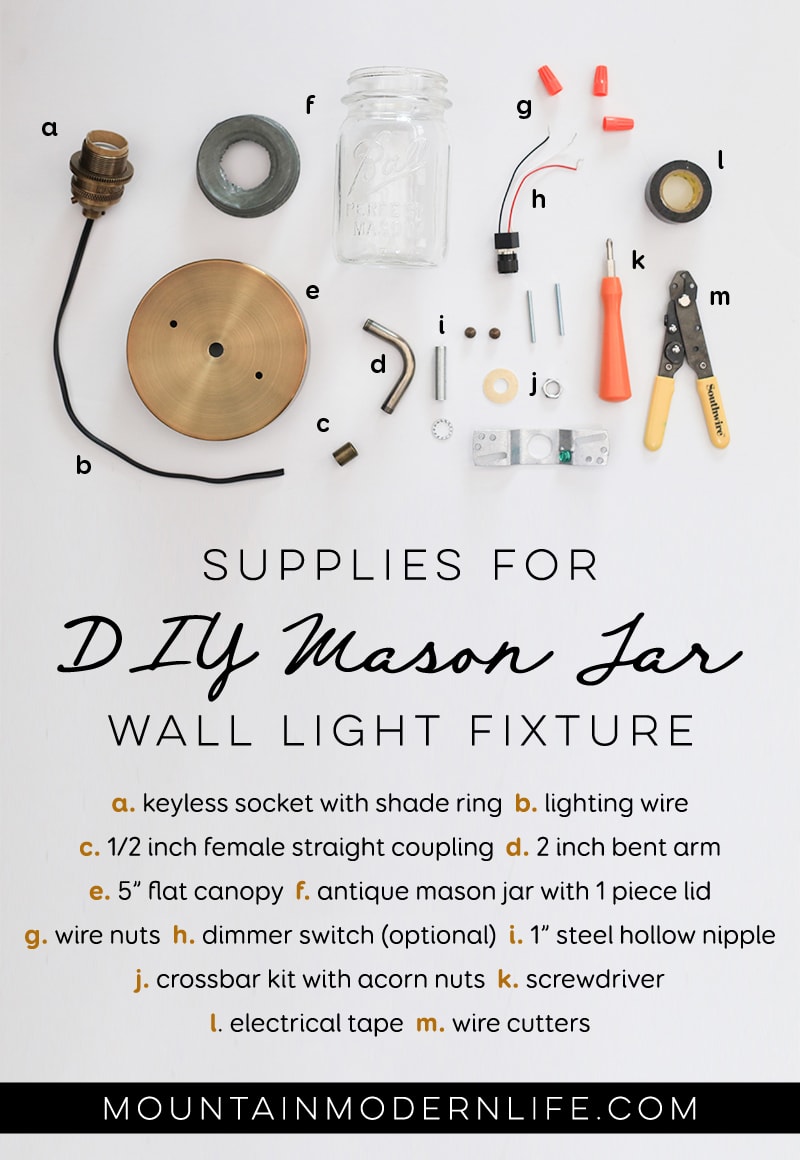 Here are the supplies we used but feel free to mix it up, use different styles, finishes, add additional parts, etc. and have fun! We purchased our lighting parts (aside from the dimmer) from Grand Brass. We’re in no way affiliated with them but have been happy with all of our previous purchases and definitely recommend checking them out.
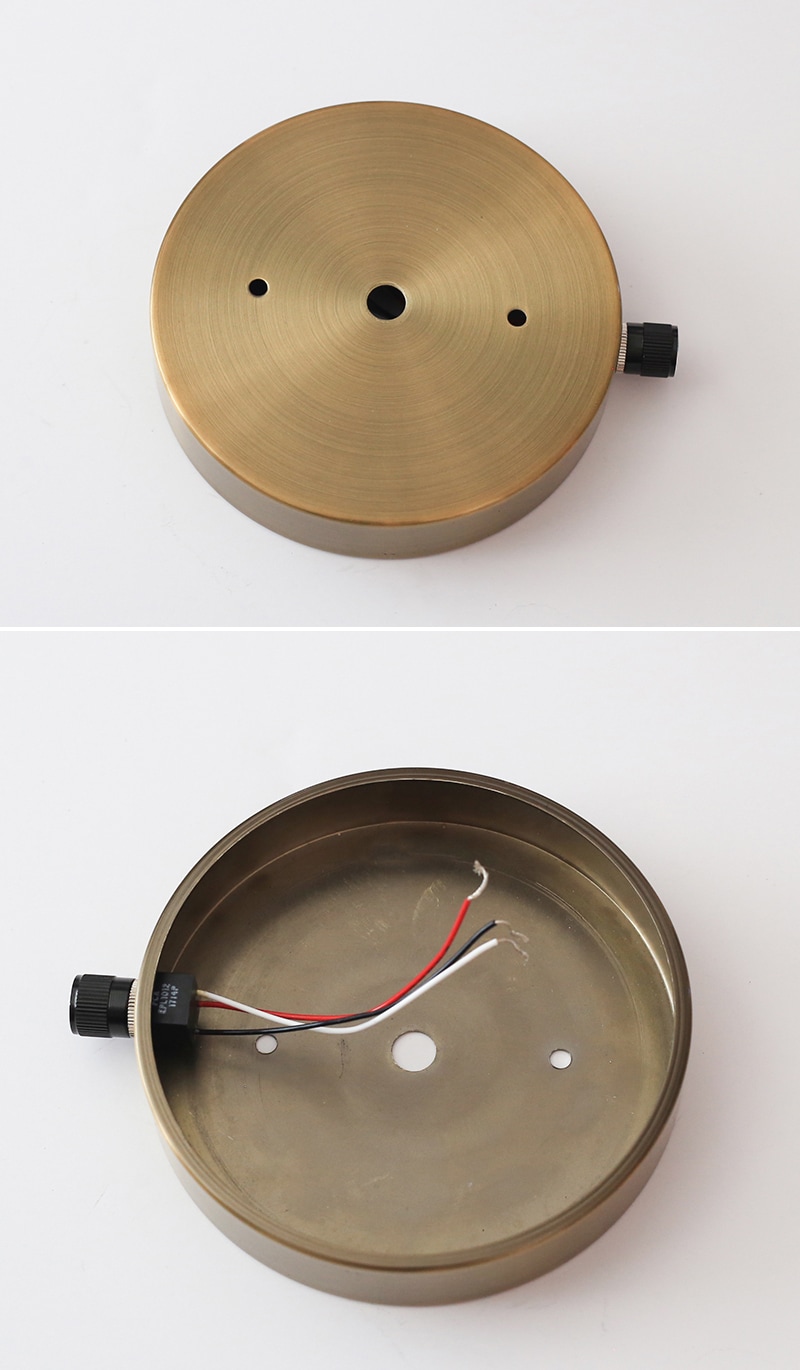
Also, the antique brass canopy and keyless socket were a little more expensive than other options they had, so you could certainly save even more money by using a different style. They actually now sell these in a flat black which I would have loved even more!

- Cross Bar Set – Antique Brass – We didn’t use the strain relief that came with the crossbar set since we didn’t use it as a hanging pendant, but you can also buy the parts in the set individually.
- 5″ Flat Canopy – Antique Brass
- 1″ Steel Hollow Nipple (you may want to use a smaller size)
- 1/2″ Female Threaded Straight Coupling – Antique Brass
- 2″ Male Threaded Bent Arm – Antique Brass
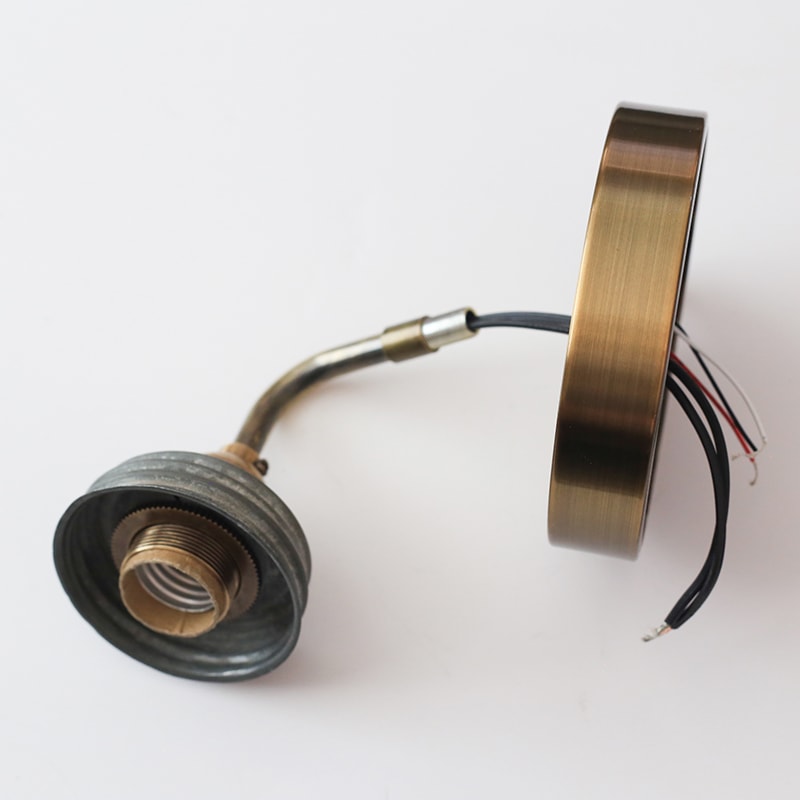
- Keyless Socket with Shade Rings – Antique Brass
- Lighting Wire – we used leftover 18/2-SPT1 wire, but you may want to use something else depending on your situation.
- 12V LED G45 Light Bulb – if using in RV with 12v lighting
- Antique Mason Jar with a one-piece lid
- Hammer/Nail or Drill/hole bit – to create a hole in the mason jar lid
- Wire Cutters
- Wire Nuts (if you get a dimmer it may come with some)
- Electrical Tape
Optional:
- 12v DC Dimmer Switch (if using in an RV or for 12v Light)
- Drill/Drill bits/Safety Goggles – for installing in the wall or adding the hole for a dimmer switch
- Clamps – if drilling hole for the dimmer switch
- Wrench to help tighten the hex nut on the underside of the canopy
- Screws – we ended up needing some extra screws to attach our fixture to the wall
- Voltage Detector
- Copper Ground Wire – we didn’t use this since there wasn’t a ground wire supplied from the wall of our RV
- Brass Darkening Solution (or spray paint and painter’s tape)
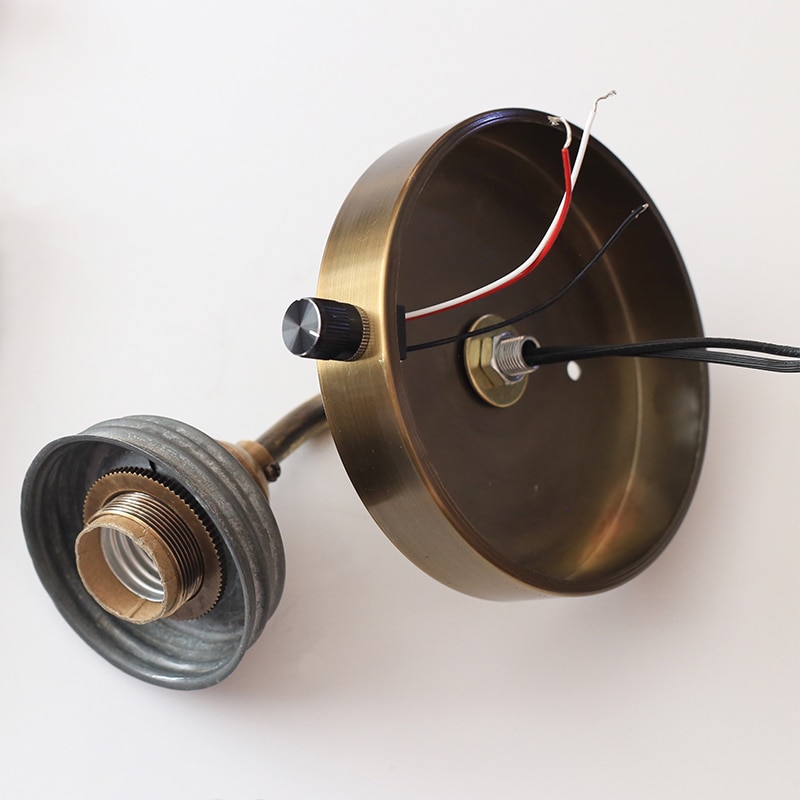
Step 1: Create a hole in the canopy for a dimmer switch (optional)
This is optional for those who may not have a wall switch but want to add a dimmer switch to the fixture. If you choose a canopy with a wire way hole on the side you can skip this part. Or if you only need an on/off switch you could also purchase a socket with a switch.
However, if you do want to add a toggle or dimmer switch, you can do what we did and drill a hole into the side of the canopy. We first decided where to place the hole, and realized we wanted ours on the side that would face the wall. This way it would be mostly hidden. We actually learned this the hard way by first installing it at the bottom of the canopy, but it stuck out like a sore thumb. Lesson learned.
Once we decided the best place for the hole, we used the switch as a guide to determine the bit size needed to create the hole. Since the metal is pretty thick we clamped the canopy down and drilled a pilot hole first before using the bigger bit. Make sure to wear safety goggles!
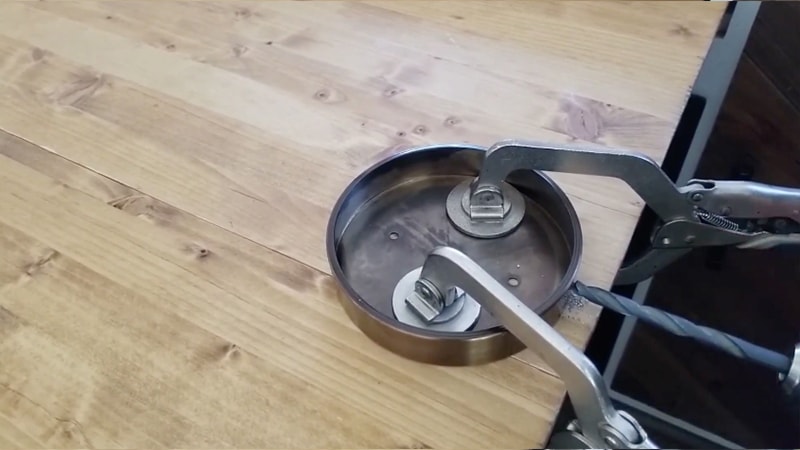
You can attach the switch, then set the canopy aside.
Step 2. Make a hole in the Mason Jar Lid
Take your one piece mason jar lid and create a hole in the center using the socket as a guide for how large it needs to be. You can place the socket on top of the lid and trace around it, making a circle on your lid for the outline of the hole you need to cut out.
It doesn’t need to be perfect since the shade rings will cover the top and bottom of the lid. Unfortunately, we didn’t document this on video because we’re using lids from our old mason jar light fixtures that already had holes. It’s really easy to do though. Here’s an old photo from when I did this a couple of years ago:
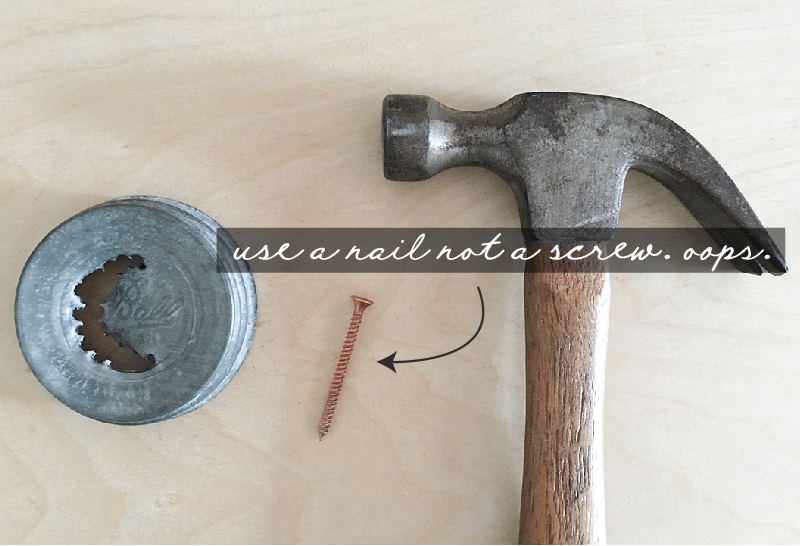
You can create the hole using a drill and hole saw bit, or with a nail and hammer. Basically, create one hole with the nail and hammer and then go around your outline, until you’ve made one large hole.
True confession, I used a screw when I did this a couple of years ago and it made my lid super sharp and jagged. Oops. Luckily you can’t tell once the shade rings are on, but ummmm yeah, I’d recommend using a nail. You can also use a metal file to smooth the edges when you’re done, but again no one will see or touch this since the shade rings will be on either of it.
You can then set your lid aside and we can move onto assembling the light, yay!
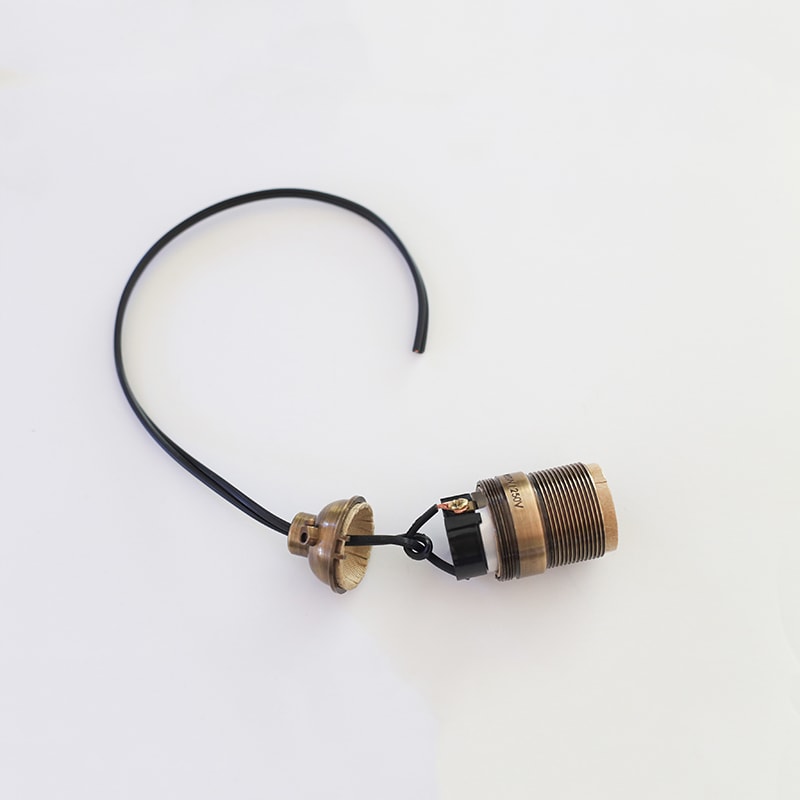
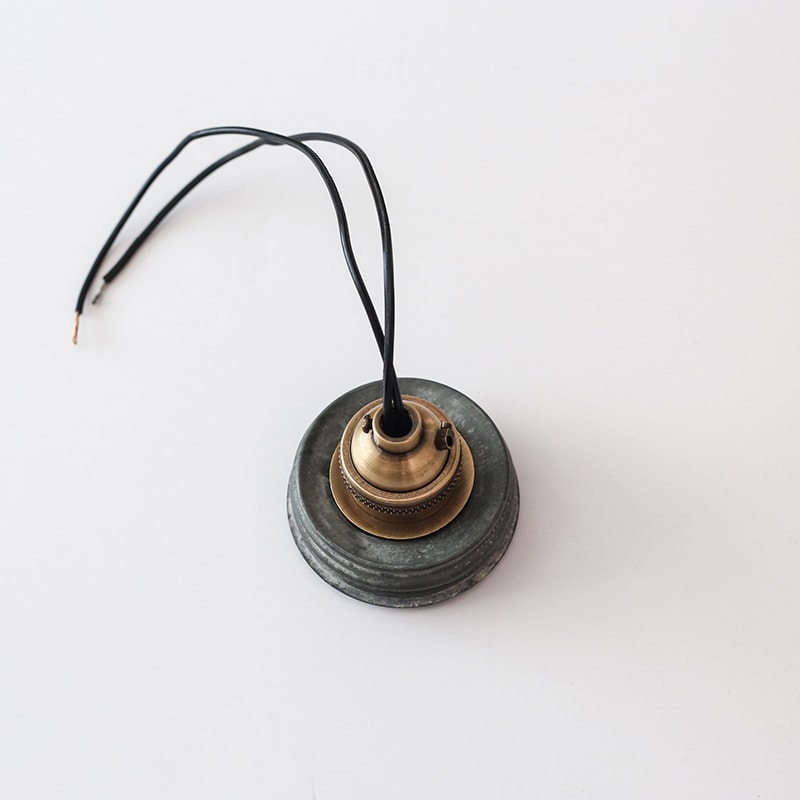
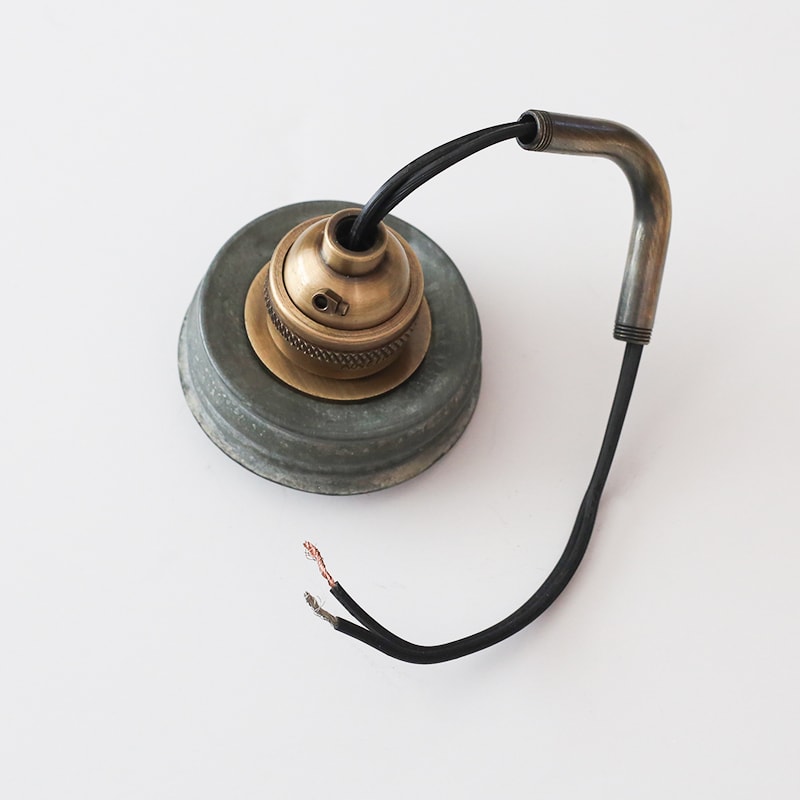
Step 3: Wire the socket
Now you’re going to wire your socket. You’ll want to cut a piece of lighting wire that will be long enough to thread through the fixture and connect to the wall. I always make sure it’s a little long at first because you can cut it later. We used leftover 18GA wire, but you may choose to use a different type of wire.
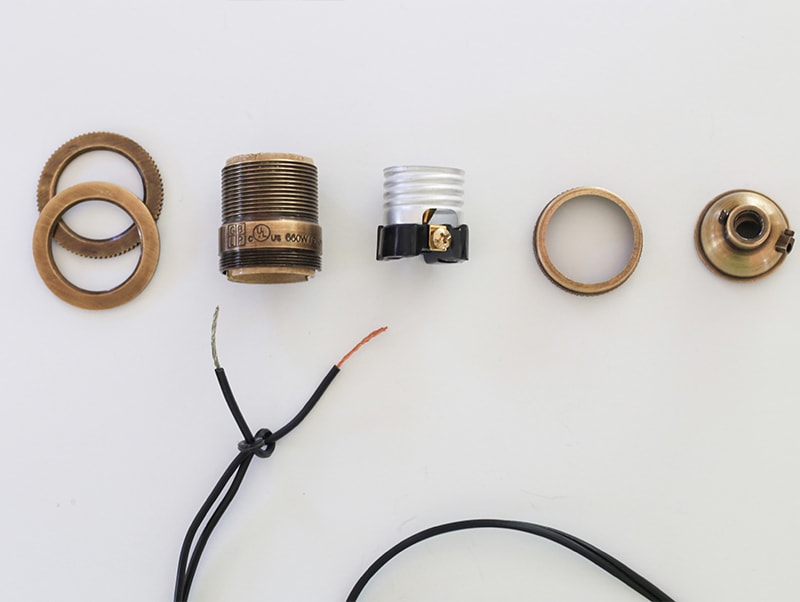
Make sure to determine which wire is hot and which is neutral. If they are not color-coded then the ridged wire will be neutral and the smooth wire will be hot. Take your wire strippers and strip about 1/2 inch from the ends. You’ll then take the socket apart by unscrewing all the pieces and then attach the hot wire to the brass screw and the neutral wire to the silver screw.
You can watch Eric do this in the video above or check out this awesome post for in-depth info on wiring a socket. This may seem complicated if you’ve never done it before, but you’ve got this!
Once everything is wired you can screw the socket back together.
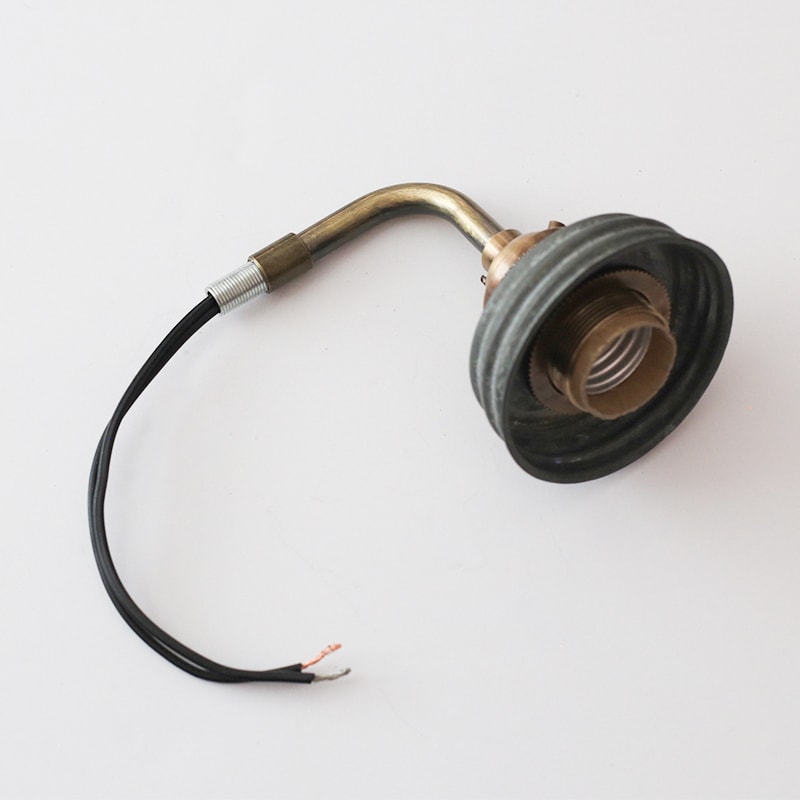
Step 4. Attach the mason jar lid
Now you’ll want to take your mason jar lid and place it on top of the smooth shade ring and then screw the knurled (ridged) shade ring on top. Your lid will basically be sandwiched between both shade rings at this point.
Step 5. Attach the Bent Arm
Next, you’ll take your 2-inch male bent arm, thread it through the wire and screw it into the socket. If you’re having issues screwing it in you can use a screwdriver to loosen the screw on the socket, then tighten it back afterward.
 Step 6. Attach the Coupling
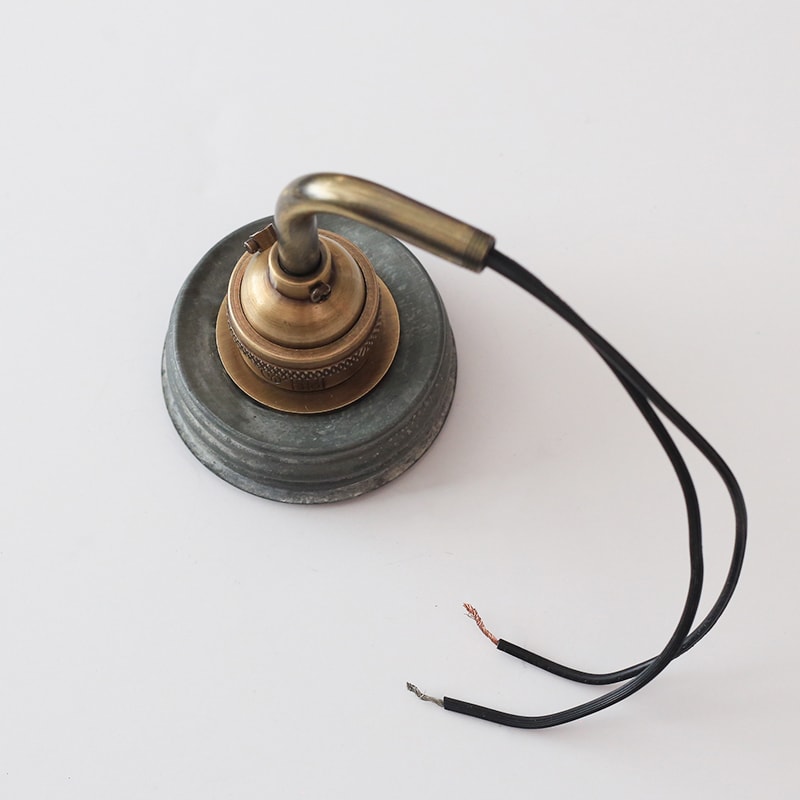 Step 6. Attach the Coupling
Next, you’ll take your 1/2 inch female straight coupling, thread it onto the wire and screw it into the bent arm.
We recommend not overtightening at this point because it can be a pain to unscrew parts sometimes. I’ve found it’s better to screw it in and have it secure, but go back and tighten everything once you know the fixture is done and good to go.
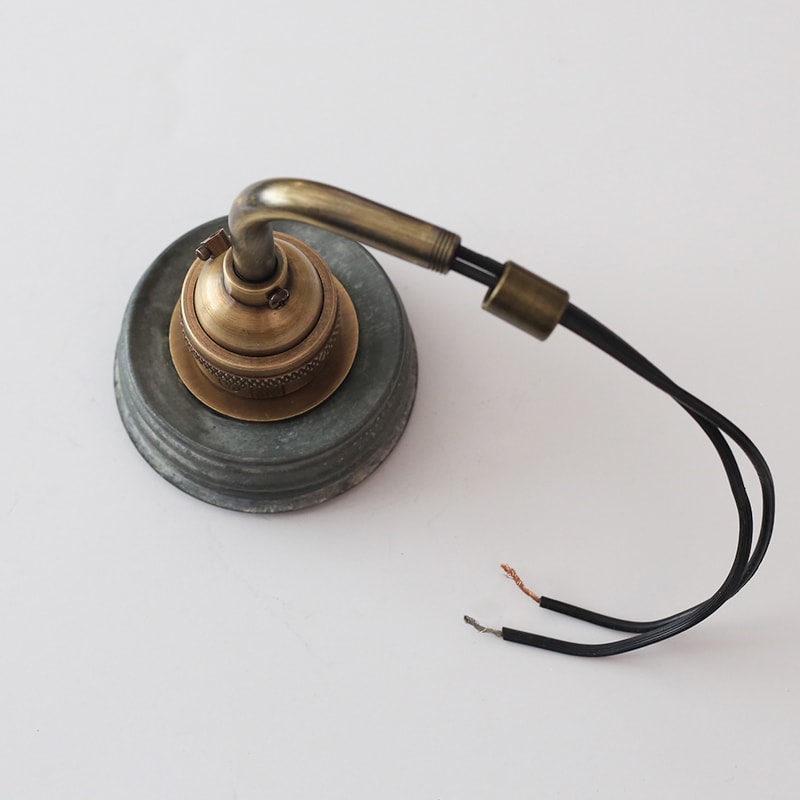

Step 7. Attach the Threaded Hollow Nipple
Next, you’ll take your 1-inch hollow nipple, thread it onto the wire and screw it into the coupling.
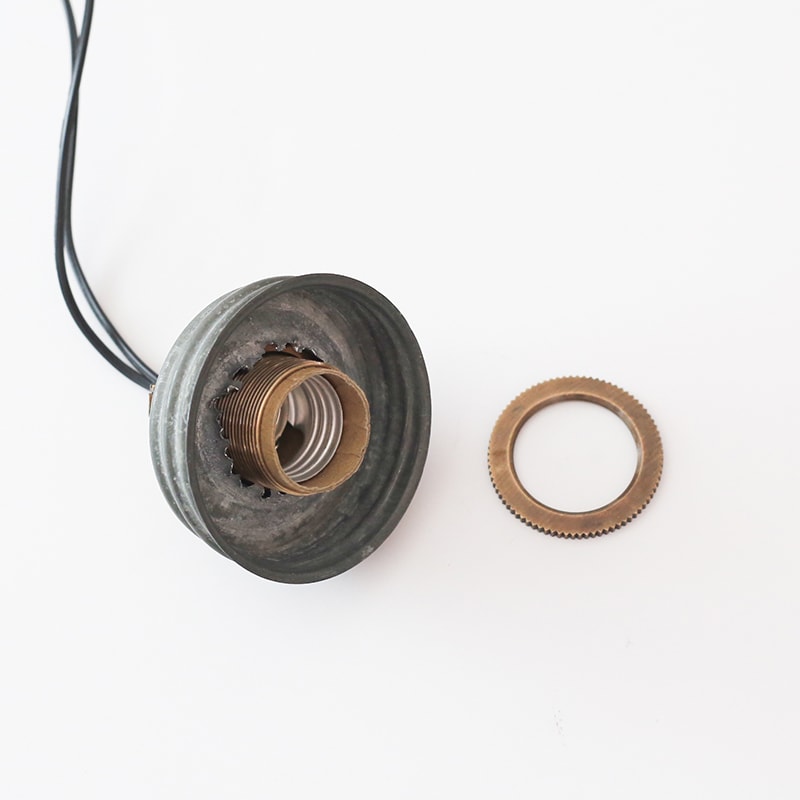
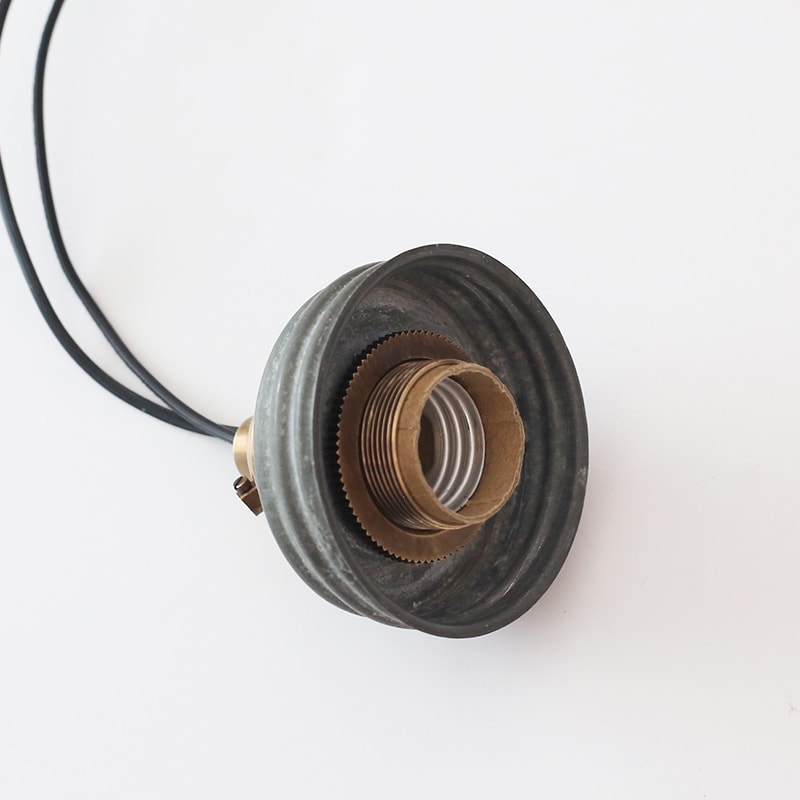
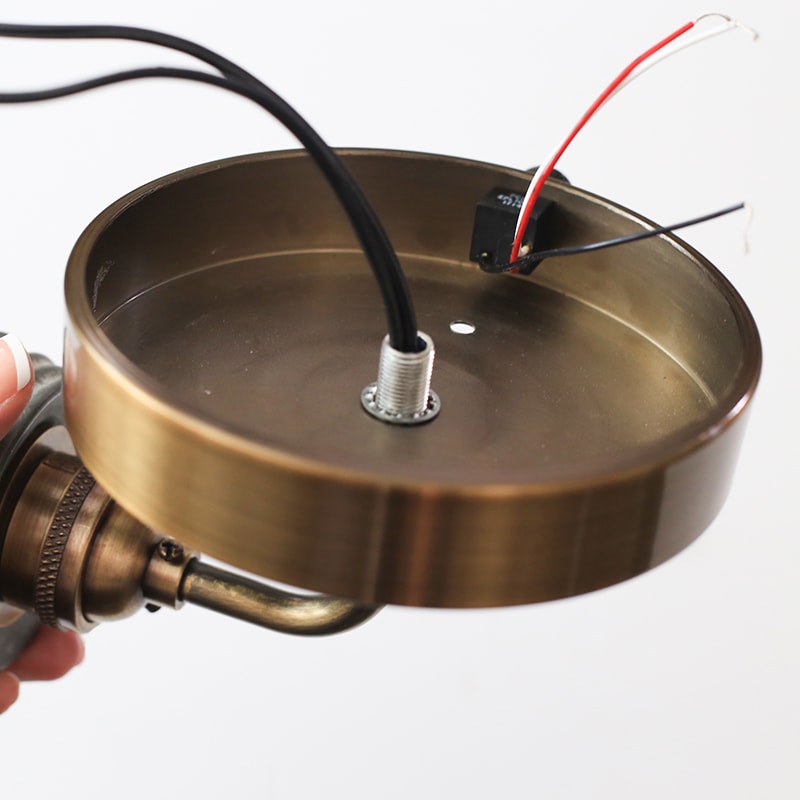
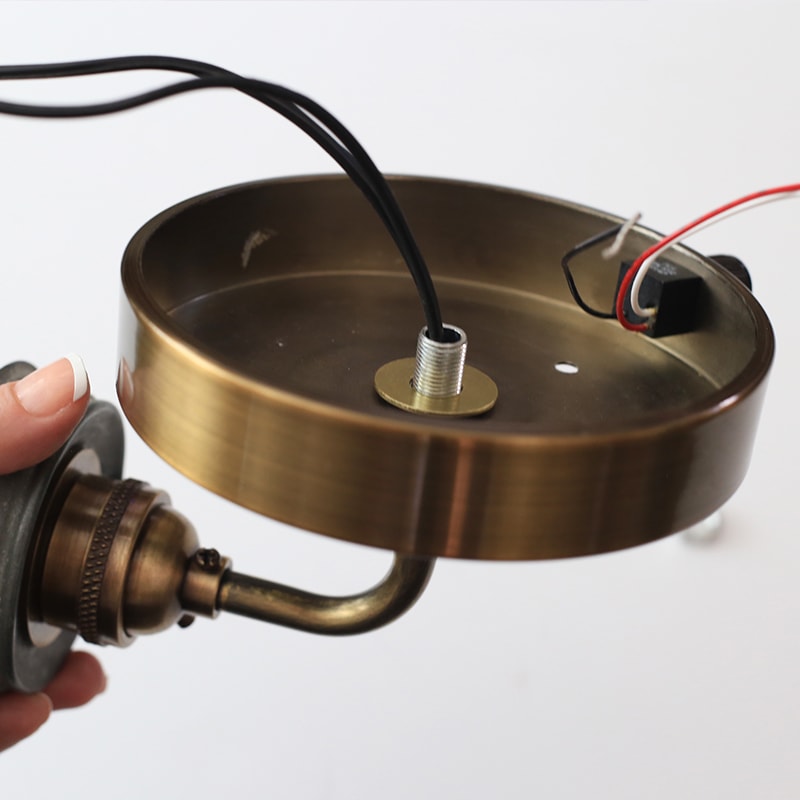
Step 8. Attach the Canopy
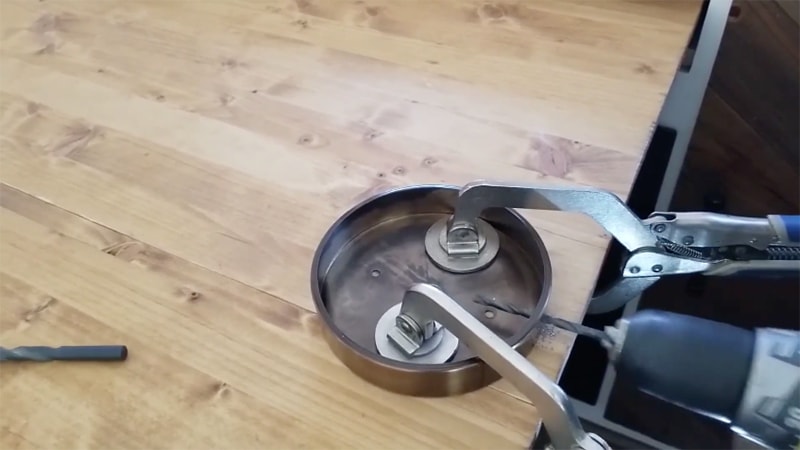
To attach your canopy you’ll thread the canopy through the wire and over the hollow nipple.
You’ll then take the star lock washer and slide it over the hollow nipple, followed by the washer, and finally the hex nut. These are all parts that come in most crossbar sets, but you can also purchase them individually.
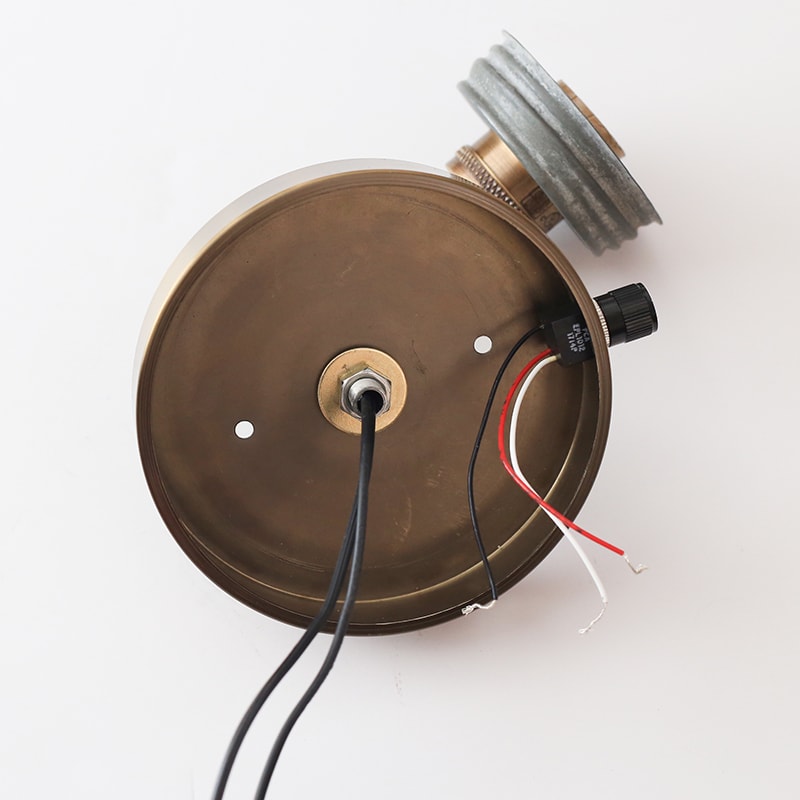
Step 9. Tighten
At this point, you can make sure everything looks good, then go back and start tightening all of the connections. You may want to use a wrench to tighten the hex nut on the underside of the canopy, we just don’t recommend using a wrench or pliers to tighten any areas you’ll see as they could scratch the finish.
Your light fixture is built, woo-hoo! Now all you gotta do is connect the wires and install it – just as you would with any light fixture.
Step 10. Connect Wires
If you added a dimmer or toggle switch you can follow the instructions to connect the wires to your lighting wire and then connect it with those coming from your wall.Make sure you know which wires are hot and neutral for both the fixture and the wires in the home or RV you’re installing them to!
If you’re unsure about how to connect or install your fixture, be sure to consult an electrician!

Step 11: Install, then add bulb and mason jar!
You can install the light using your crossbar, the bolts/studs it came with and acorn nuts. Be sure to turn off your electricity before installing to avoid shocking yourself or blowing a fuse. You can always use a voltage tester to check what wires are hot or to make sure the electricity is off.
We generally connect the wires before install, then screw in the bulb, turn on the electricity and make sure everything works. This way if it’s not working for some reason we can make changes before it’s installed. If everything looks good we go ahead and turn the power back off and finish the install.
We did have to use some additional screws to attach our fixture to the walls of our RV, but you may or may not need any.
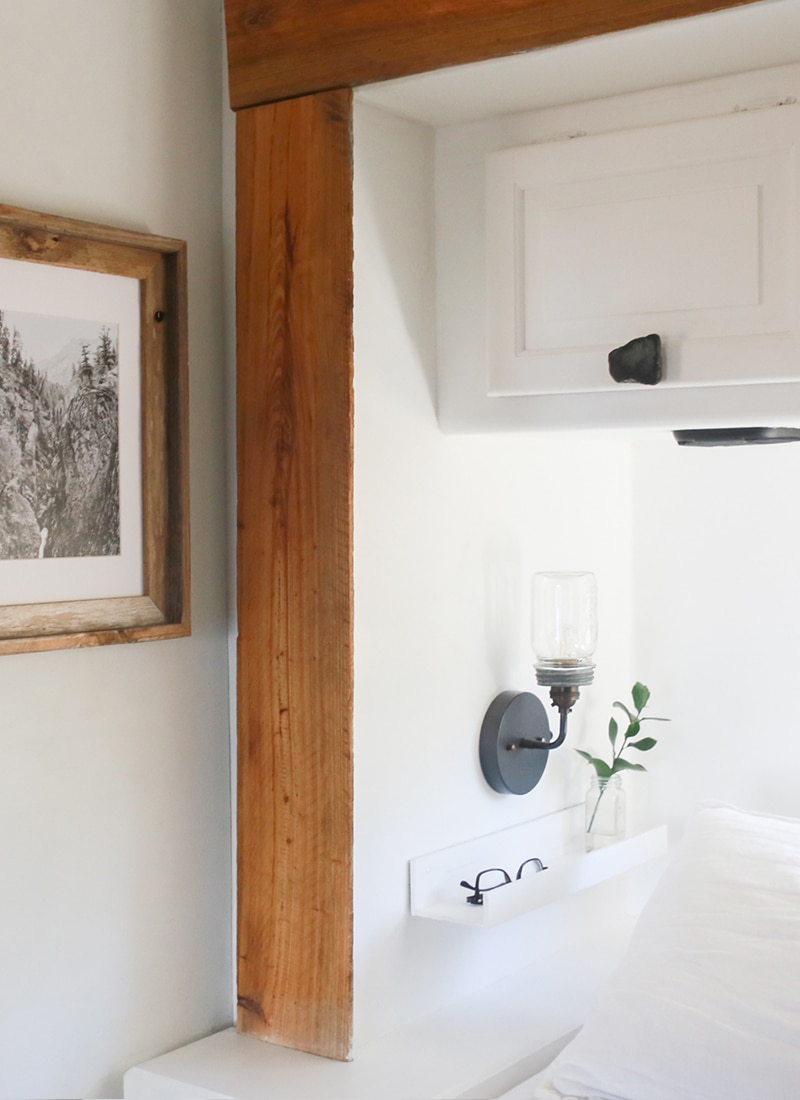
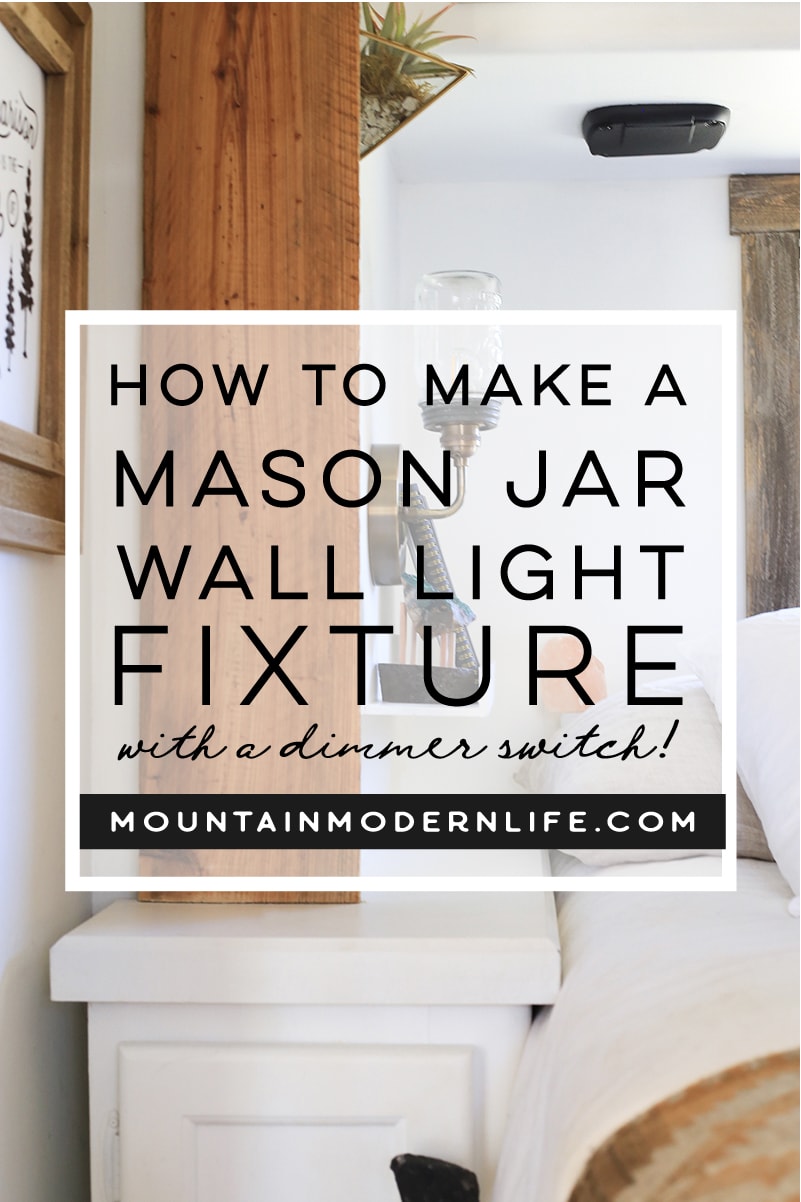
Anyway, that’s it! Here’s our mason jar light fixture installed in our RV bedroom and we LOVE having a dimmer!
Updated Photo:
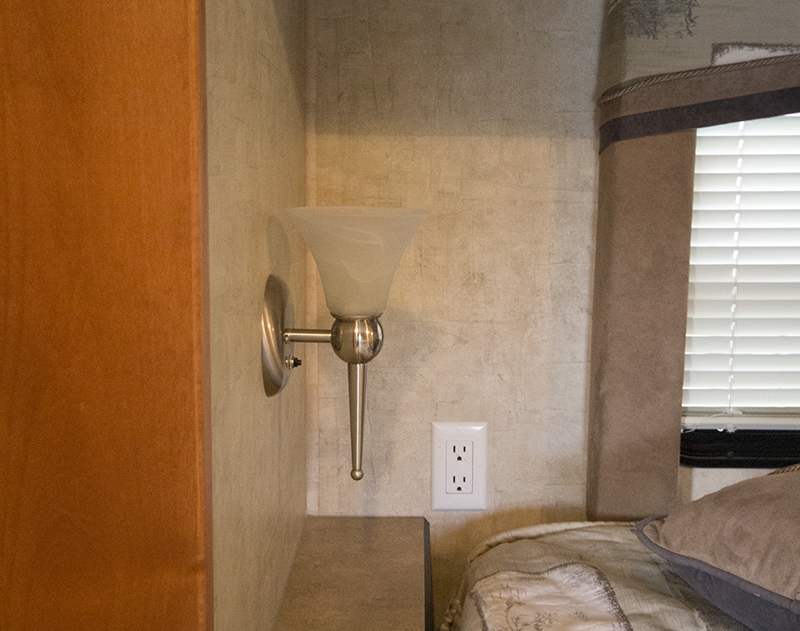
We did end up using a Patina Solution we had previously picked up from Rockler to darken the brass, which I think works soooo much better in our bedroom. If you use something similar just be sure to follow the directions. You’ll want to do this process before making the light fixture – and it only works on unfinished brass – which is why some of our pieces didn’t darken up.
If you plan to spray paint your pieces before making the fixture, I recommend taping off the threads, otherwise, it can become a nightmare to take apart later if necessary (trust me, I learned this from experience with the first light fixtures I made, whoops!).
Related RV Lighting Videos:

Below are some additional lighting resources you may wanna check out:
Lamp Part Wiring Intro – Instructables
Wiring Sockets Detailed Directions – Instructables
How to Update RV Interior Lighting
How to Install LED Dome Lights in Your RV
We really hope this post and video were helpful, but if you have any questions or end up making your own lighting, be sure to tell us about it in the comments below!


I love these mason jar lights and I love the idea of making my own. Thank you for the tutorial! I have one question… what size mason jar did you use?
Thanks! I love how these turned out but this can easily be tweaked to fit different styles too. We used pint size jars 🙂