UPDATE: All new featured RV tours will be posted on my other website, Wanderful RV Interiors. Existing tours will slowly be moved to the new website, and anything already moved will automatically redirect.
Disclaimer: This post may contain affiliate links, meaning, if you click through and make a purchase we (or those featured in this post) may earn a commission at no additional cost to you. View our full-disclosure here.
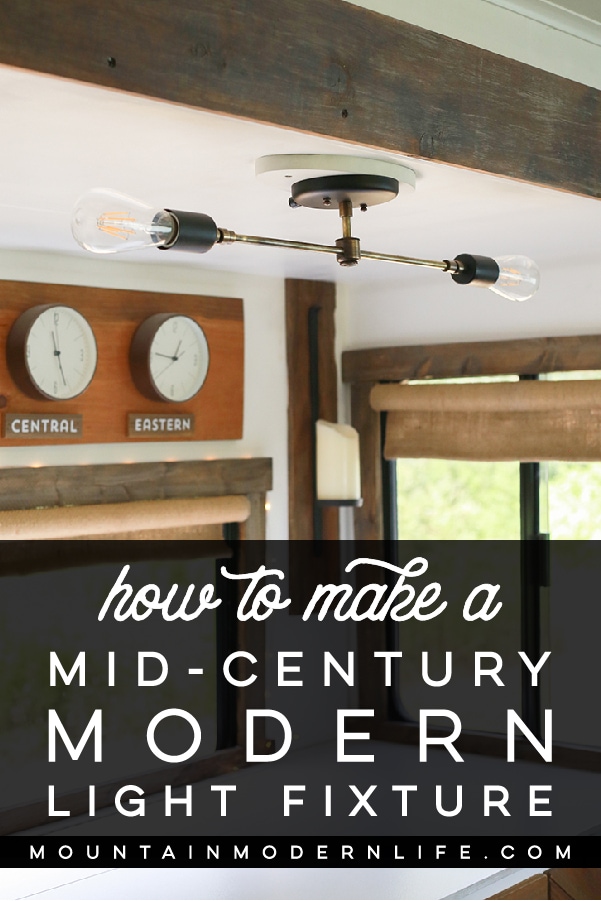
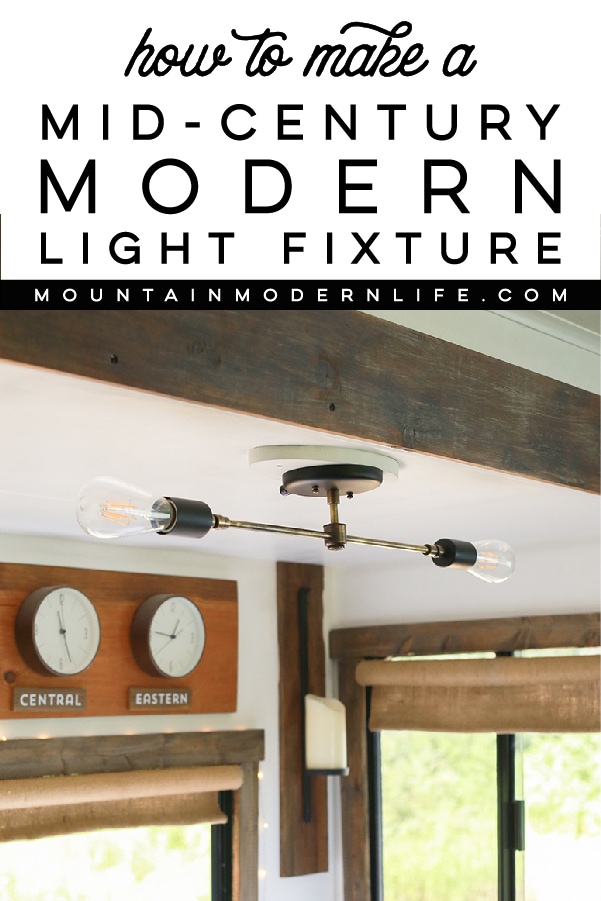
It’s only taken me 3 years, but I’m finally going to share a post on how we created the DIY light fixtures for our RV, woo-hoo!
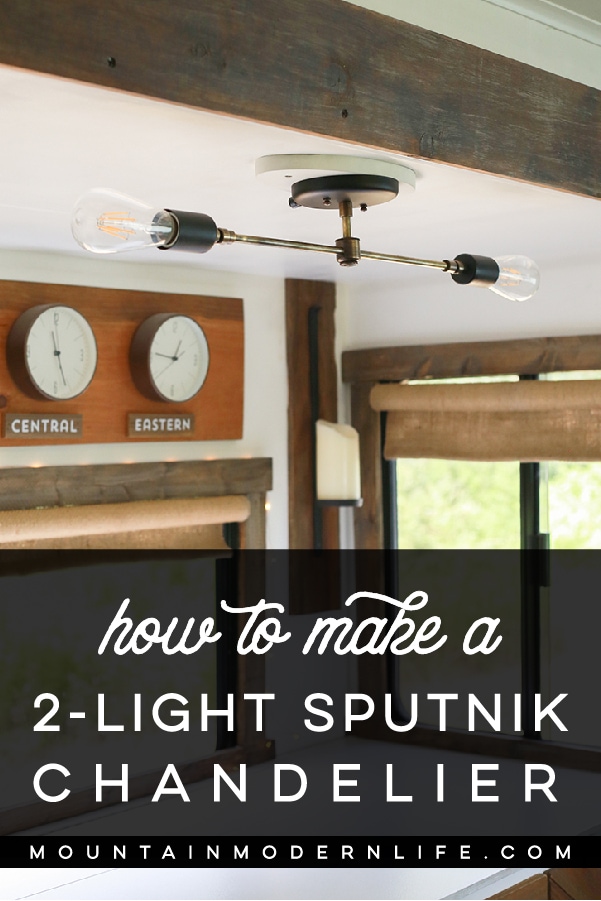
If you’re looking to make mid-century modern light fixtures, or more specifically a 2-light sputnik chandelier, then I hope this post will help guide you along the way, or at the very least give you some inspiration.
We recently shared a video showing how easy the process is, but the best part about making your own light fixtures, aside from saving money, is you can customize them however you want!
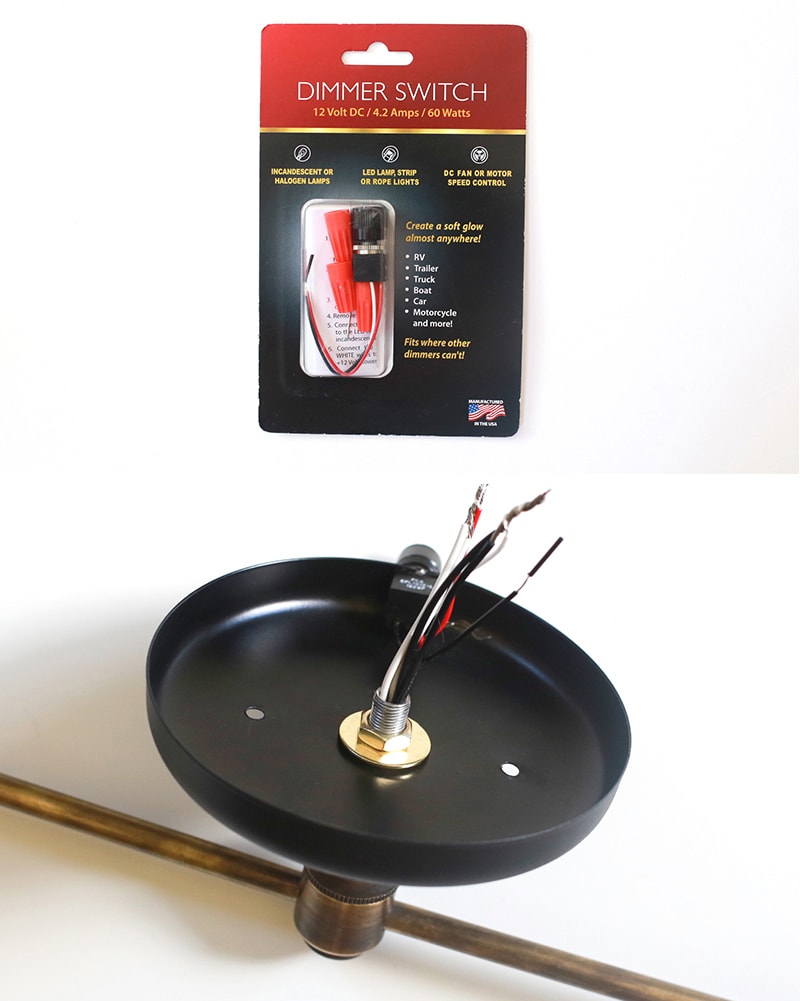
These light fixtures are technically made for sticks and bricks homes, but there’s an easy hack that makes them useable for an RV – simply make sure the lightbulb you are using matches the power supply.
We have an entire post dedicated to this topic you can check out here. Just know if you’re creating this in an RV with 12v power you’ll wanna use 12v LED light bulbs and a 12v dimmer. If you’re using this in a home or RV with 120v power you’ll wanna use 120 LED light bulbs and a 120v dimmer. (LED bulbs are optional but recommended).
Disclaimer: We’re not electricians and everything we’ve learned about light fixtures has either been found online or through experience. Please use your best judgment when dealing with electricity, or if you’re unsure of something please consult a licensed electrician.
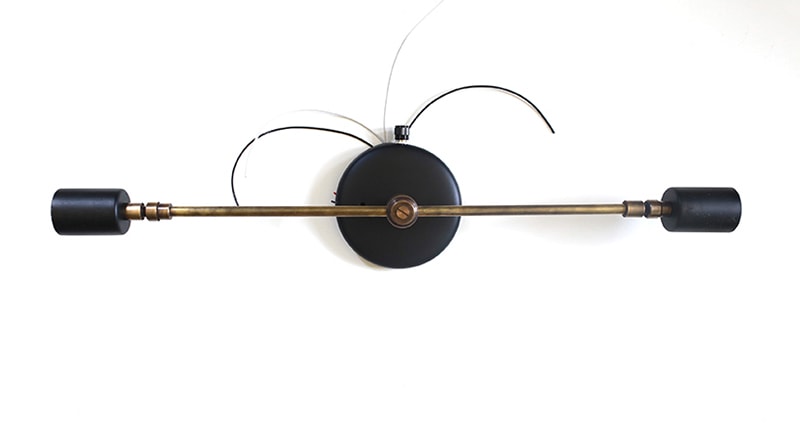
DIY 2-Light Sputnik Chandelier
During our RV renovation, we needed several light fixtures, but this was back in 2015 when it was more difficult or expensive to purchase the style of lighting I wanted. This is why we went the DIY route, and to be honest I’m so happy we did because Eric and I had a lot of fun making these.
With that said, it’s now much easier (and more affordable) to find similar lighting options, so you may wanna weigh the pros and cons, along with pricing, before deciding to DIY vs. buy light fixtures for your own home or RV.
I still think this can be an affordable option for creating high-quality, custom lighting, especially if you need several fixtures. Not to mention, it can be a fun, creative project!
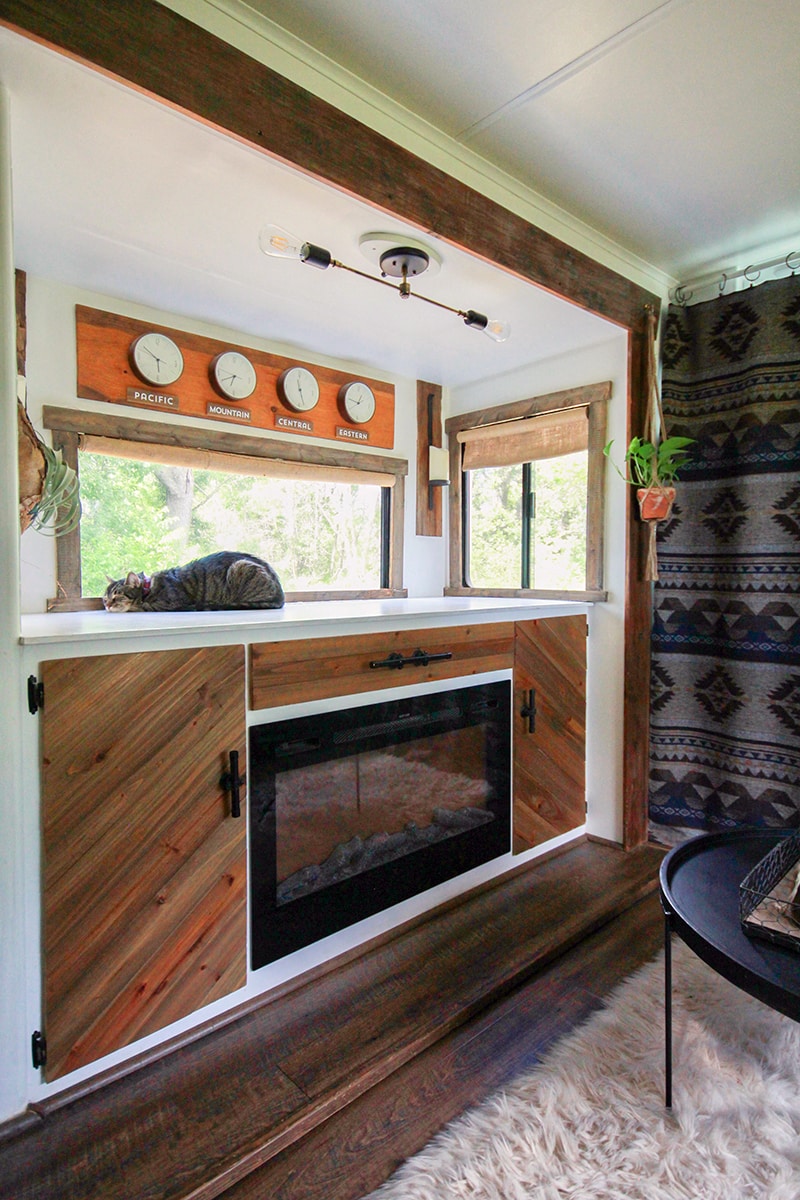
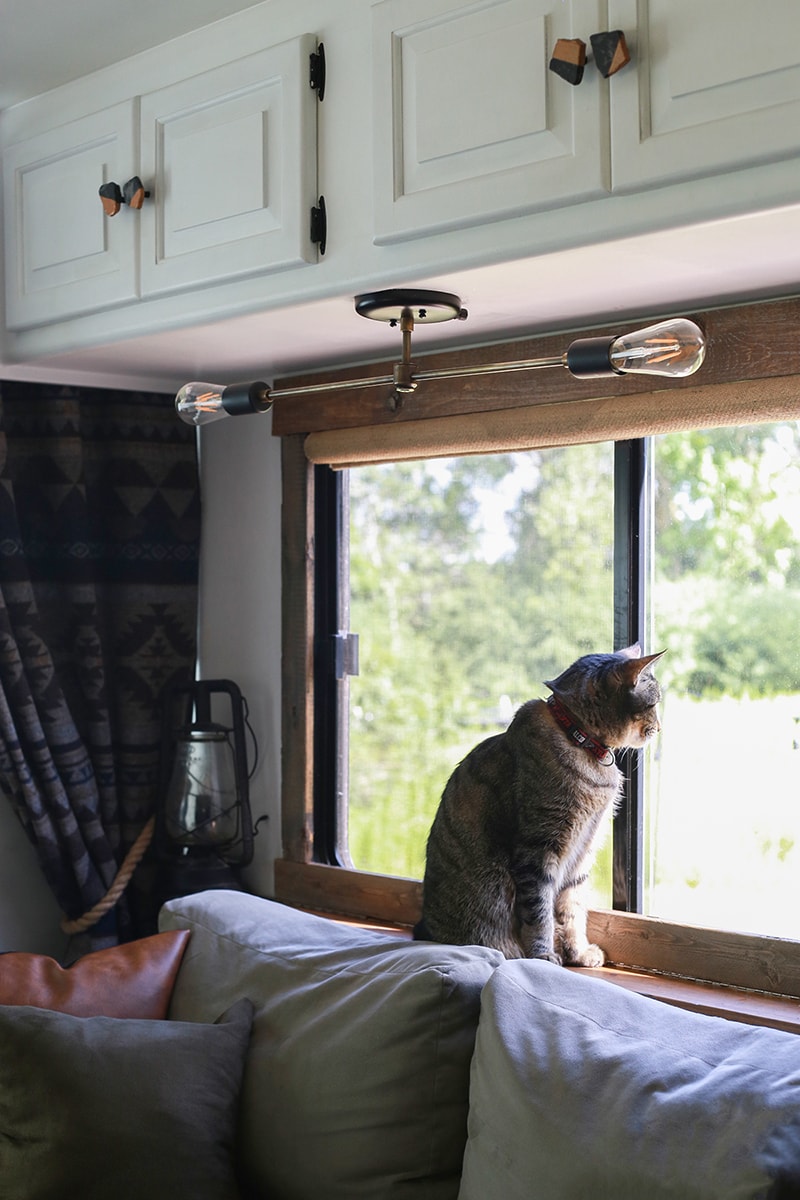
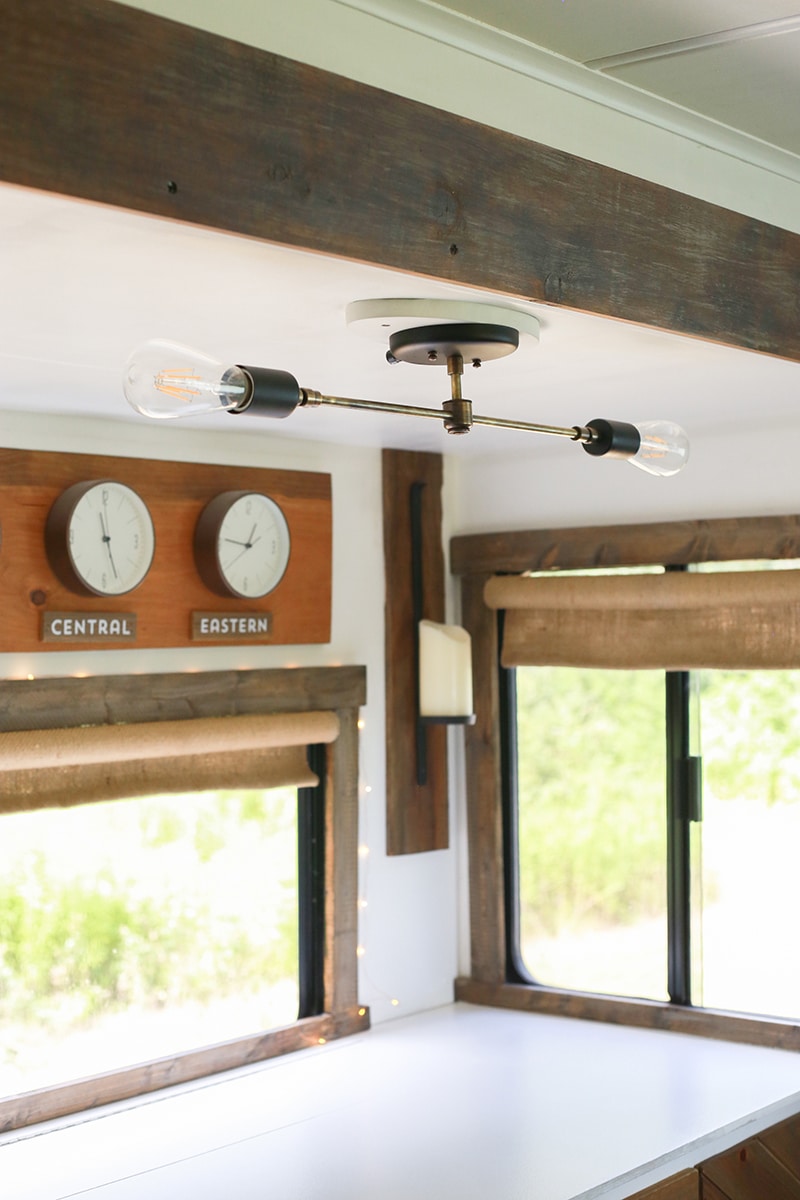
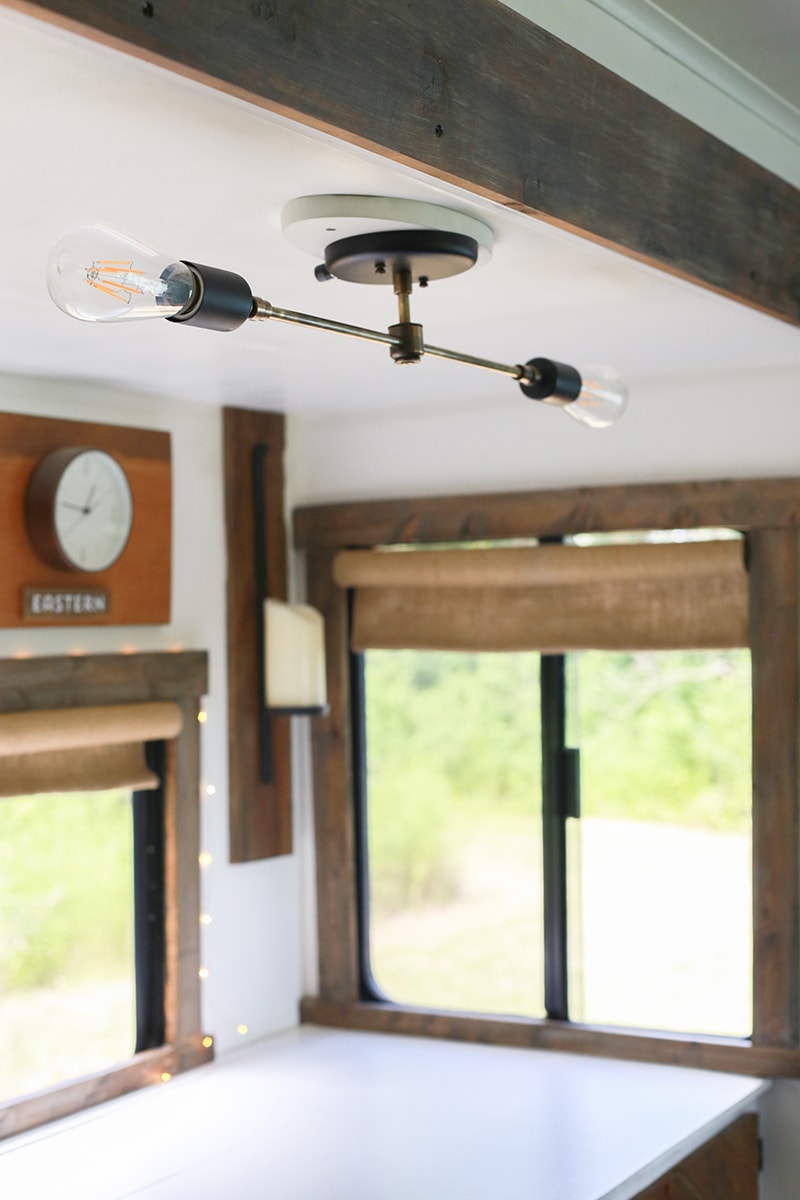
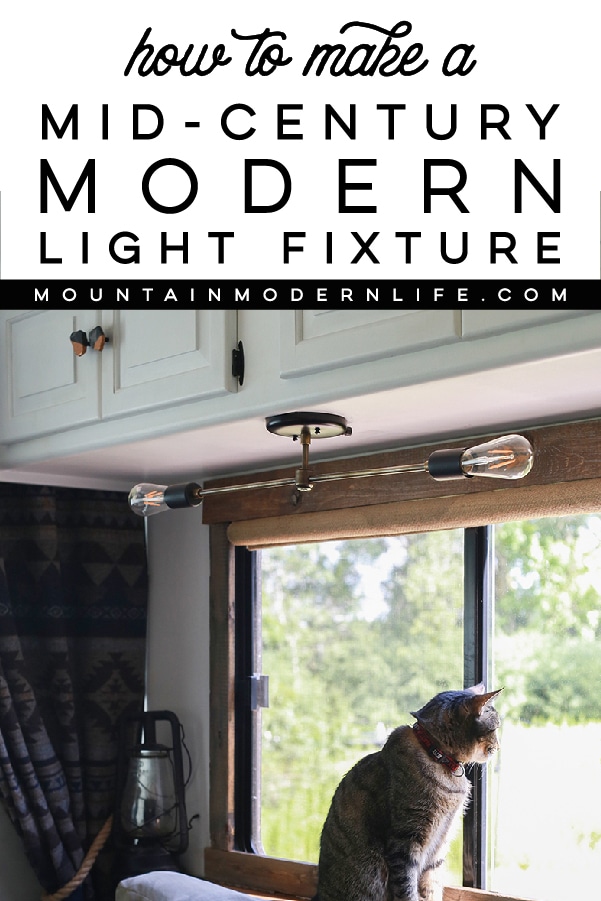
For this post, I’m going to be showing photos for how we created the light fixture above our media cabinet. This light fixture is nearly identical to the one above our sofa, except we used a modern swivel on each arm (they don’t really swivel so much but do add a tiny bit of length and I like how they look).

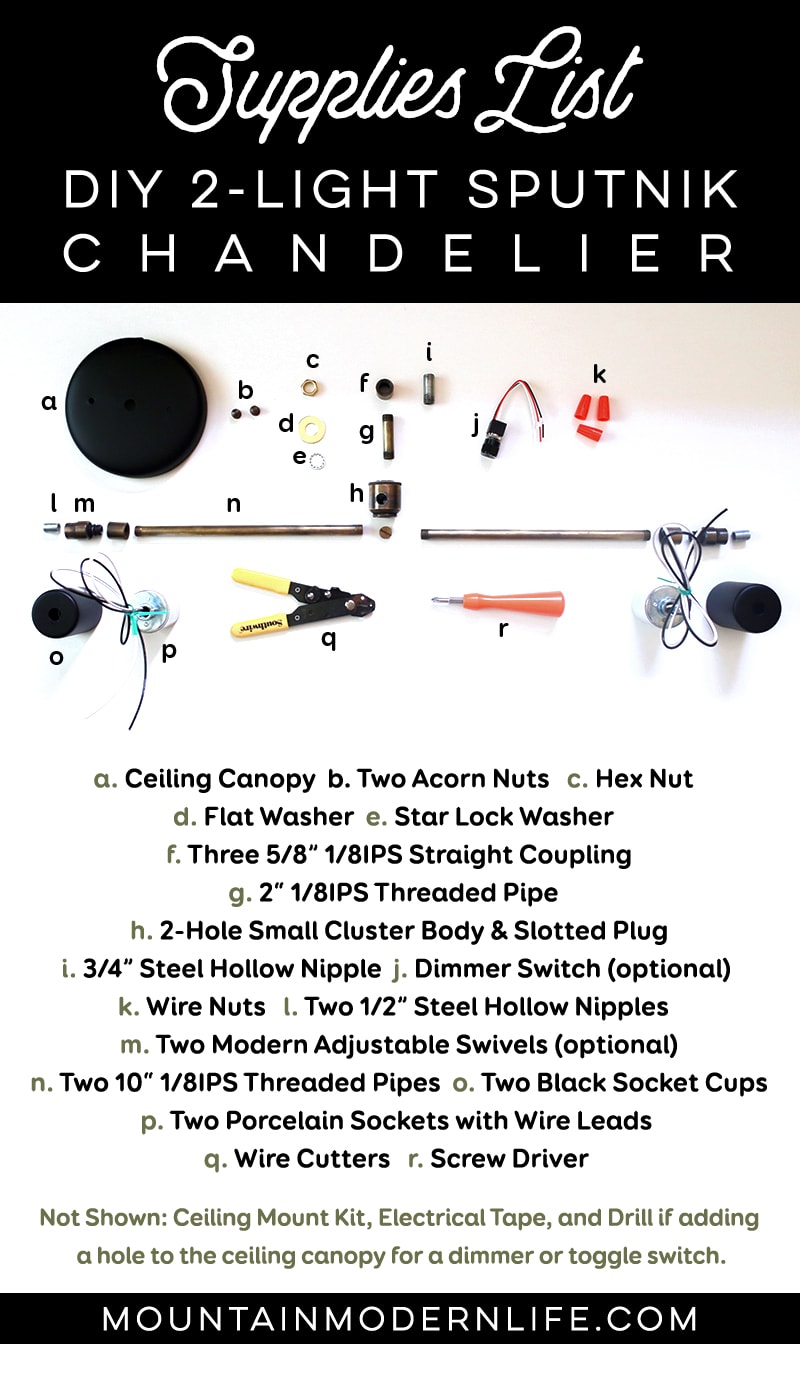
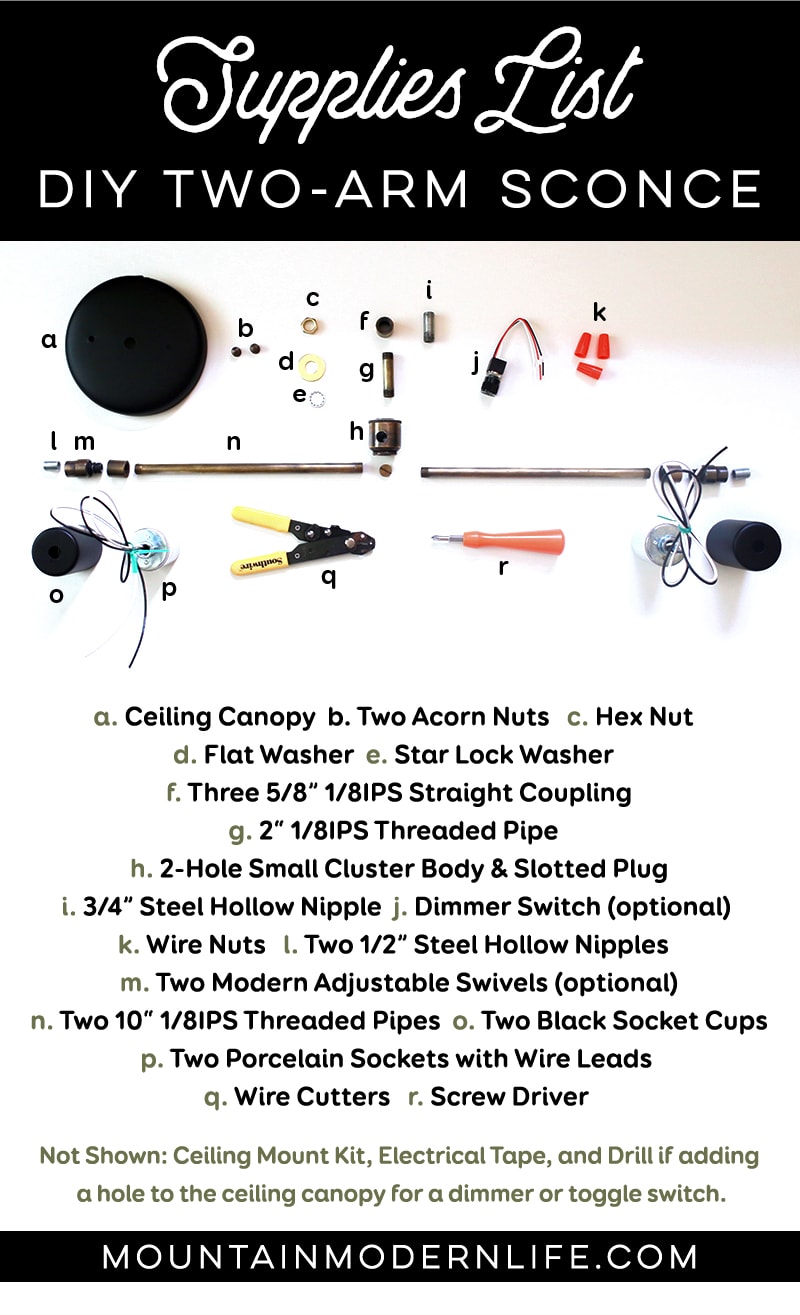
- Wire Cutters
- Screwdriver
- Electrical tape
- Wire Nuts
Optional:
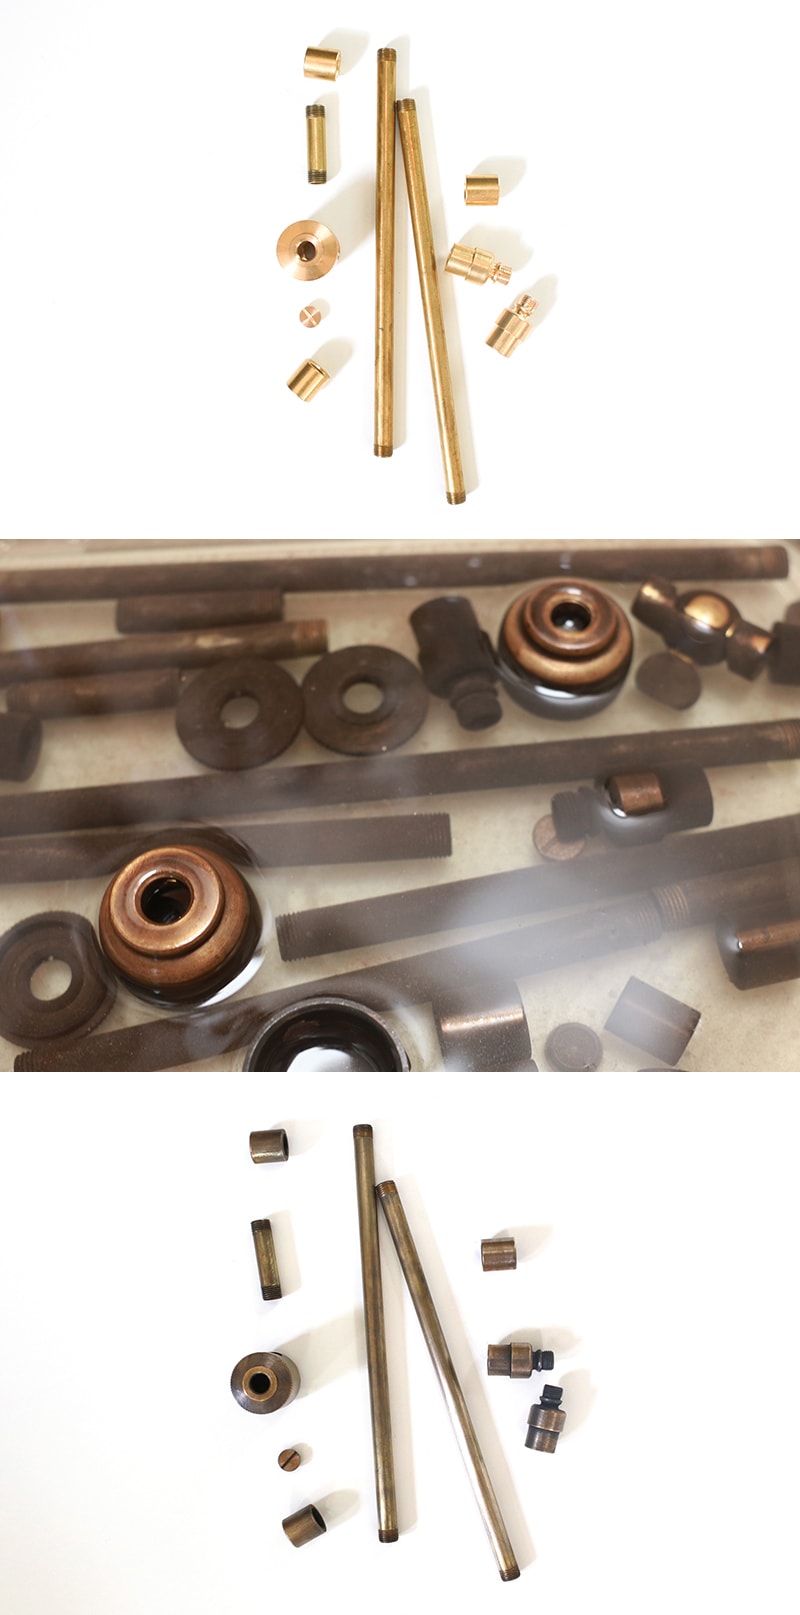
Brass Darkening Solution – This is if you want to add a patina to unfinished brass. If you go with this type of darkening solution be sure to follow the directions (it’s super easy) but you’ll also need baking soda, a clean cloth, a container, gloves, and 000 steel wool. Or you can look for antique brass parts or any other finish you want.
Drill/Drill Bits/Clamps – if drilling hole into the canopy for toggle or dimmer switch. You can watch the video we made for our DIY Mason Jar Lights if you want to see how we made a hole in the canopy for the dimmer switch.
Lighting Parts used:
- 12v LED Light Bulbs (if using in an RV with 12v lights, otherwise use a bulb that matches your power supply)
- Ceiling Canopy
- Ceiling Canopy Hardware Mounting Kit
- 12v Dimmer Switch (if using 12v)
- Two Porcelain Sockets with Wire Leads
- Two Black Socket Cups
- Two 1/2″ Steel Hollow Nipples
- 3/4 Inch Steel Hollow Nipple
- Three 5/8″ 1/8IPS Female Straight Coupling
- 2″ 1/8IPS Threaded Pipe
- Two 10″ 1/8IPS Threaded Pipes
- 2-Hole 1/8IPS Sided Small Cluster Body and Slotted Plug
- Two 1/8IPS Modern Adjustable Swivel (optional)
You can also purchase the ceiling canopy and mounting hardware individually:
Patina vs. Spray Paint (optional)
If you plan to give your pieces a patina or different finish you’ll want to do this before making the fixture. I spray painted the first light fixtures we made but forgot to tape off the threads so it was a nightmare to try and take them apart when I made a mistake. If you do want to use spray paint, just be sure to tape off the threads first. I did actually spray paint the black socket cups, but that’s because they aren’t threaded and the ones I purchased were glossy and I wanted them to be more of a matte color. They’ve held up great over the years, but I did also spray a clear coat on top.
We use a brass darkening solution for our brass light fixture pieces, which is super easy to use, and I definitely recommend going this route if you want an antique patina. Keep in mind, the pieces will need to be unfinished brass and not have any kind of lacquer finish on them for it to work.
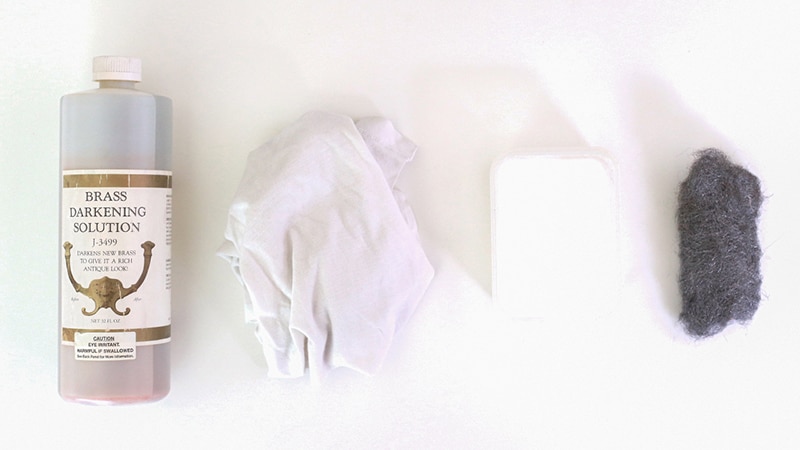
You’ll want to follow the directions on the solution you purchase, but we basically poured the liquid into a container, along with the lighting pieces, let it sit for about 5-10 minutes, then rinsed it with water. Afterward, we rinsed the pieces off again but with a mixture of baking soda and water to neutralize them, and then dried the pieces off with a cloth before using fine steel wool to bring out some of the highlights.
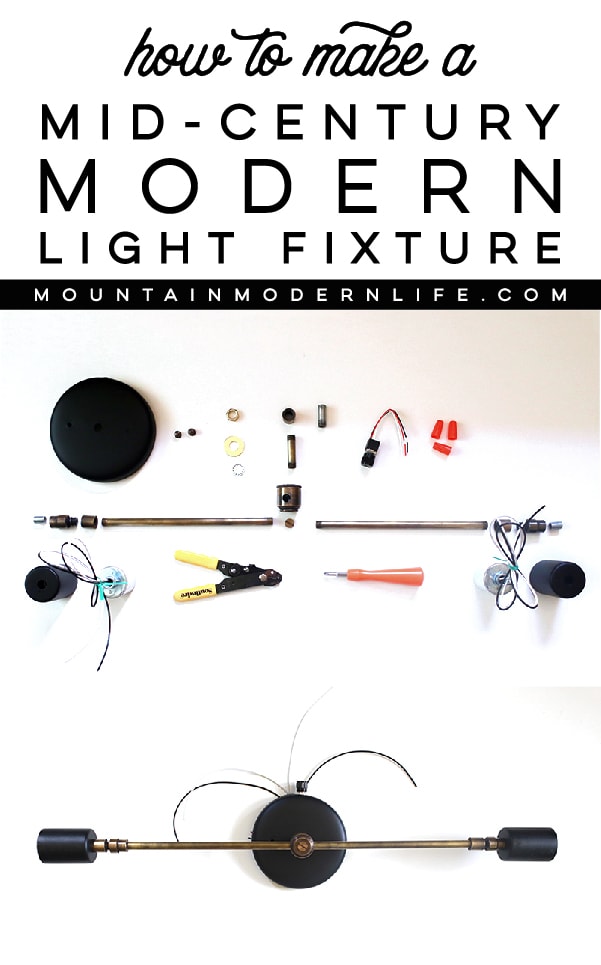
How to Make a 2-Light Sputnik Light Fixture
Now onto making the actual light fixture! I know these steps may look like a lot, but it actually goes pretty fast once you get the hang of it.
You’ve got this!
Keep in mind you can mix and match parts to create a custom fixture for your own space. You may need shorter or longer pipes, a different finish, more than two arms, arms that swivel, etc. Back when I ordered parts I purchased some random extras to mess around with, so remember to experiment and have fun.
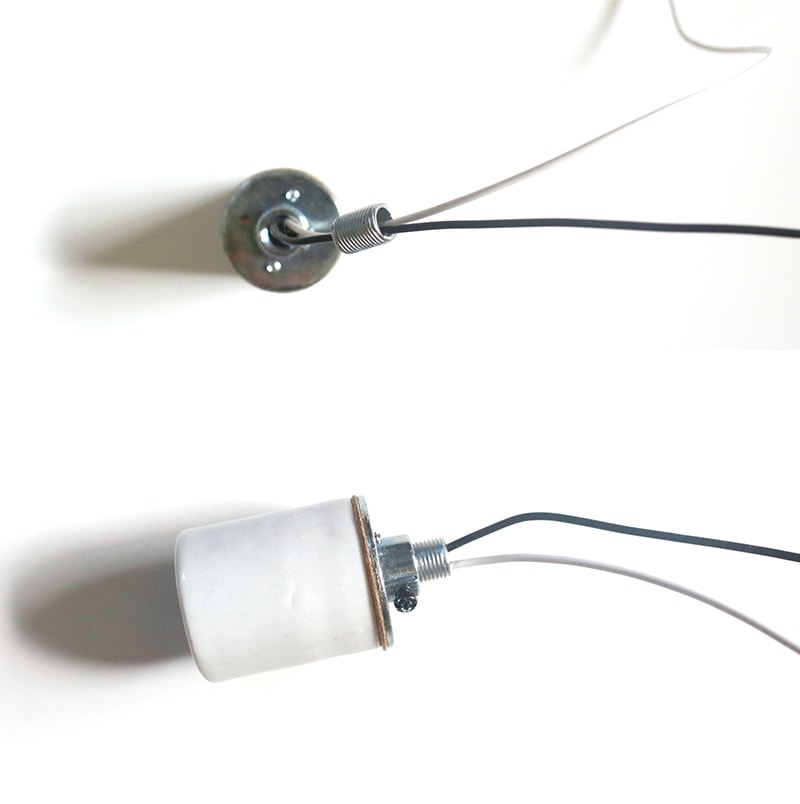
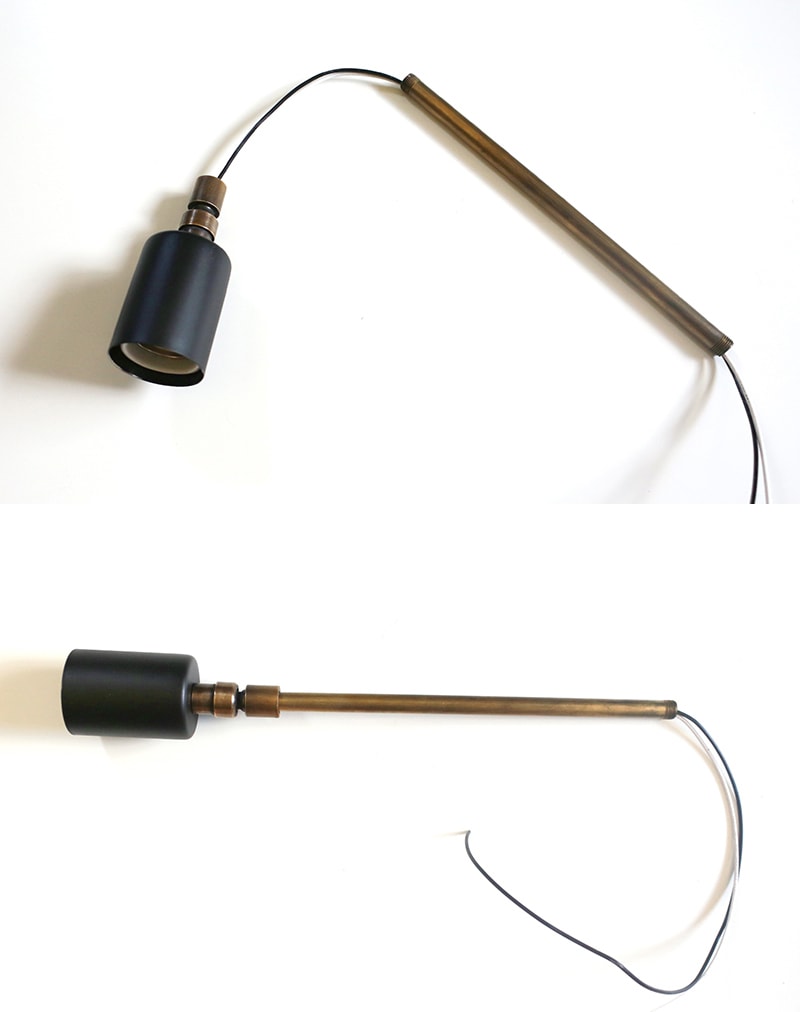
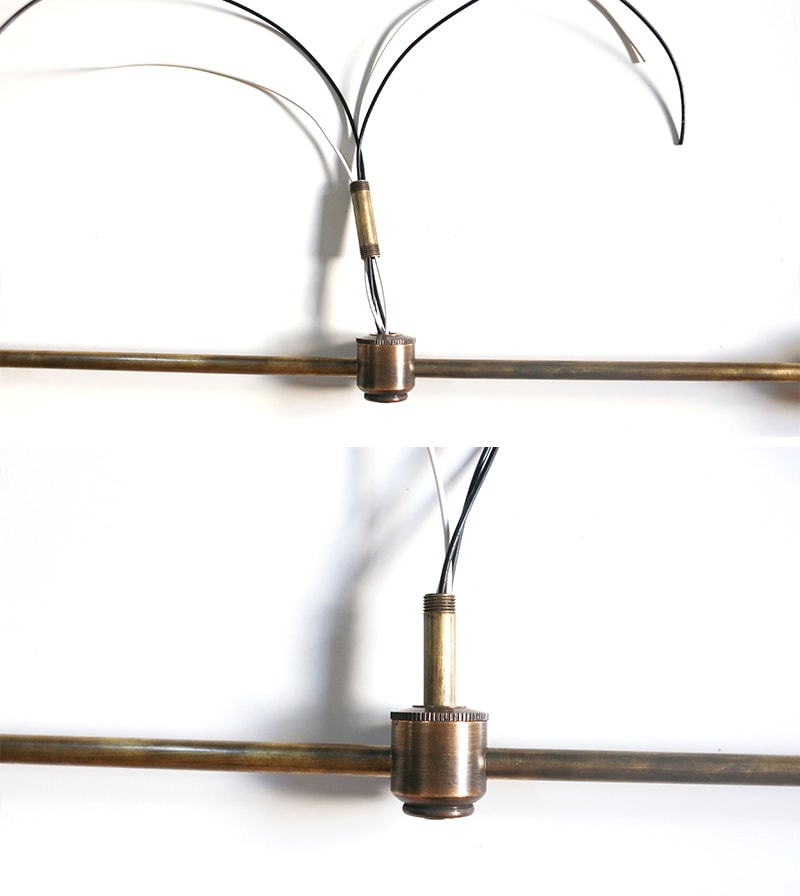
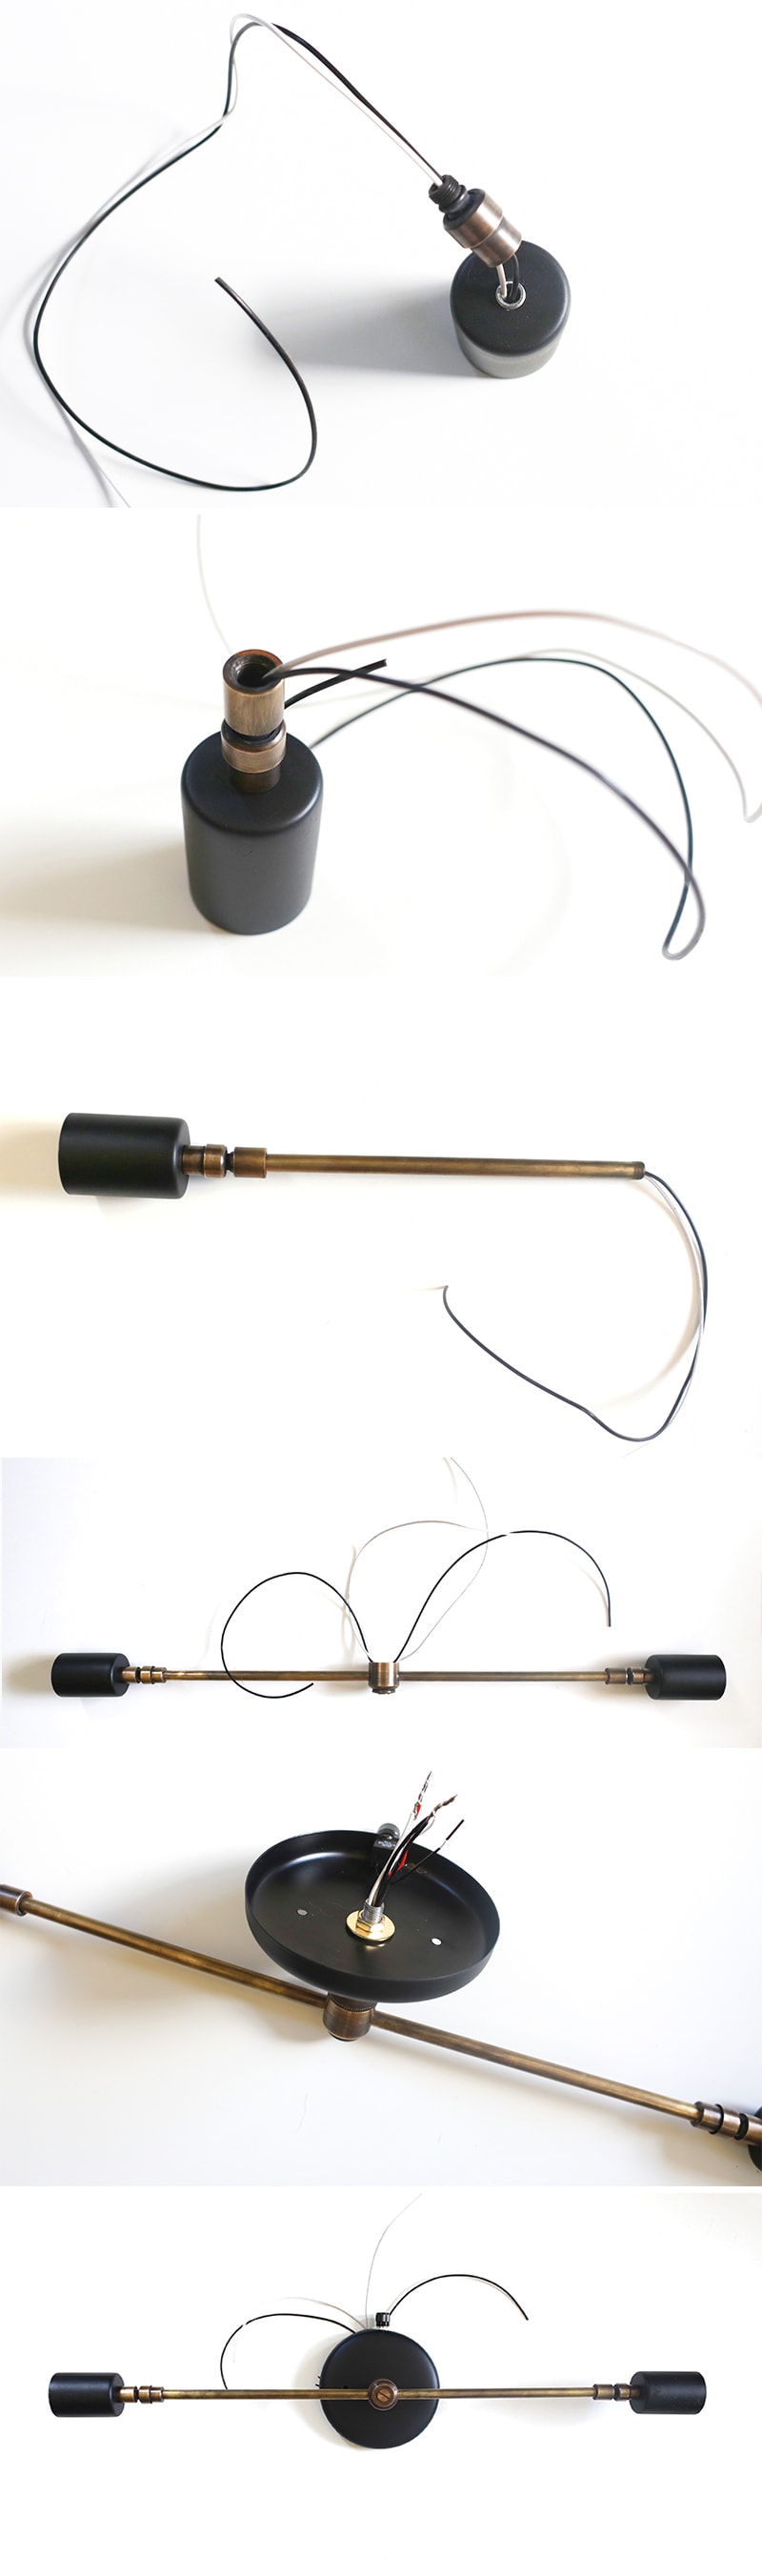
Step 1:
Thread a 1/2″ steel hollow nipple through one of the pre-wired porcelain sockets.You can tighten (or loosen) it with a screwdriver if you need to.
We used pe-wired porcelain sockets and these are awesome! Wiring your own sockets isn’t too difficult, and you can see how we did that over on this post. However, I really love that you can buy these pre-wired sockets because it’s one less step to worry about. Just make sure you don’t screw the hollow nipple past the back of the porcelain socket or it could accidentally strip the wires. We show this in the video after making that mistake ourselves, whoops. This is why we recommend using a 1/2 inch hollow nipple, but depending on your fixture, you may want to use a different size.
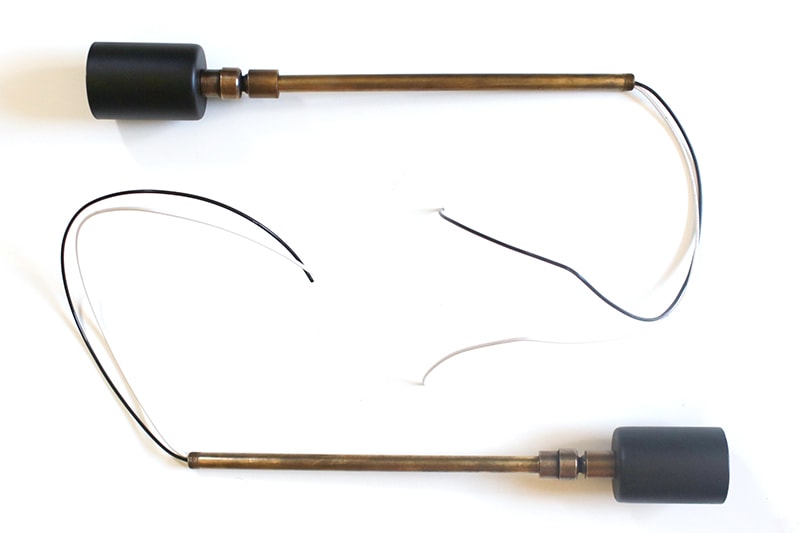
Step 2:
Thread the black socket cup through the wires.
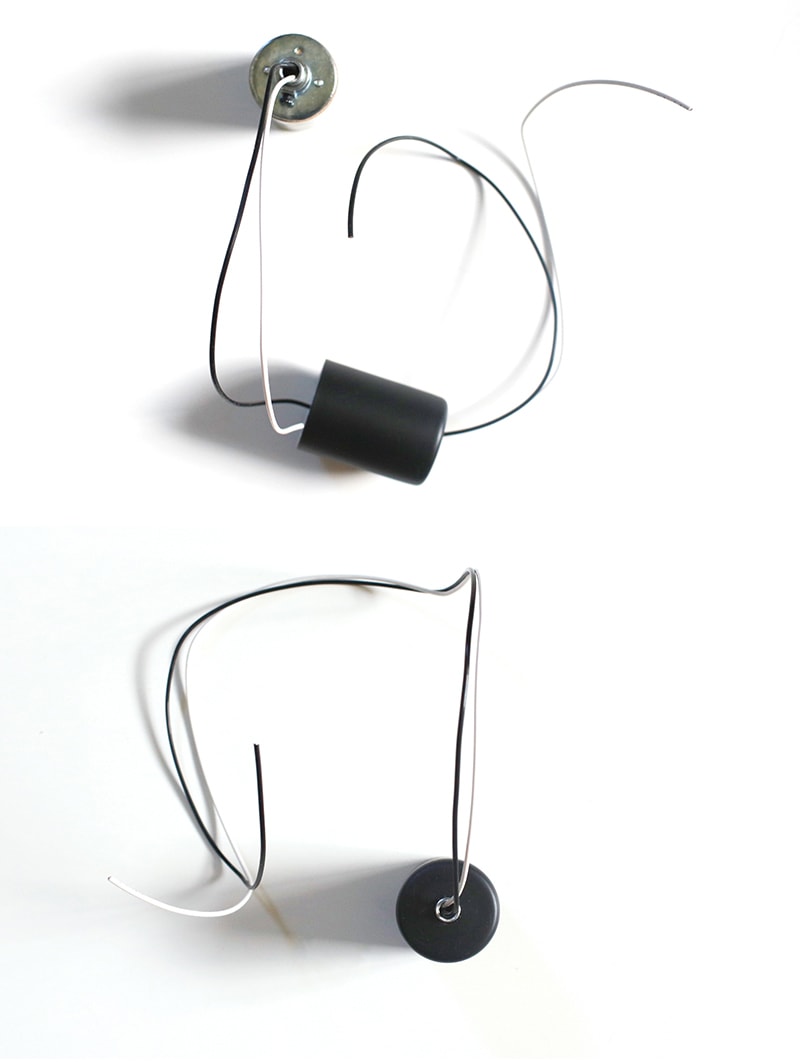
Step 3:
Thread the modern swivel onto the wires and then screw it onto the hollow nipple that should be sticking out through the black socket cup.
We didn’t add this piece to the fixture above our sofa, only to the fixture above our media cabinet so it’s optional. Or you can use a different type of swivel, like this one, which is what we used in the past before re-doing these light fixtures.
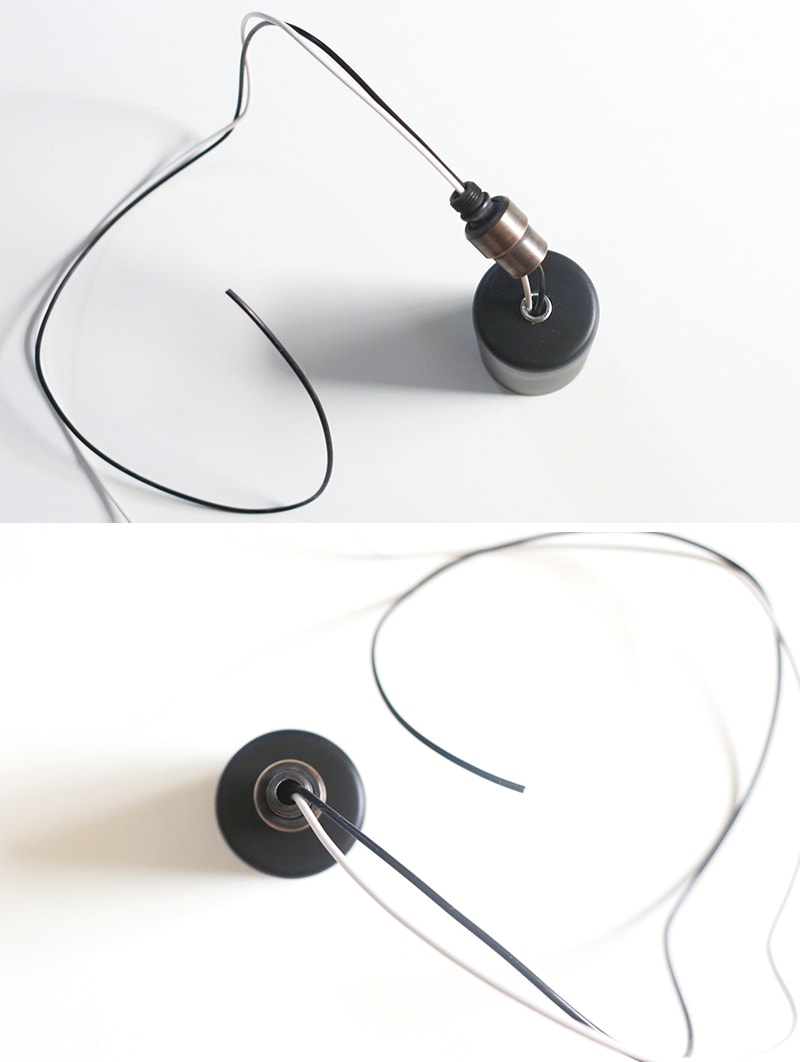
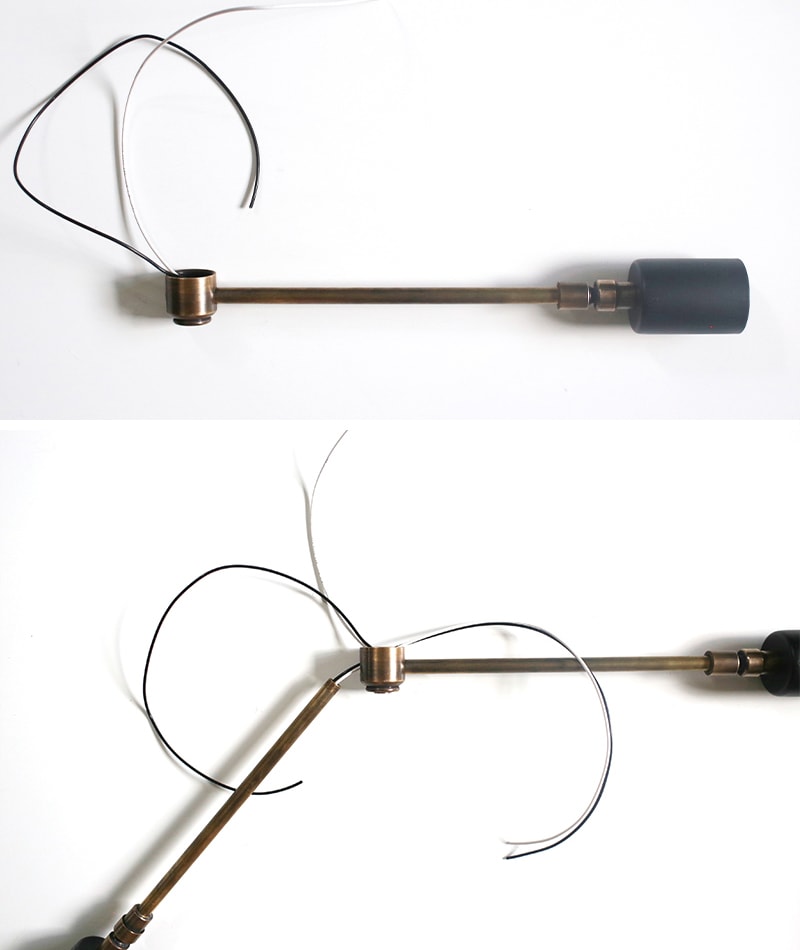
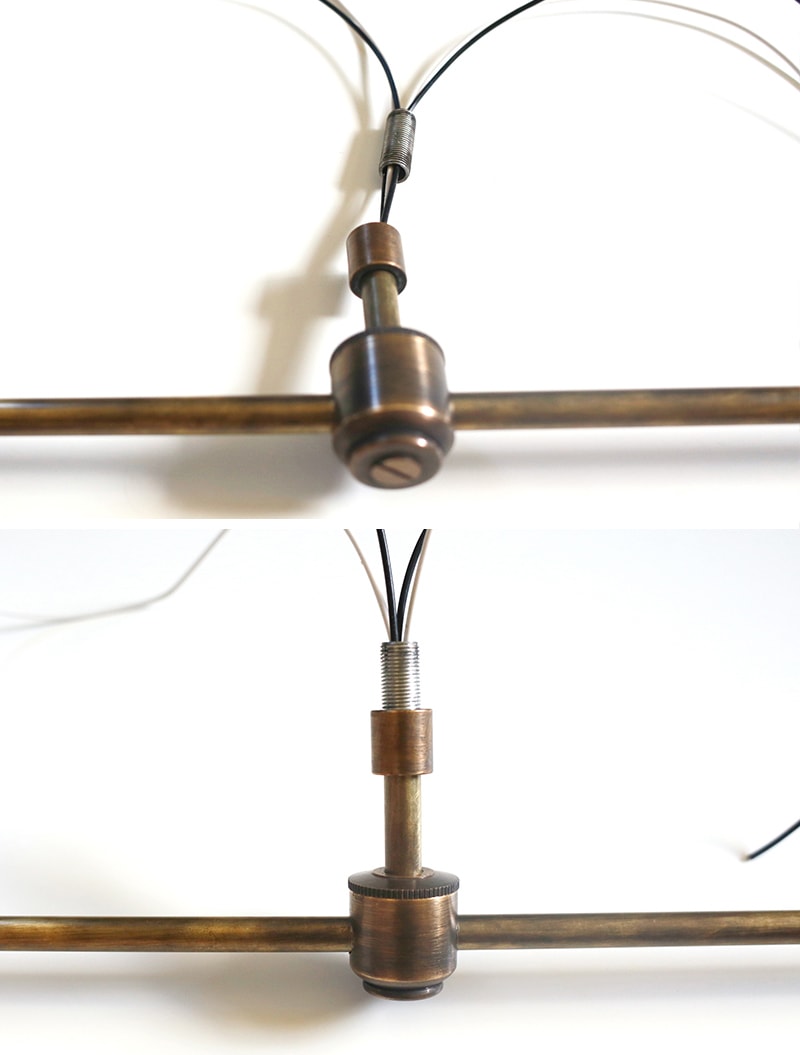
Step 4:
Thread the 5/8″ Female Straight Coupling through the wires and screw it onto the end of the modern swivel.
Step 5:
Thread the 10″ pipe through the wires and screw it into the coupling.
The first arm is finished, yay!
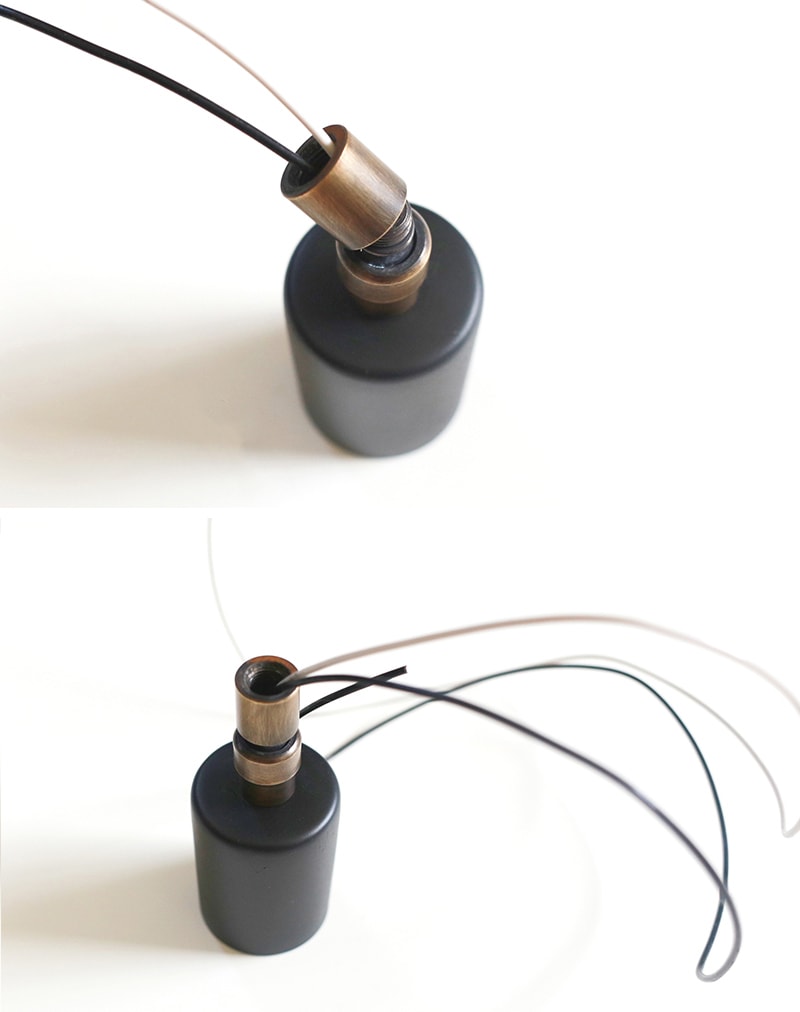
Step 6:
Repeat the steps above to create your second arm.
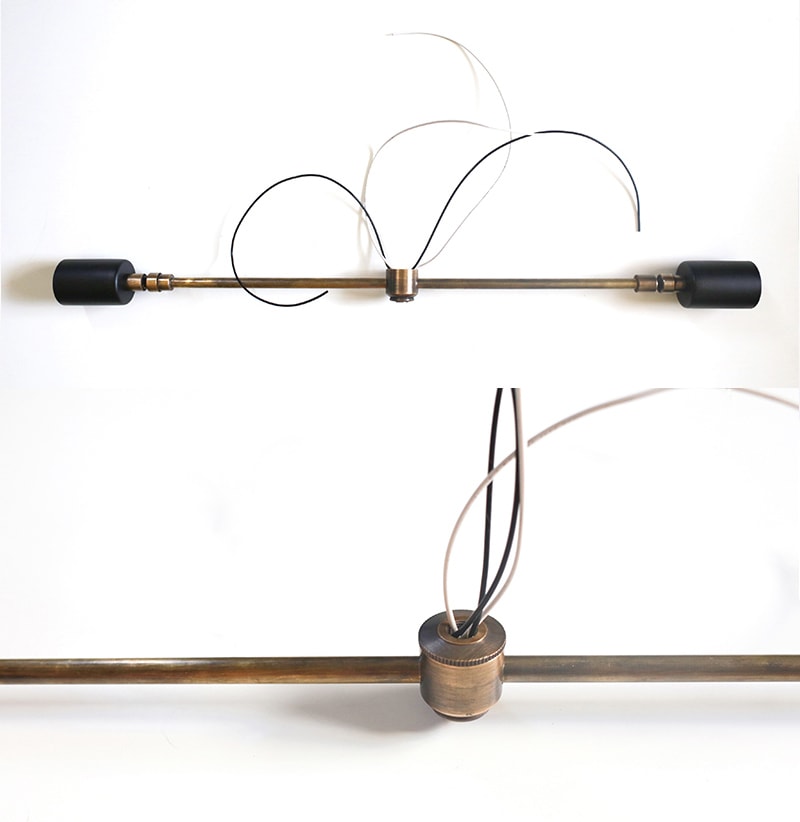
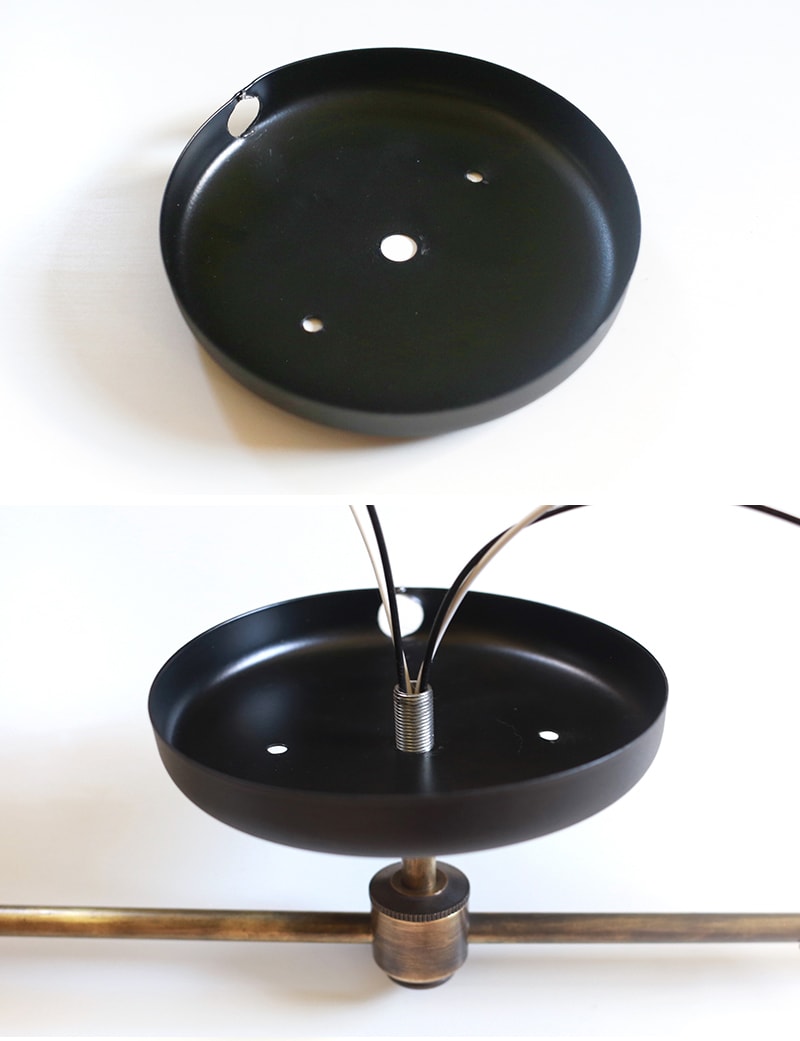
Step 7:
Plug the bottom of the 2-sided cluster body with the slotted plug. Then screw one of the finished arms into one of the side holes.

Step 8:
Screw the second arm into the other side of the cluster body.
Step 9:
Slide the lid of the cluster body through the wires and screw it in place. When you’re finished, all of the wires should be coming out through the top.
Step 10:
Thread the 2″ pipe through the wires and screw it into the lid of the body cluster. This is the pipe that comes down from the ceiling canopy so you may want a smaller or larger size.
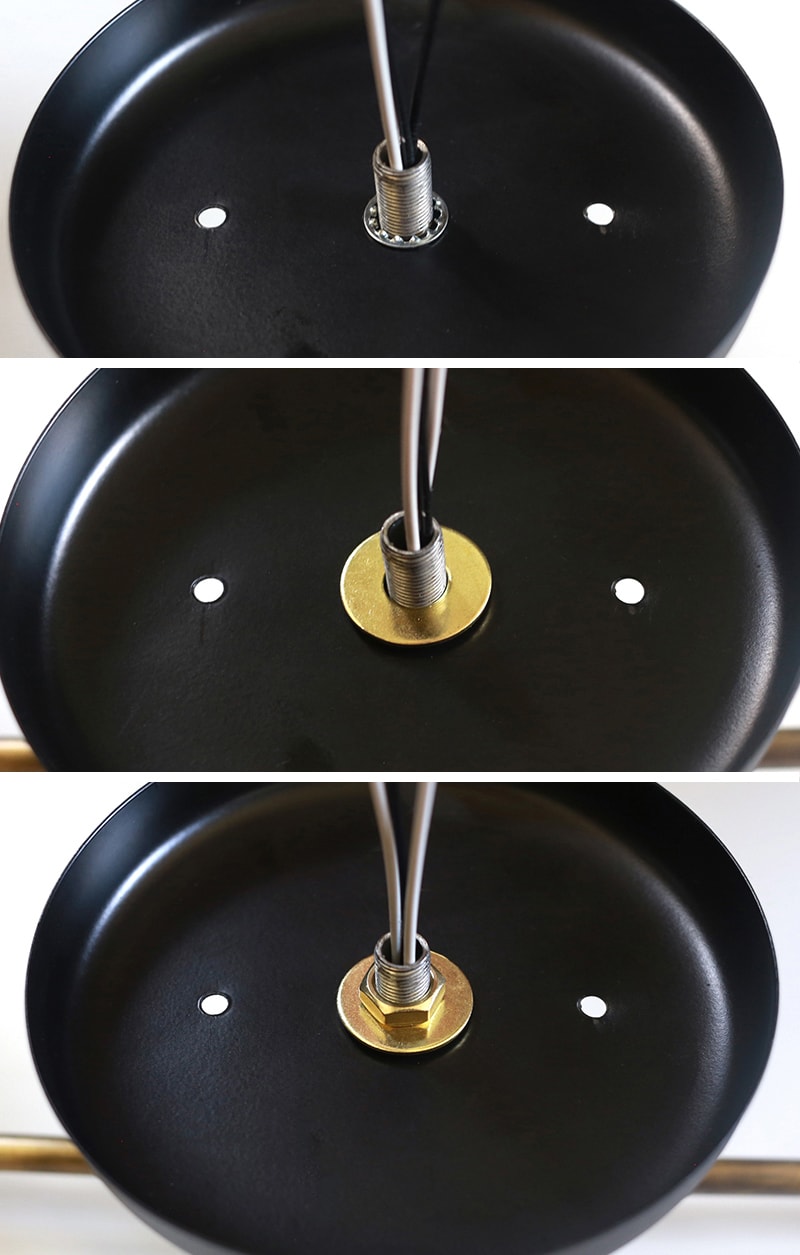
Step 11:
Slide your final coupling through the wires and screw it into the 2″ pipe.

Step 12:
Slide the 3/4″ hollow nipple over the wires and screw it into the coupling.
Step 13:
If you plan to add a dimmer or toggle switch to your light fixture, now’s a good time to drill a hole into the canopy piece if it doesn’t already have one. (You can see how we did this in our DIY Mason Jar Light video).
The canopy below is the first one we ever drilled a hole into for our toggle switch, and it’s far from perfect, but once the switch is in place you can’t tell. This hole works for our new dimmer switch so we decided to re-use it rather than drilling a new hole into another canopy.
Now you can take the ceiling canopy and thread it through the wires and over the hollow nipple.
Step 14:
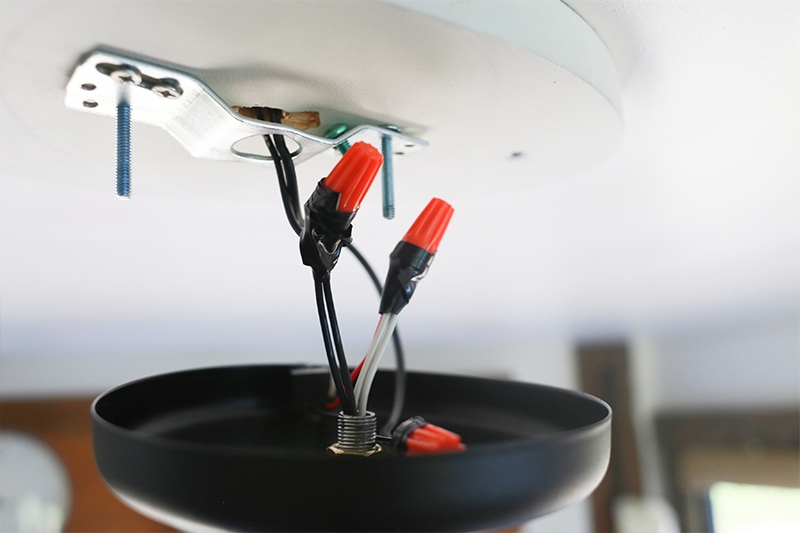
Next, thread the star lock washer, followed by the flat washer over the wires and hollow nipple. Then thread the hex nut on top of the flat washer and screw it tightly in place so the canopy doesn’t slide around. If you have a hole for the dimmer switch, make sure it’s facing the direction you want before tightening down the hex nut.
Step 15:
If you don’t plan to add a dimmer or toggle switch you can skip this step. And if you want to add a dimmer or toggle switch now is the time to get it into position. Simply follow the instructions and always make sure you know which wire is hot and which is neutral.
Adding a dimmer really helps create ambiance and I highly recommend adding them to any light fixture you can. They are a game-changer!
Step 16:
Once your dimmer switch is installed you can cut back any wires (we always do this last to make sure we have enough wire), and then install your new light fixture using the ceiling mounting kit.
If you’re unsure about installing the light fixture, make sure to contact a licensed electrician.
Make sure you turn off the power before installing (safety first!). You may also want to use a voltage tester.
We like to connect the wires without the full install, then turn the power on to make sure everything works. If it’s all good we turn the power back off and finished the installation.
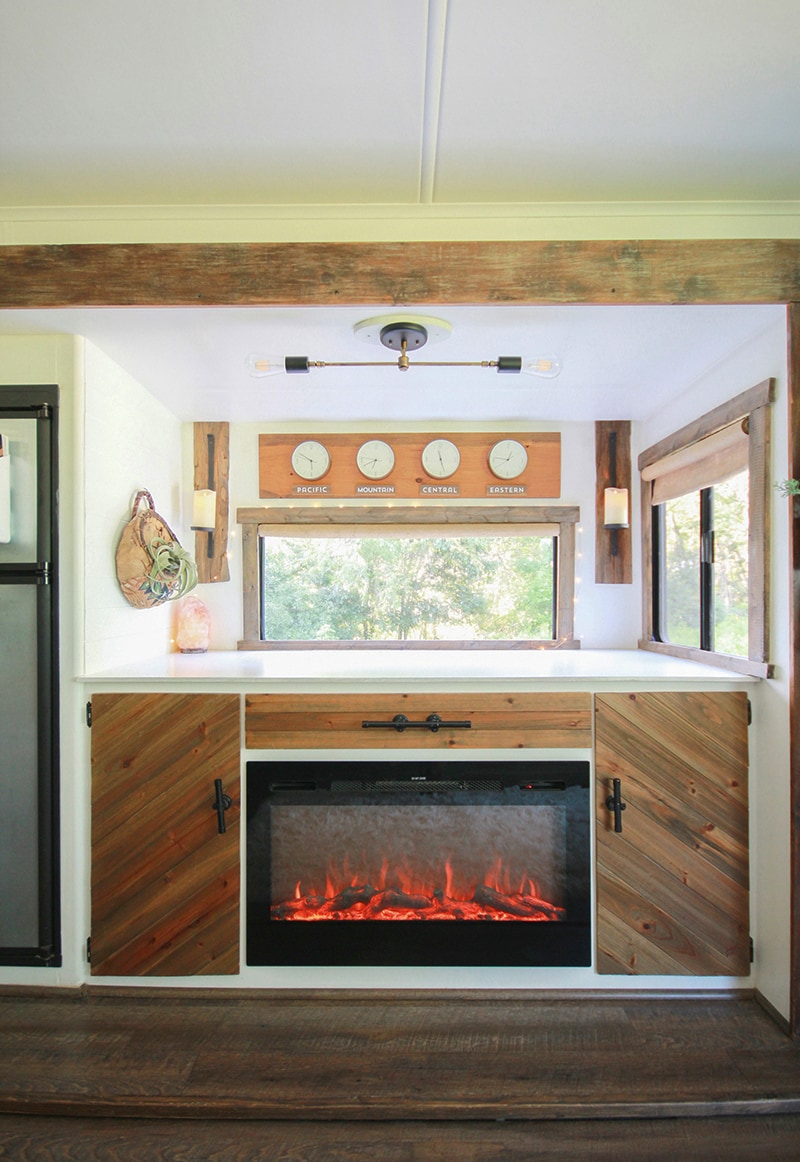
Updated RV Light Fixtures:
Here’s a photo of the original light fixture that was above the sofa in our RV:
And here’s the updated light fixture:
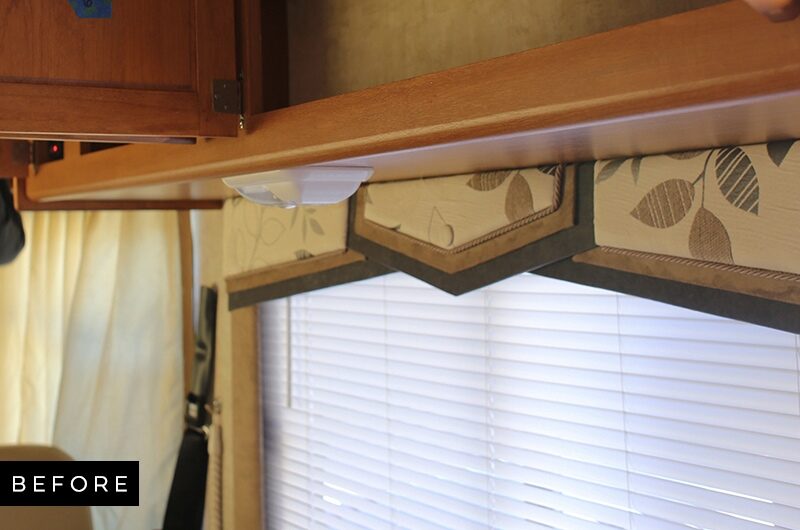
And here’s a photo of the original light fixture that was above the dinette booth:

And here’s the after:
When we removed the original light fixture there was an oval indent in the ceiling so we painted an oval wood shape white and installed that first before installing the light fixture. Not perfect, but it’s better than it was.
If you’re curious about the 3-arm light fixture we made in the hallway, we plan to share a video on that soon. However, it’s really similar to this post, only we used a 3-hole cluster body and made 3 arms instead of 2.
I really hope this post was helpful and inspires you to experiment with making your own light fixtures! As you can see, making the fixture is super easy, especially once you get the hang of it. In fact, installing the fixture probably takes the same amount of time as making it, ha!
If you’ve made your own lighting and have any tips or resources we’d love to hear them in the comments below!

Mid-Century Modern Light Fixtures You Won’t Believe are DIY
How to Update RV Interior Lighting
How to replace RV LED Dome Lights
Specific 12v LED Bulbs we purchased:
ST64 Edison Style 12v LED bulbs | G45 Edison Style 12v LED bulbs | A19 Edison Style 12v LED bulbs (we prefer warm white)
Thanks for sharing these directions Katie. I have so wanted to make these. YAY!!!
I love this project! I’m so glad you shared it. The non-traditional lighting really makes the RV look more like home.
Oh!!! I’ve really been wanting to swap out our lights! You’ve inspired me to bump the lighting project up on our renovation list, thanks!
Oh!!! I’ve really been wanting to swap out our lights! You’ve inspired me to bump the lighting project up on our renovation list, thanks!
That’s awesome Cindy Scott let us know how they turn out and if you have any questions along the way 🙂
What is the total length of the light fixture? Thanks.
Sorry didn’t mean for it to post twice! LOL
The total length from bulb to bulb is 32.5″ and without the bulbs is about 24″. You can customize it to whatever length you need though 🙂