UPDATE: All new featured RV tours will be posted on my other website, Wanderful RV Interiors. Existing tours will slowly be moved to the new website, and anything already moved will automatically redirect.
Disclaimer: This post may contain affiliate links, meaning, if you click through and make a purchase we (or those featured in this post) may earn a commission at no additional cost to you. View our full-disclosure here.
Today I will be sharing a tutorial on how to make a DIY wood sign using your printer, and without tracing paper or a Silhouette Machine. I hope everyone had a great weekend and that all the mom’s out there had a FANTASTICAL Mother’s Day! My sister and I took our mom to see the Georgia Guidestones yesterday in the “granite capital of the world”, which she has been wanting to check out since she moved here from Pennsylvania.

Georgia Guidestones located in Elberton, GA
I was really surprised that 4 other cars stopped to check out the Guidestones during the 10 minutes we were there, especially considering they are in the middle of nowhere. I had never even heard about the guidestones until after I moved to Georgia and there was an episode on the history channel discussing the controversy involved {you can learn more about them here}. However, the best part of our mini road trip was a row of shops filled with antiques and old wood that we stumbled upon on our way back home.

DIY Wood Sign Using Your Printer
Part of me wants to be selfish and keep this AMAZING discovery to myself because it’s seriously my new favorite store. However, it’s for that very reason that I HAVE to share it. I know most girls get excited over shoes, purses or makeup, but I get excited over chippy reclaimed wood, old shutters, and stair spindles, haha. I’m just happy that my mom is the same way so that the stop wasn’t completely selfish. If you live in Georgia or near Athens, then you may already know about this row of shops, also known as Heritage Heart Pine, located in Carlton Georgia. There are several rooms filled with antiques, vintage clothes, books and TONS of reclaimed wood/materials from buildings and homes as old as the 1700’s!!! As soon as I walked in the store I practically froze because my brain was trying to process everything around and I couldn’t decide which way to go first. Jimmy Poss, the owner, was so nice and helpful and also gave me a little history on some of the different woods.
I’m so sad this place is nearly 2 hours away but that won’t stop me from heading over there at least once a month to check it out and stock up on some treasures. In fact, the piece of wood I used in my “Makeover Monday” project below is from his store. I was originally going to post a different project today, but I was so excited about my “new” old wood that I’ve decided to share the project I worked on last night instead. This was a super easy project that I learned to do from this post, and best of all it was sooooo much fun! I am officially ADDICTED to making wood signs. Seriously.

Materials Needed:
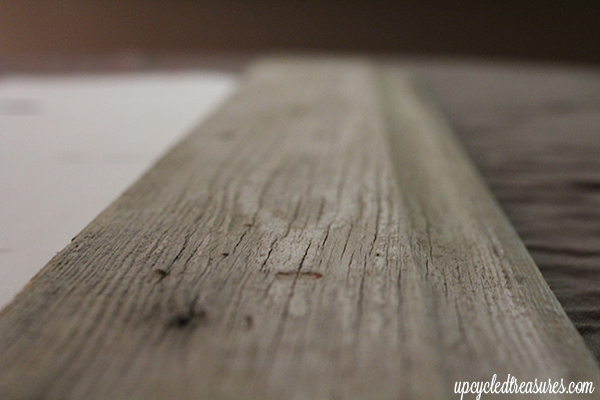
- Wood – I used reclaimed wood from the 1800’s
- Ink Jet Printer
- Printer Paper
- Paintbrush
- Craft/Detail paintbrush not pictured
- Paint
- Water
- Painters Tape
- Sharpie – or other object with shape similar to the rounded cap – the end of a detail paint brush also works well

Step 1:
Depending on the type of wood you are using (new or old), you may way to paint, sand, or distress it to achieve the look you want. My wood is super old and already had the rustic/distressed look I wanted, so all I did was wipe it down with mineral spirits and give it a light sanding to smooth it out a bit.
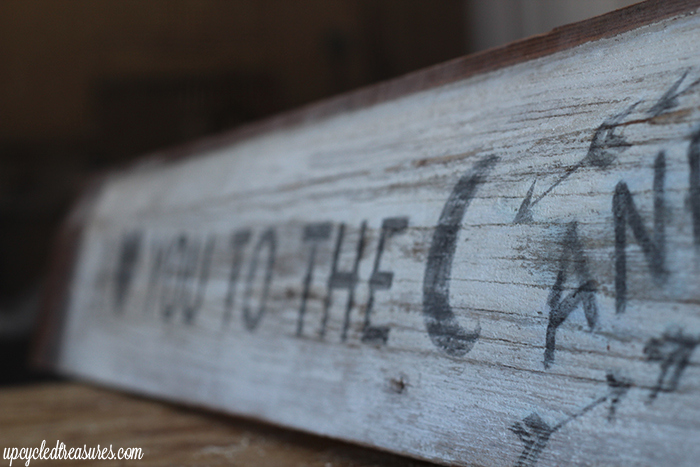
Step 2:
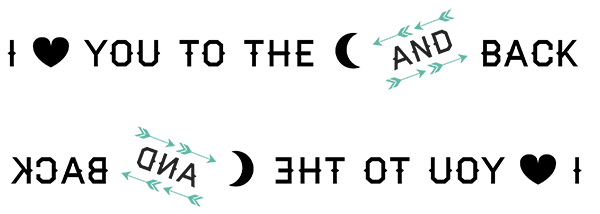
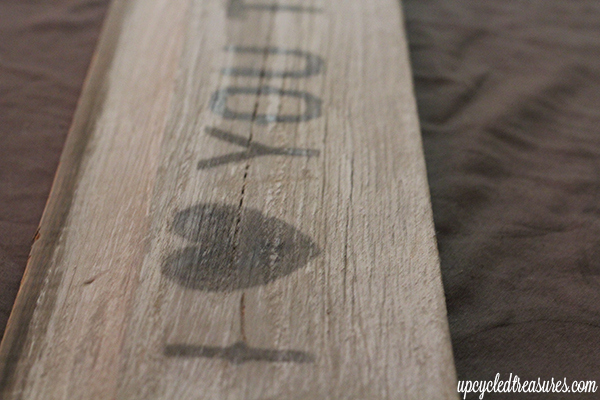
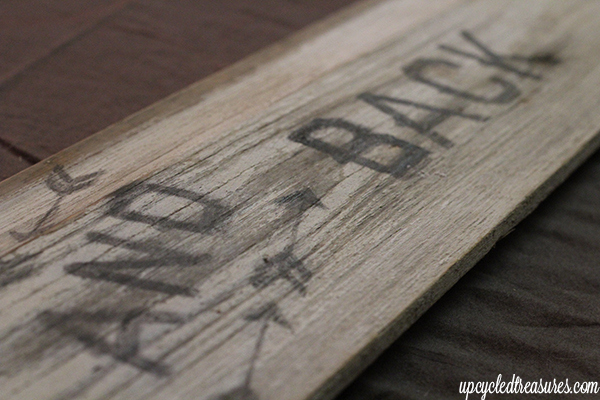
Print out the word or quote you want to use BACKWARDS. I used Illustrator to create the style and size I wanted for my “I love you to the moon and back” sign, but you could use photoshop, word, etc. The font is “haymaker” from LostType and I then added the arrows using KG Flavor and Frames Two, and created my own, super simple heart and moon graphics {my crescent moon looks more like a banana on my sign, ha}. To make your font backwards in Illustrator or Photoshop, simply highlight your text and click on Object–>Transform–>Reflect – and select vertical, which should be automatically selected. Voila! Your text is now backwards and ready to print! Depending on the size you need, you may need to print it out on more than one page. I separated mine onto 4 different pages.
Step 3:
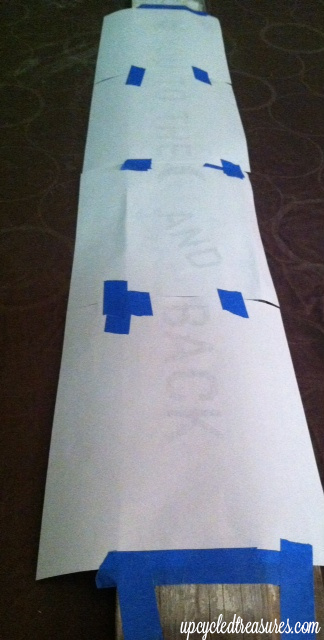
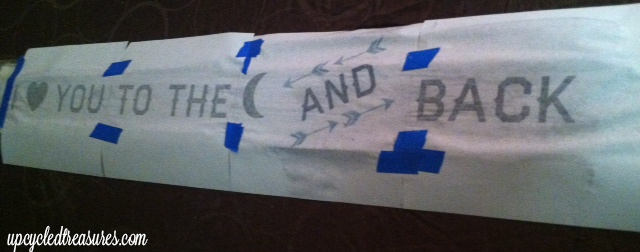
Tape your Page{s} where you want them on the wood with the ink side facing down, and the blank side facing toward the ceiling. Taping it down ensures that your word/quote will stay in place and not move around or smudge when you complete the following steps.
Step 4:
Lightly brush water on top of the page{s}, making sure to cover all of the letters without soaking the paper. Afterwards, your words should be legible but Don’t Lift the paper yet!

Step 5:
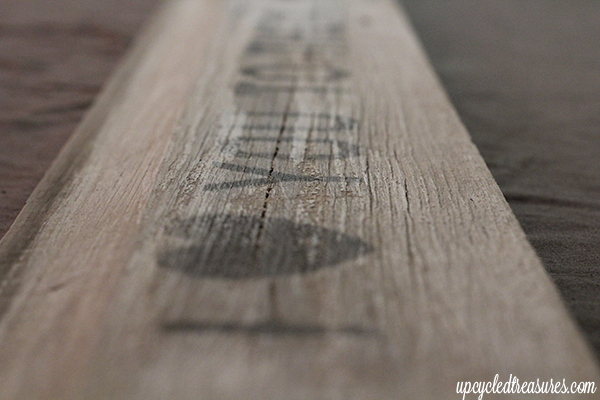
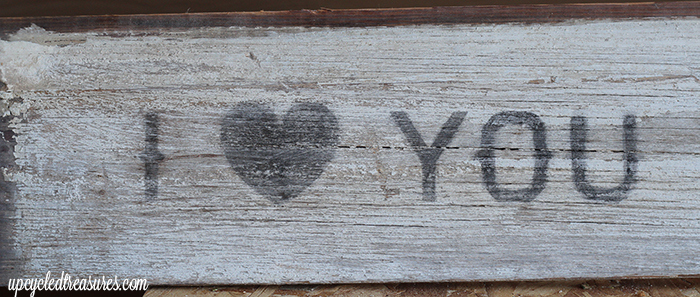
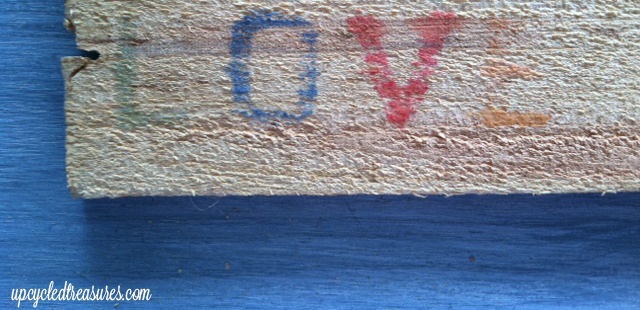
Gently rub the cap of the sharpie over each letter to “burn” the ink into the wood. You will notice the letters becoming slightly darker. I realized it was easier to “burn” the letters while the paper was still damp, so I worked as quickly as possible and just added a little water if an area was too dry by the time I got to it.

You can see the slight color variation as I rub over the heart with the cap of my sharpie
 Here is my heart image AFTER being rubbed with the sharpie cap
Step 6:
After you have finished rubbing over each letter, then it’s time to remove the paper, yay!
Step 7:
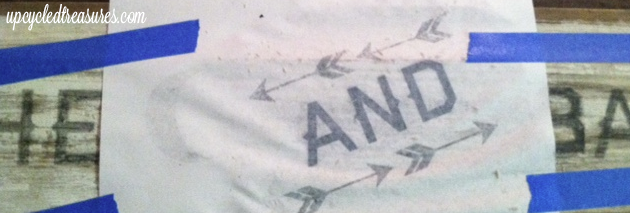
If there are parts of your letters that didn’t show up or fill out as nicely as you want, you can go back in with a small paintbrush and DILUTED paint, to fill them in. I mixed only a couple drops of black paint with a little bit of water to go over some of my letters. I also realized that the arrows I printed out didn’t show up and I am guessing this is because of the light blue color. I ended up changing the color to black, reprinted that section, re-taped it to the board {making sure it was lined up} and then repeated the process and it worked perfectly. The paper did pill up a bit but I think that’s because the paper is so thin and it didn’t affect the outcome.
Step 8:
You can now lightly sand your board if you want the letters to appear more distressed.
Step 9:
Seal your board with wax or polyurethane to protect it, and if you want to hang it up you can attach twine or rope to the back. I will be doing this later in the week.
Step 10:
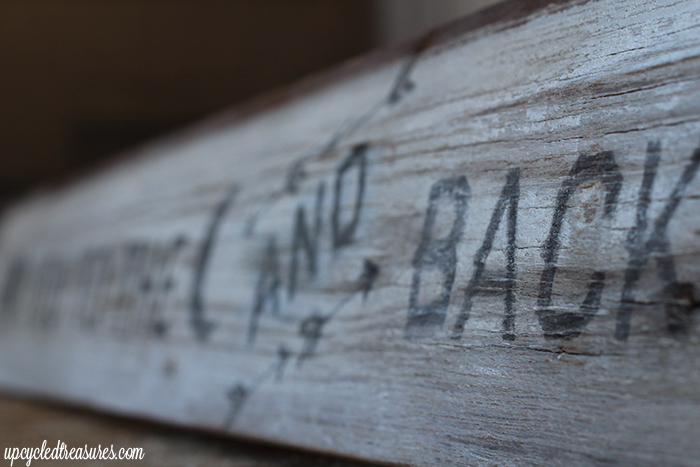
Rejoice and enjoy your new sign! Yay! We wanted a long sign to hang over the archway into our dining room and I will update the photos once it’s actually hung up. I definitely plan to make some smaller signs using multiple boards in the future, like I did with my Relax Wood Sign.


Update:
So I decided not to hang this above our dining room archway and wanted to cut it in half to make a smaller sign instead. We then drilled holes into the top and added rope so it could be hung. However, now that it’s cut the words are uneven on the boards which sorta annoys me. The good news is I can always make another one. Debating if I should add something to level it out like maybe an exclamation point made out of the same arrow surrounding the “and”.
Not really sold on that idea though because I don’t want it to feel like it’s yelling. I can’t decide if I should leave it the way it is, or if I should add something to the end. What do you think? I plan to make more signs to add to my Etsy shop as well in the next couple weeks…
Another UPDATE:
After receiving a comment from Ashley asking if this would work for colored ink, I decided to test it out. I first printed out some really small letters and when I went to transfer it, must have used too much water because the ink did transfer, but was runny. I tried it a few more times {with less water} with essentially the same results {the top left was my 3rd attempt with less water}. I then made the font larger and made sure to use A LOT less water than I did with my “love you to the moon and back” sign and it transferred over much nicer.
I think the light colored arrow I was trying to use on this sign wasn’t bright enough and the wood wasn’t light enough, otherwise, it would have worked. So the verdict is: Yup, color will print as well – just be extra careful about painting on the water and the bigger the letters the less likely it will be to run. Plus, the bolder the color, the better. That’s what I got from my experience anyway. Of course I only did a super quick sanding on the board before transferring the word over, so more sanding probably would have helped as well.
The ink was runny because I “painted on” too much water and the letters were too small and close to one another.
This was a super quick test but once I made the letters larger and more spaced out, the ink transferred over much better.

If you would like to see more transfers using your printer, be sure to check out my DIY Family Established Monogram Wooden Sign and DIY wood slice Christmas Ornaments.
I just love, love, love this sign … the wood, the font, the phrase … love it all!
By far the best one ive found…so easy! no need for card stock or freezer paper. excellent! thanks for sharing and not being selfish. 🙂
Thank You!!!!! I can’t wait to make some signs for our wedding with some of the other wood I picked up 🙂
Great tutorial! I love it!
Thanks Ashley, man I wish you lived closer so we could work on some crafty stuff together 🙂
Very clever! I honestly would never think of reversing text on the computer…I do it all the time with photos, but this would never have crossed my mind! I love signs but I avoid them…afraid of those tricky letters! I am totally giving this a try! Thanks for the tip!
Hi Kim! Thanks for stopping by and if you decide to make a sign I would love to see it when you’re finished! All I can say is that this process was SOOOOO easy, I only wish I would have tried it out earlier. I’m not gonna lie, while I was working on it I was so worried it wouldn’t turn out right because it was just too easy. I’ve learned to trust in the process of whatever it is I’m working on, and that seems to help. Plus I’ve realized that if something doesn’t work out,as least I’ve learned something 🙂
~Katie
Hi Katie, this is such a fabulous idea, and one that I’ve never seen before. Kudos to you! Thanks for sharing it with us. I’m off to check out the Georgia Guidestones, which I’ve also never heard of. Have a great day!
Debbie
Thanks Debbie!
No way!!! I tried to transfer a print to wood with a gel medium for Mother’s Day and had so many problems! I have to try this!!!
http://Www.exploringdomesticity.blogspot.com
If you make a sign this way I’d love to see it!
I love this! What a great idea 😉 Thanks for sharing at Give Me The Goods Monday.
Jamie @ somuchbetterwithage.com
Thank you Jamie and thanks for hosting the link up party!
I love signs!! This one is great! Thanks for sharing on Project Inspired 🙂 Pinning!
Nancy
Thank you for hosting the link up party! I’m so excited you visited my page 🙂
~Katie
That is absolutely one of my fav quotes! Love it!!!
I know it’s cheesy, but I love it too 🙂 Thanks for stopping by!
~Katie
visiting from redoux. This is fantastic
Thanks for stopping by Karen!
Thanks for the great idea. I need a gift in the near future for a baby shower. This is perfect! I love it when “a plan comes together”.
Thanks Linda and I’d love to see how your sign turns out for the baby shower!
~Katie
Awesome idea! Thanks for the tip! One quick question, did you use a laser printer or an ink jet? Or does it not make a difference?
Hi Lisa, I used an ink jet printer. Thank you so much for the comment – I hadn’t realized that was no where in the post so I just updated it. I’m not sure if it would work with a laser printer, but I feel like the ink from the ink jet printer is what gets it to transfer. Thank again!
~Katie
Thanks so much for sharing this technique (and your favorite new store) with us. Great tutorial with lots of info and pictures! I saw your post over at “Common Ground” blog party.
Thanks Miss Kitty and I can’t wait to share the other projects I’m working on that I picked up from the store as well. I also can’t wait to get back out there and stock up some more!
I have never tried this transfer method, but am definitely going to! What a cool idea! I have a Board just for signs. Pinning now 🙂
Thanks Karen! I’m definitely going to use this method on several more signs, I felt like a little kid in art class because it was so fun and easy!
This is Awesome! Thanks for sharing!
Thanks Sandi!
Great tip!! I will have to try this… doing it this way gives it that aged look immediately so it saves you the step of sanding after painting as well!!
Thanks for sharing,
Krista
Thanks Krista! I did lightly sand over the letters after I did a couple touch ups, but probably only for a few seconds because you are right, this process already gives it that aged look which is pretty awesome. 🙂
Love the quote! Turned out great 🙂
Thank you for partying with the Wildly Original Crowd.
<3 Christina at I Gotta Create!
Thanks Christina! Can’t wait to party it up some more next week 🙂
I Love,Love,Love this idea! Can’t wait to tryit! Thank you for being so crafty & sharing.
Thank you so much Linda! I can’t wait to see what you create!
~Katie
Sweet, you’re right, it does seem too easy. But I’m giving it a try, I have a boat load of expensive tools already and really didn’t want to invest in a Silhouette too. Found your project on that DIY Party!
Hi Tricia! First off I love your blog name and can’t wait to check it out. I look forward to seeing what sign you make 🙂
~Katie
You are brilliant! Thank you so much for sharing this! I think that this is something that I can actually handle without having an aneurysm! I also really like ‘you are my sunshine ‘ and I am thinking of trying this method with that saying! Thanks again!
Hi Rebecca! Yes, this project is super easy and I was honestly scared it wouldn’t work because of that, haha. I would love to see your sign when you’re finished 🙂
~Katie
Thanks for linking up to Gingerly Made’s Show & Tell link party. You have been featured! http://www.gingerlymade.com/2013/05/show-tell-features_21.html
Yay!!! Thanks Ginger! 🙂
Very nicely done. Love it! Thanks for linking up on Made in a Day!
Kim
Thanks Kim!
I love how super easy this is! Thank you!
Hi Amie, I couldn’t agree more. The fact that this project is so easy is one of my favorite aspects, haha. Thanks for stopping by!
~Katie
I was just wondering what program you are using on your computer to have the font print backwards.. or does any program have the backward printing font? thank you Stori
Hi Stori! I used photoshop but you could use any photo editing software. You probably have paint on your computer so you could use that. Just open your image – Click “Rotate” and then “Flip Horizontal” 🙂 Let me know if you have any other questions and have a great holiday weekend!
~Katie
Does this work with colored ink as well? I seen that it didn’t work on the light blue, just wondering if it worked for you at all in bolder colors.
Hi Ashley! To be completely honest… I’m not sure. I would think bolder colors would work like a deep red or deep blue but don’t really know. That’s definitely something worth experimenting with. I will try to test it out tomorrow and get back to you, and if you test it out before me I’d love to hear about the results 🙂
~Katie
Thanks! I will try to get to it as well!
Hi Ashley – I updated my post with the results and colored ink will transfer over. You would probably want to “paint on” muuuuuch less water and make sure the letters are a decent size and spread out. Thanks for bringing up this question so I could experiment. It’s definitely good to know 🙂 Have a great day!
~Katie
Oh geez you make this look so easy! I really really wish I would have tried this sooner too! Love that quote- my mom used to always say that when she kissed us goodnight! It looks cute cut in half and hung– I think it adds to the charm that it’s not perfectly centered 🙂
Awww, what a sweet story! This seriously was so easy and I felt like I was a little kid in art class. It was awesome and so much fun!
Just discovered this blog, very informative, thank you!
We have some great wooden signs
Great Blog!
Thank you!
Would this work for an outside sign? Or would the ink run???
The ink shouldn’t run but you may want to seal it with a protective coat first 🙂
WHAT would I seal it with that would make it thru the sun and rain?
That is such a good idea. Every time I want to tranfer a picture or words to a canvas I print out my picture then turn the paper over and rub charcol or pencil on the back. Then I put the picture down on my surface and draw over it. It presses the charcol down and I get the exact picure I want. It’ works great. 🙂 I love crafts!
I AM INTO STICK BUILDING OLD WESTERN BUILDINGS. THIS CONCEPT OF MAKING SIGNS IS A GREAT WAY TO PUT SIGNS ON THESE BUILDINGS. HOWEVER, MY C, B,S R, ETC ARE COMING OUT BACKWARDS ON THE FINISHED SIGN. WHAT AM I DOING WRONG?
THANKS, NICK
Did you use regular printer paper or transfer paper
I used regular copy paper and actually think I just used wood glue and clamps to attach the boards {my sister has it now}, but it would be better to add some brackets or strips of wood to the back for support.
I have a question…what did you use to attach the boards, one above the other, when you cut it in half? I am planning to make a larger version of this idea so I will probably have 4 boards ….. thanks, Karen
Hi Karen, I just realized that I responded to your comment above to a different Karen, woops. Hope you figured it all out!
Thanks for sharing! Not sure if you ever decided to put something at the end of the sign you cut in half but I thought maybe a period at the end in the form of a star might go nicely with the moon?
Hi Irene, I actually really didn’t like the way it was after I cut it, but my sister loved it so I just gave it to her and figured I’d make a new one, haha. Thanks for the idea though!
I love your sign and tried the method, but the ink does not transfer. I know my printer is an inkjet. Any ideas? Thanks!
Hmmmm… Not sure why it wouldn’t work, I have used this technique maaaaaaany times since. You may have needed a little more water or could try rubbing a little harder? Have you tried it on a different piece of wood?
Did you use regular copy paper? I tired cardstock one time but it didn’t work as well.
Let me know if you figure it out!
Hi there, I’m having the same issue! When I wet my paper, it becomes so soggy that I can’t rub it or the paper falls apart 🙁 Also, I was using some rough cedar, and my black ink just looked horrible/smudgy/not legible. Does the wood have to be smooth? Thanks for any advice you can offer!
Has anyone tried this on a fully painted piece of wood before? I think I’m going to give it a shot but was hoping to see examples if someone has already tried it. Thanks!
can you lightly paint the wood a color for the background first? will the ink still tansfer?
I have been painting wood signs for a few years and never saw this idea!! I am so excited to give it a try now…thanks so much for sharing!
Love this idea! I’m making a sign using this technique for my -1 anniversary with my fiance. (We are getting married in exactly 1 year!) I’ll definitely be stopping back for some more DIY ideas from this site and your wedding blog!
Thanks for the great ideas. I, like you, would much rather go to wood shops, recycle shops, than shoe shopping any day. I visited Carleton geogia a year ago and now I’m sad I missed this place. It looks like it is awesome. Thanks again for sharing your talents and clever ideas. Going to try a few.
I, too, am curious how this would work on a piece of painted wood. Also, does the type of wood matter? I’m thinking of using something like pallet boards and wonder if their absorbency ability would be different from say a piece of treated wood or something.
Hi! You said you used an ink jet printer. Just curious if another type of printer, laser, would work for this project too?
I am so happy to have run across this. I’ve been avoiding wooden signs because I can’t hand paint letters but now I have no excuse. I’m going to make Christmas gifts for friends now…yay!!!
I was wondering if you could paint the wood a real light color like I’m thinking a very muted mint green and then do the transfer I was thinking about doing a few of these for my newlywed friends for Christmas and wanted to use colors that would match their decor or wedding colors for a few. Love this idea soo much!
Hi! I tried this method on an piece of wood that I had painted and sanded to look rustic. When I tried to transfer the letters from the paper nothing showed up after I peeled the paper off. I tried multiple times. Any tips?? Thanks!
Hi
Ok, love the idea. I did a bit more researching because every time I tried to do it, the water would smudge the ink. So basically, you do the same things but use wax paper the size of regular paper instead. And instead of using water, you would get a credit card and scrap it. It worked nicely with colored and black ink.
Hi Alivia,
Hmm, not sure what was going on there unless maybe too much water was added? I’ve actually used the wax paper method as well {see link below} and liked that too, but still love using the printer method. I’ve used it more times that I can count. Both ways still fascinate me every time 🙂
http://upcycledtreasures.com/2013/05/diy-french-cottage-tray/
~Katie
Hi, im also busy making wooden boards just with shells and sea grass. And then i really would like to sell them. I loved your tutorial!! And your work! Got me some new ideas…
Mine doesn’t come out as dark as yours. It looks gray 🙁
Hi Kristy,
Did you paint over it afterwards? I used this more as a guide and then you can see that I diluted some paint and went over the letters with a detail paintbrush afterwards.
Hope that helps 🙂
~Katie
This looks simply stunning! Do you think this would work with a wooden picture frame? I would love to make this as a gift for my best friend but with the words “With a little help from my friends” we are both Beatles lovers. Please let me know! 🙂
Hi Samantha,
It should work on any wood, although the darker the wood the more difficult it may be to see. I love your idea and am sure your friend would too!
Love this idea, you have saved me tons of time over stenciling. I was having trouble with bleed through and spacing. Thank you so much!!!
Thanks Carol and I am so happy you found the post helpful! Enjoy your weekend 🙂
If you wanted to stain the wood, would you do it before or after you transferred the letters?
Hi Erica,
I would stain the wood first as it may cover up your words if you do it after.
You can see how I did something similar in this post:
http://ahandcraftedwedding.com/diy-time-capsule-wedding-guestbook/
Also, be sure not to stain it too dark or it may be difficult to see the ink transferred.
~Katie
Hi…I tried this. Sadly it did not work. Any suggestions as to why?
Hi Shannon,
Hmmmmmmmm… I have used this technique sooooo many times without issues, so I’m really not sure what’s going on.
Is the ink transferring but being blurry or only partly being transferred over, or just not transferring at all?
I’ve used this on plain and stained wood and on various types of wood. What are you trying to transfer it onto?
You want to make sure you are using a regular inkjet printer {not laser}, and regular copy paper. Then place the image face down onto the wood, and brush on enough water to cover it, but not too much water otherwise it could tear the paper or make the image blurry.
You definitely want to make sure you are pressing the end of a marker, pen, or small paintbrush against the paper after you brush on the water so that it “burns” the image onto the wood. If it doesn’t transfer over completely you can always go over it with a sharpie marker or small detail paint brush. I hope this helps and let me know if you figure it out – or figure out why it wasn’t working.
Here are a few more links with similar projects I’ve done using this same technique:
Here are just a few of the projects I’ve created:
http://ahandcraftedwedding.com/diy-time-capsule-wedding-guestbook/
http://ahandcraftedwedding.com/diy-wedding-christmas-ornament-wood-slice/
http://upcycledtreasures.com/2013/11/diy-family-established-monogram-wooden-sign/
Thanks!
~Katie
Love it! can’t wait to try it
Hi Katie… So I tried this project yesterday but unfortunately it didn’t come out very nice 🙁 When I got to the part of removing the paper, my letters looked all smudgy. Do you know why that would happen? Is there a way I can clean up the smudges? I definitely do want to try this again so would appreciate any tips! Thank you!
Oh my why does this page take so long to load and then the popups. What a disaster!
After doing this SEVERAL times, I found an even easier way!! I have to share this, bc like you, I was SO excited!! Ok so, same concept with flipping the letters or words on your computer, but instead, print it onto a SHEET PROTECTOR! I just cut part off that has the holes (like if it were going into a binder) so it would fit properly into my printer. You can see straight through them so you can line it up on your board however you need to, before pressing down and making the transfer. It’s AMAZING. And the best part, you wipe if right off and can use it again!
Wow that is an amazing tip! Thanks for sharing, I’ll definitely have to try it out sometime 🙂
This is the Best tutorial and technique I have found for transferring text to wood! Yay! Thank you so much for sharing! I would have shared a photo but I don’t see where to upload one. I have posted mine on my FB page. Not perfect and not done yet, but I love how it’s coming out. Just have to be patient with the rubbing and not get the paper too wet otherwise it will run. I had one word that ran and not easy to clean up.
Hi, I would just like to say thanks for the content. I am not one to comment that frequently but keep up the good quality work and many thanks for the quality article.
Thanks Dexter!