UPDATE: All new featured RV tours will be posted on my other website, Wanderful RV Interiors. Existing tours will slowly be moved to the new website, and anything already moved will automatically redirect.
Disclaimer: This post may contain affiliate links, meaning, if you click through and make a purchase we (or those featured in this post) may earn a commission at no additional cost to you. View our full-disclosure here.
One day while browsing Houzz I came across a rustic wall sconce, and I was all heart eyes.
It was simple, rustic, and beautiful. I became OBSESSED.
You see, once we removed the cabinets above the dinette booth (which is now our media cabinet) I wanted to flank the windows with some sort of reclaimed wood sconces. I figured it would add character and be a way to display candles, plants, or who knows what. As soon as I saw this rustic sconce, I was instantly inspired. 
The only problem is we were still in major renovation mode in the RV, ya know trying to make sure the kitchen and bathroom were functional. Needless to say, all decor projects were pushed aside. Oh, priorities…
Fast forward some 6 months later and we finally made our own rustic wall sconces for our RV. Better late than never, right?
If you’re looking to add character to the walls of your home or RV, I hope you find inspiration from this post. It took less than 30 minutes to make both of these sconces – probably more like 15. Well, aside from waiting for the stain to dry.
All I’m thinking is, why didn’t we make these sooner?

DIY Rustic Wall Sconce
As much as I LOVE the barn wood used in the inspiration photo, we wanted to make sure the wood we used was light since these would be going in our RV.
I thought it would be awesome to use the wood from the previous rustic wall hangings we had in our bedroom, but that wood was WAY too heavy to bring in the RV.
Luckily we still had some reclaimed cypress that we had picked up from owner of the cabin venue we married at.
We’ve used that cypress for our bedroom slide out, to make the rustic horseshoe towel holder, for the mountain art in our tiny kitchen, and some other random projects here and there.
Now we were down to the last couple scraps and had just enough to make two sconces from them.
Here’s what one of the scrap wood pieces looked like before:

We only used materials/tools we had on hand, making this a $0 project. Now that’s my kind of project!
Since we’re on the road we don’t have access to all of the tools we previously had at our sticks and bricks home, but luckily this project didn’t require much.

- Wood (we used reclaimed cypress wood)
- Wood Glue
- Paint/Stain/Sealer (we dry brushed green paint then added Pure Tung Oil)
- Hanging Hardware
- Saw (we used our circular saw because that’s all we had on hand)
- Nailgun
- Drill
The first thing we did was cut our wood down to size. You can use whatever dimensions you prefer and what works in your space.
The width of the board we used was perfect for our space at 5.5 inches. Each sconce was made of three boards:
- 1 board cut to 23″
- 1 board cut to 5.5″
- 1 board cut to 5.5″, with both ends cut at a 45 ° angle
Eric made 45° cuts on the ends of (2) 5.5″ boards – this is because we made two sconces. These would become the bottom support of the shelf.
It may have been easier to cut these angles with our compound miter saw, but we didn’t bring it so we used what we had.

Paint/Stain/Seal
Once all of the boards were cut to size, I dry brushed some green paint onto the boards. After the paint dried I lightly sanded the boards down and then went over them with dark tung oil. It really brought the wood to life.


Tung Oil can take 7-14 days to fully cure so that’s something to keep in mind if you decide to use it.
Attaching the Support and Shelf
After it dried we added wood glue to the edge of the board with the angle, and then used our nail gun to attach it to the vertical board. We nailed at an angle from the top as well as through the back. Just make sure your nails aren’t too long so they don’t poke through. We did this because it was the easiest way to attach the boards, especially since they are thin, but you could also screw into the back for extra support. We originally thought about using brackets for this, but didn’t have any on hand, so nails it was!

We then did the same thing to the “shelf” piece, using wood glue and nails to attach it. Easy peasy.

After it was all put together I actually added another coat of stain to make it slightly darker.
Add your Hanging Hardware
We considered adding hanging hardware to the back of these, but in the end, we just screwed them into the wall. We figured this would be the most secure way to hang them in our RV, and so far, so good.
The wood we used was light (similar to cedar) and we don’t plan to set anything too heavy on them, but make sure to take the weight into consideration for how you hang yours. And if you can’t screw into a stud you may want to use anchors.
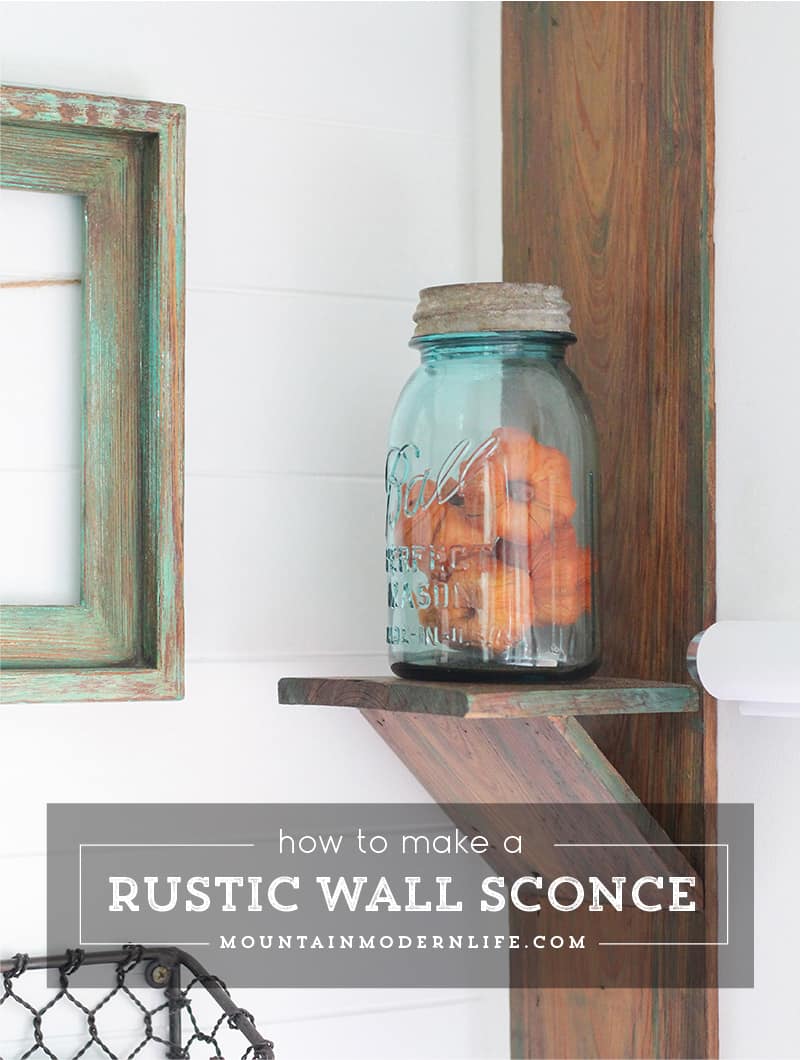
Here are our rustic sconces all finished and hung up in our RV. I love how they turned out!

I thought about using quakehold to semi-permanently hold the jars onto the shelf but will be changing them up over time so instead, I’ll just remove them before we drive down the road.
In fact, I planned to put LED candles on the shelves but the ones I brought with us are too short, so I’ll need to get taller ones or some holders first.
Until then I like how the mason jars look. What do you think?

Is there a project you’ve been wanting to start, but for whatever reason, it keeps getting pushed down on your priority list? Tell us about it in the comments below and if anything else, I hope this post will help you bring that project into the forefront to get ‘er done!

They look pretty great. In fact that whole section of your RV looks great. I would love to be able to travel around in an RV for a year. In fact that’s at the top of my Life List. Anyway, have you seen those Command velcroy strips? Like Velcro but all plastic. You could put a piece on the shelf and a piece on the jar and maybe that would keep them in place but it isn’t permanent.
Thanks Alicia! I’ve tried command strips in our RV but not to hold anything down so I may have to try that. For now I just set them in a basket when we drive the RV, I figure better safe then sorry, haha.
great job guys, everything looks so great…
Thank you Diane 🙂
I love the blue mason jars on there! You could also put led candles inside the jars, but I suppose that would give the light a bit of a bluish cast. I also really like how you just dry brushed a bit of paint on the boards; simple but effective!
Thanks Judy! I tried putting a couple LED tea light candles in there but they didn’t let off as much candlelight as I wanted. I love that idea though and now you have me thinking I may want to use those until I replace them 🙂
Loved the wall sconces ,working on reclaimed wood is so much better,it gives a farmhouse look which I like.
I couldn’t agree with you more Mary, it makes my heart so excited!
This turned out great! 🙂
Thanks Antonella!