UPDATE: All new featured RV tours will be posted on my other website, Wanderful RV Interiors. Existing tours will slowly be moved to the new website, and anything already moved will automatically redirect.
Disclaimer: This post may contain affiliate links, meaning, if you click through and make a purchase we (or those featured in this post) may earn a commission at no additional cost to you. View our full-disclosure here.
Does your RV shower faucet leave a lot to be desired?
We recently changed out our RV shower head and hose, and as soon as we were finished we went online and ordered a new RV shower faucet.
How to Replace an RV Shower Faucet
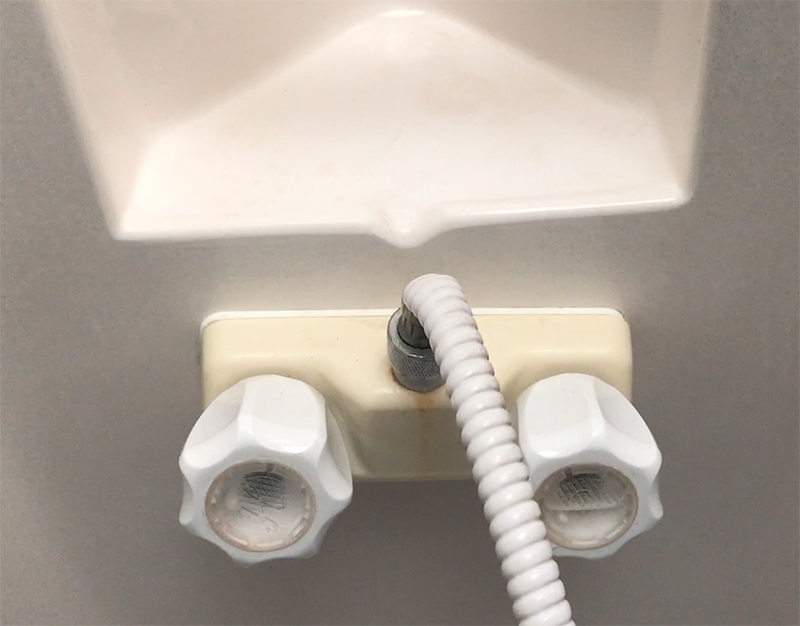
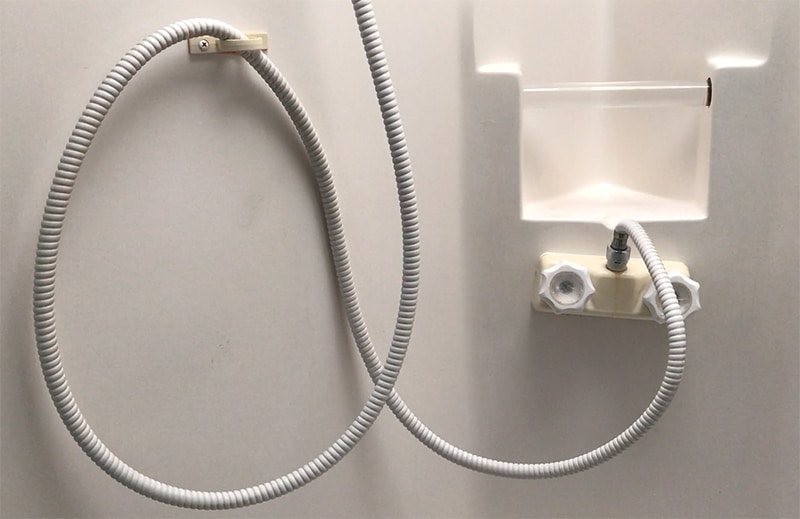
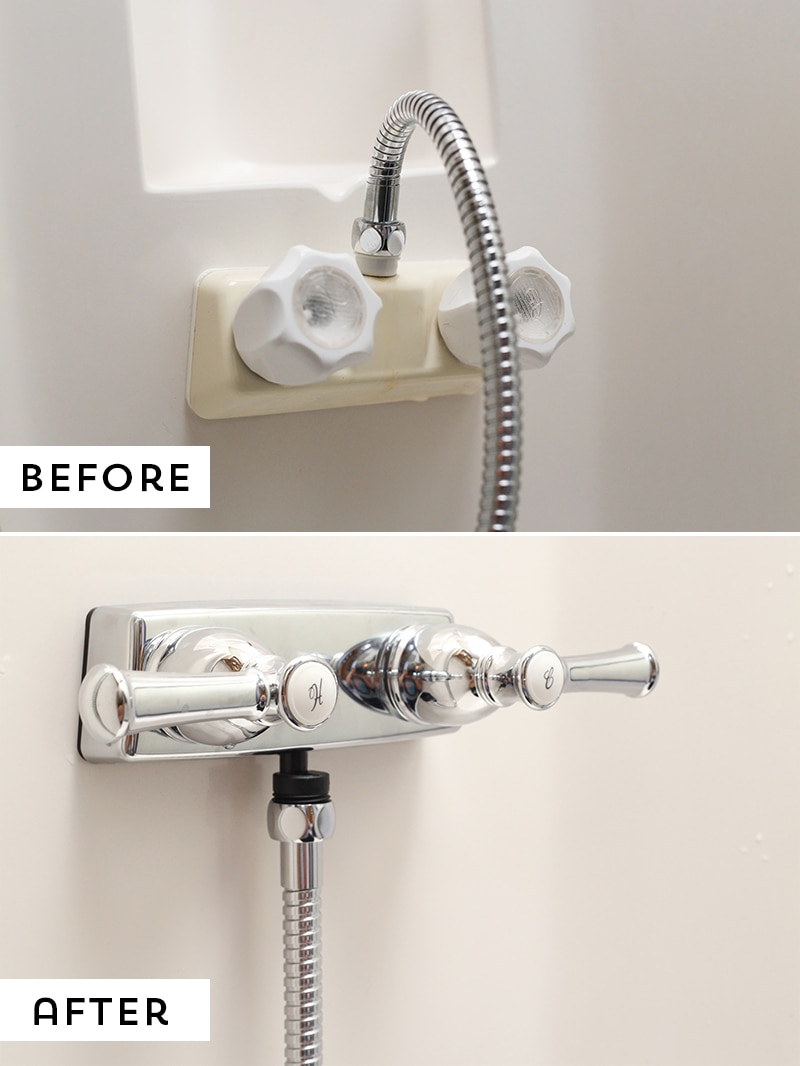
While our RV shower faucet was in working condition, it was definitely time for an upgrade. It was a dingy off-white color and stood out like a sore thumb next to our new shower caddie, shower head, and hose.
Had we known we could get a great looking RV shower faucet for less than $30 and have it installed in less than 30 minutes, we would’ve changed it out a long time ago.
If you’re looking to replace the RV shower faucet in your RV, the good news is it’s an easy upgrade anyone can do.
Check out the video below where I walk through the process of replacing our RV shower faucet:
Tips for replacing your RV shower faucet:
If you watched the video above you can see exactly how we changed out our RV shower faucet, but I’ll go over a few of the tips below.
Tip #1 – Every RV is Different
The first thing I noticed when doing research before changing out our faucet was that there are a million different access points to the back of the shower faucet. I’ve seen some behind false walls in the kitchen, some that can only be accessed with the slide out, and then some (like ours) where there is a specific compartment outside the rig that lets you access it.
So when you’re starting your project be aware that it may not always be in the same place as what you find online. If you find yourself having a difficult time locating it I’d reach out to your manufacturer and see if they can guide you in the right direction. You may also find the answer in your owner’s manual.
Tip #2 – Turn off the water supply
If you’re doing projects in your RV I’d assume you’re well aware that water can be one of your worst enemies. So when tackling a project that deals with water it’s best to make sure your water supply is turned off.
As you disconnect from the back and front sides of the faucet you’ll still get a little bit of water leakage but it won’t be a full on flood.
We turned off the water supply then opened all the faucets and flushed the toilet until no more water came out. This in turn made sure we only had a small dribble of water that escaped onto the floor. So make sure to turn off your water supply.
Tip #3 – Pay attention to how you remove the old faucet
I’ve found when I am tackling a project that requires me to replace something it’s always easier to get the job done right if I pay close attention to how I take the item apart. By doing this you’ll be able to better understand how to put it back together with the new pieces.
In the instance of replacing your RV shower faucet pay close attention to how you detach the back of the faucet as well as to the rubber washers that are located between your hose and faucet.
Tip #4 – Flip the faucet
This tip was suggested to us by a few of our YouTube viewers, and I can’t lie we absolutely love it. It’s a simple change that transformed the way our shower hose hangs, and created a much more enjoyable shower experience.
Our old faucet was installed with the hose hook up on the top of the faucet. This in turn created kinking within the hose that lowered our overall water pressure. When we installed our new faucet we flipped it so that the hose connection was on the bottom instead. By doing this it takes a lot of stress off the hose while also eliminating the possibility of the hose kinking.
When we did this we noticed the hot and cold knobs were incorrect. In our situation we were able to easily switch our hot and cold labels on the handles of the faucet. Your faucet may not even have labels, but if it does and you’re not able to switch the labels you should be able to switch the hot and cold connections on the back of the faucet in order to make sure your labels are correct.
If you’re looking for an easy project to do, consider upgrading your RV shower faucet, it’s an easy project that’ll make a world of a difference!
Have you switched out your RV shower fixtures? Let us know your experience in the comments below!

What an incredible before and after!!! Thanks so much! Just pinned it. 🙂
Nice job and a bit lucky that the rubber grommets / seals inside the supply hose ends didn’t leak. They typically don’t like being disturbed and will leak to complain. A new pair of seals to put into the pipe ends would have made it a bit more complete, but so far so good, right?
Hey Silas you’re completely right, those rubber grommets can be finicky when you move them, which we found out the hard way with our outside water connection. but so far we are looking pretty good on the inside, though I’ve been keeping a close eye on it to make sure. I should just go ahead and replace them anyway, but sometimes it’s fun to live life on the edge hahaha. Thanks for swinging by 🙂
Great simple easy to follow and understand video!
Good to hear, thanks Chuck!
And my husband said it couldn’t be done!!! Boy is he in for a surprise when I show him this….haha And I’ve already located the access panel to get to the connections. Thank you so much for a great video and easy directions.
haha No worries at all Serena! I’m glad it was helpful, make sure to let us know how you’re new shower faucet works out 🙂
Very informative and easy to follow..
Thanks Allison, I’m glad you found it helpful 🙂
Hi Eric, your video changing out the shower faucet seems painless. Thank you, I don’t think we have an outside entrance to get to the valves. i am wondering where did you purchase your faucet?
Hey Nancy, we actually purchased our faucet off of Amazon – here is a link – http://amzn.to/2oO0Cfu – that is an affiliate link so if you use it to make the purchase we’d get a small commission at no extra charge to you. Sometimes the entrance to the valves can be difficult to find but I’m sure if you search you make and model of rig on Youtube someone probably shows it. Anyway I hope this was helpful and let me know if there is anything else I can help with 🙂
We went with a single lever faucet. It’s much easier to get the right temperature adjustment. Which in turn saves on water.
Hmmm this is a project I’m actually needing to do…ours is leaky and one of the handles is broken….
Where did you find the new rv fAuCet? The upgraDed ones ive seen are not as Cute at this!
Hey Dusti, we actually picked ours up off of amazon, here is a link – http://amzn.to/2oO0Cfu – (that is an affiliate link so if you use it to make a purchase we’d receive a small commission at no extra charge to you). With that said, if you go to amazon and search RV shower faucets you should find some good looking options, not going to lie over the years since we began our renovation the options for RV remodels are growing tremendously. Anyway, I hope this helps but feel free to let me know if you have any other questions.
Eric, love your videos and I NEED to change mine… Because I ruined it when changing my shower head. The tiny flow hole was in my faucet was off center and partially blocked by the washer from the new house (or so I thought) so I figured I would ‘CAREFULLY’ drill it out. In doing so I realized why it’s seemingly installed ‘upsidedown’. There is a small check valve (diaphragm) inside that allows water to drain from the hose when pressure is removed. (I shredded mine when the drill bit went through… now water sprays out THe check valve weep hole) Not sure how well this will work oriented 180° or if it would really MATTER other than if it got exposed to freezing temps before winterizing. Take a look at yours it may have the same Weep hole.
Hey Mark, sorry for the delayed response, and I’m sorry that difficulty snuck up on you. After looking over ours we do have a weep hole for water to drain and it is off-center a bit as well, though I don’t see a part of our housing covering it. To be honest I hadn’t really paid too much attention to it till now, and see now that may be part of the reason they are generally installed “right side up” though we haven’t had any leaking problem, and we do have another weep hole on the actual showerhead itself. As far as the spraying out of the weep hole I’m not sure what could’ve caused it, if it were us I think I’d have to consider the same thing, that maybe it had freezing temps or perhaps it was a defective faucet. Anyway, I’m sorry I couldn’t be more help, but please let me know what you figure out.