UPDATE: All new featured RV tours will be posted on my other website, Wanderful RV Interiors. Existing tours will slowly be moved to the new website, and anything already moved will automatically redirect.
Disclaimer: This post may contain affiliate links, meaning, if you click through and make a purchase we (or those featured in this post) may earn a commission at no additional cost to you. View our full-disclosure here.
As soon as we brought our RV home from the dealership I started brainstorming ways to incorporate rustic, reclaimed wood, without adding too much weight.
One of my first ideas was to remove the RV slide-out moulding (fascia) and replace it with something more rustic. If you’re looking to change the look of your RV Slide-Out Moulding, then I hope this post will help guide you along the way.
Tips for Updating RV Slide-Out Moulding
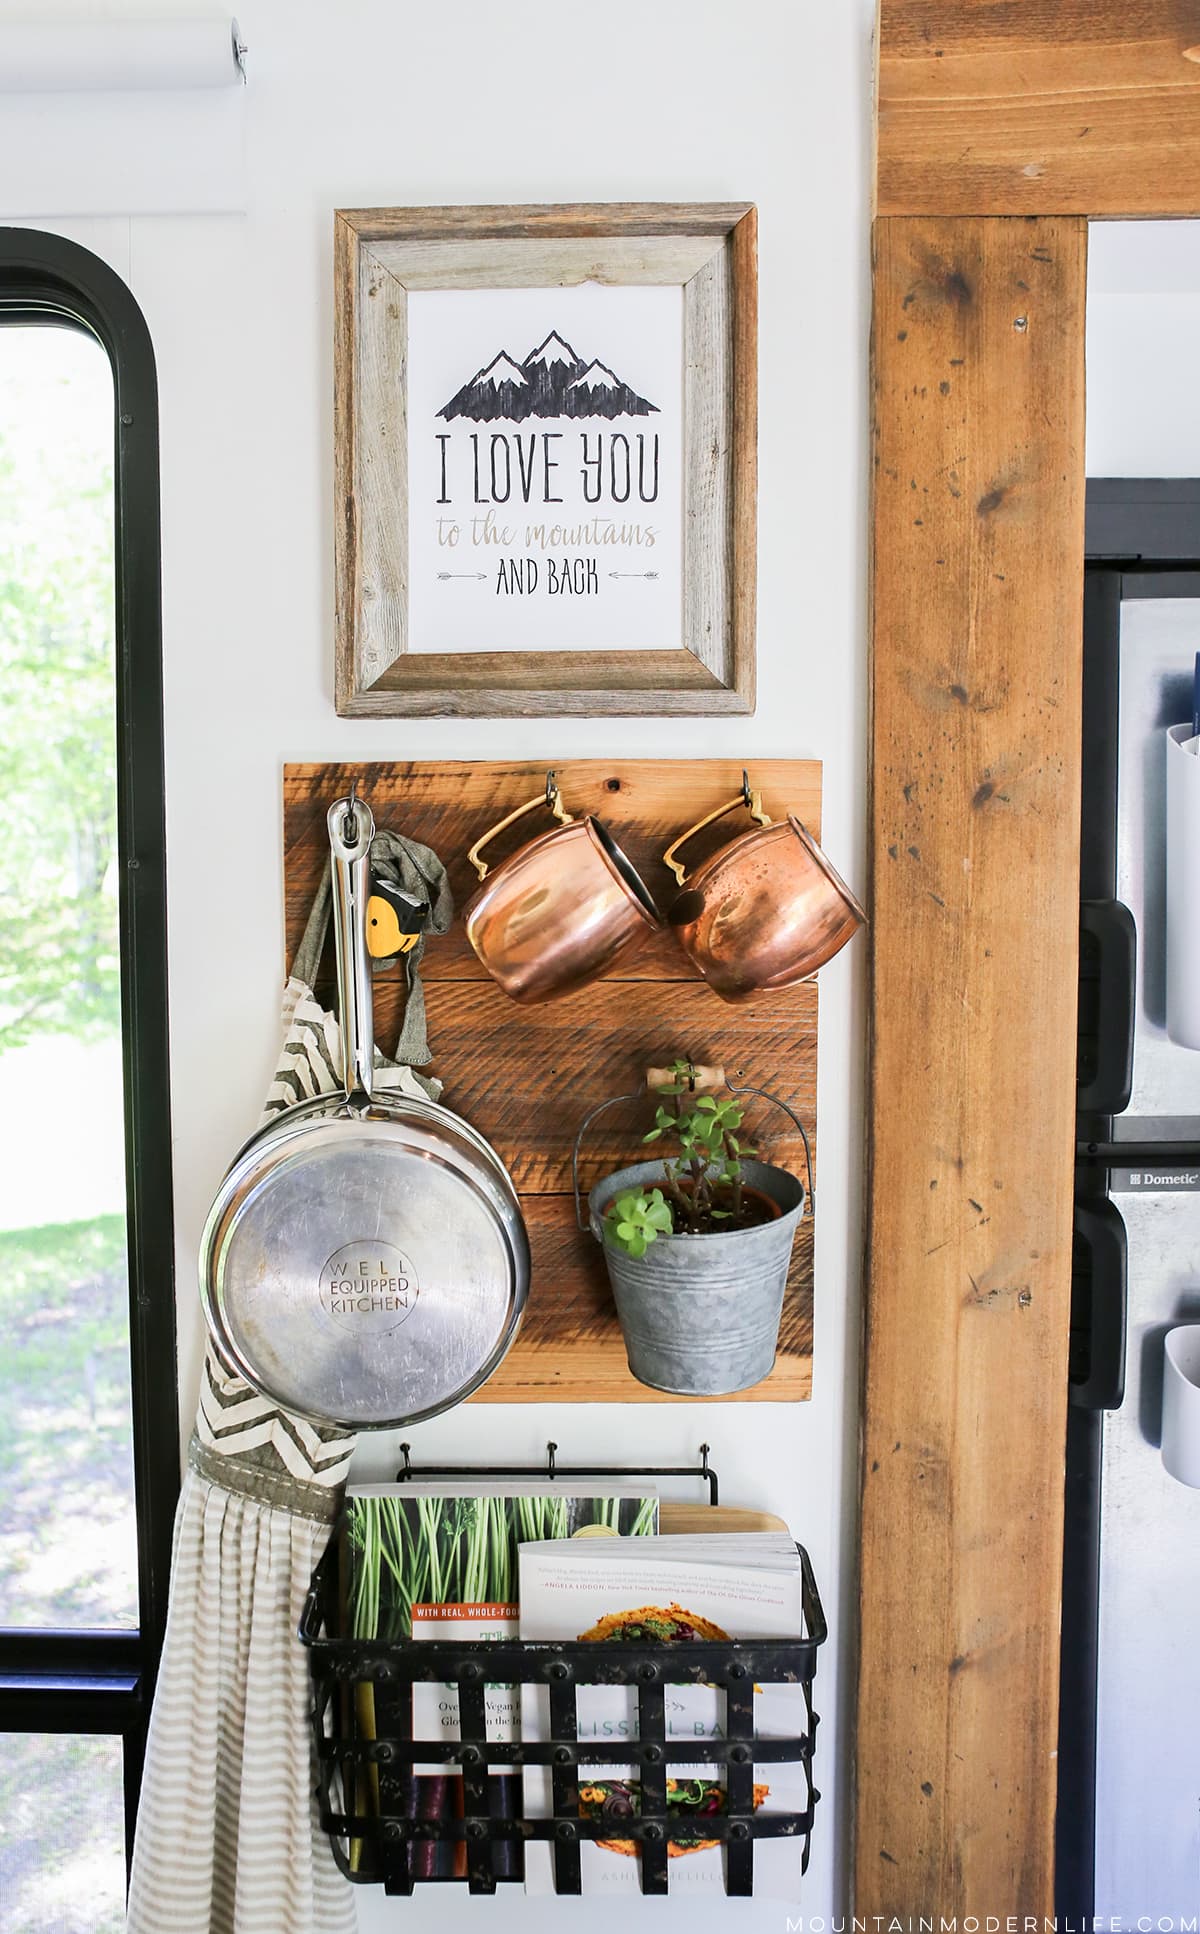
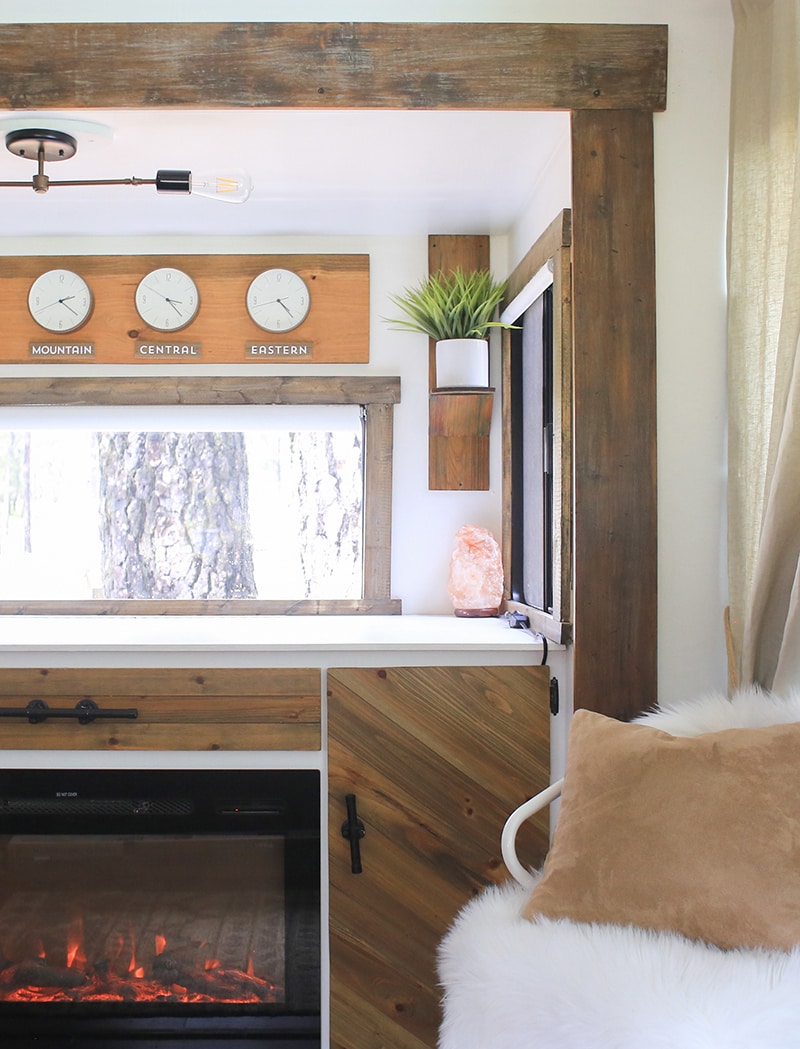
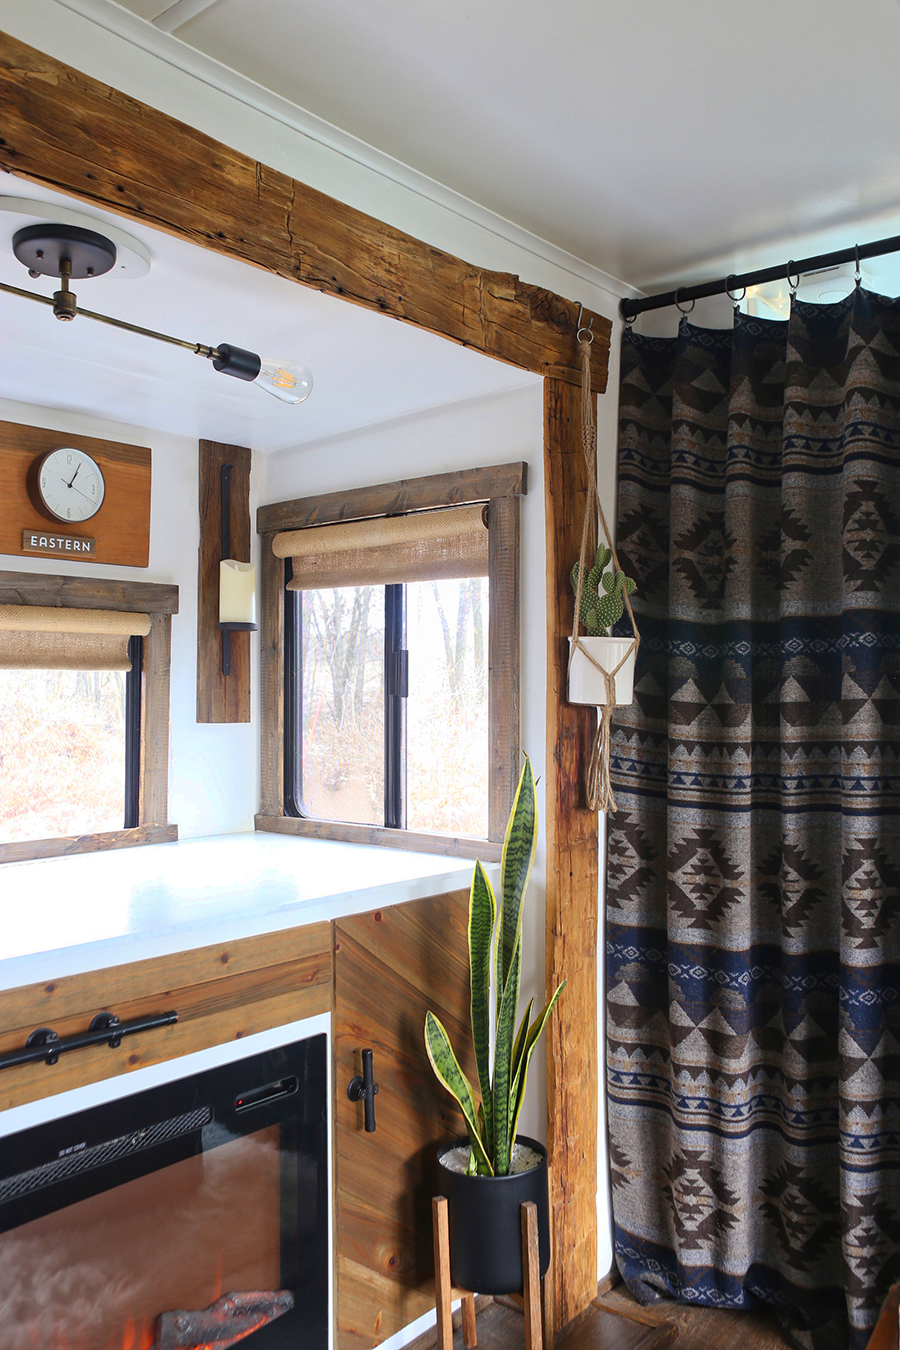
In case you’re confused about what I’m talking about, here are a couple of photos showing the wood RV slide-out moulding in our living room area:


Check out the video on how to update your RV Slide-Out Moulding:
First Up: The Inspiration
I was especially inspired by cozy nooks framed by rough hewn beams, rustic window trim, and door frames found in most mountain homes.
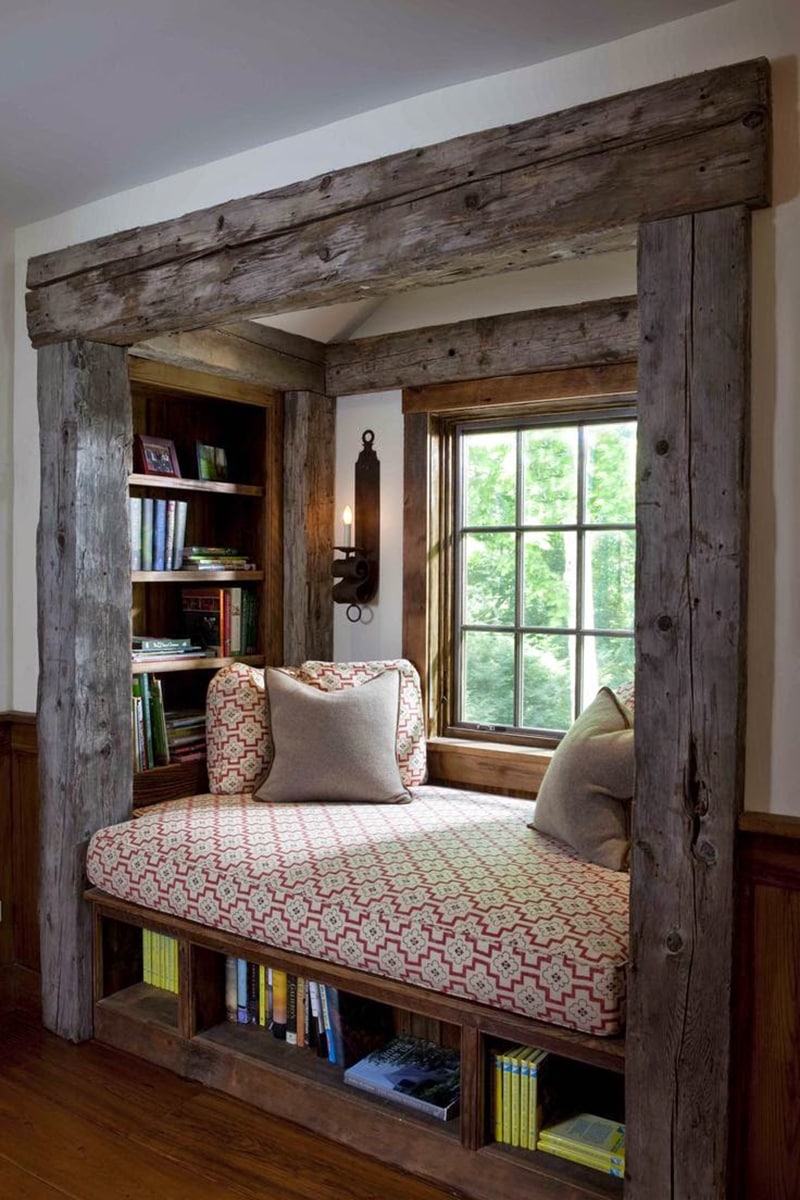

I absolutely love the mixture of woods used in the photo below:
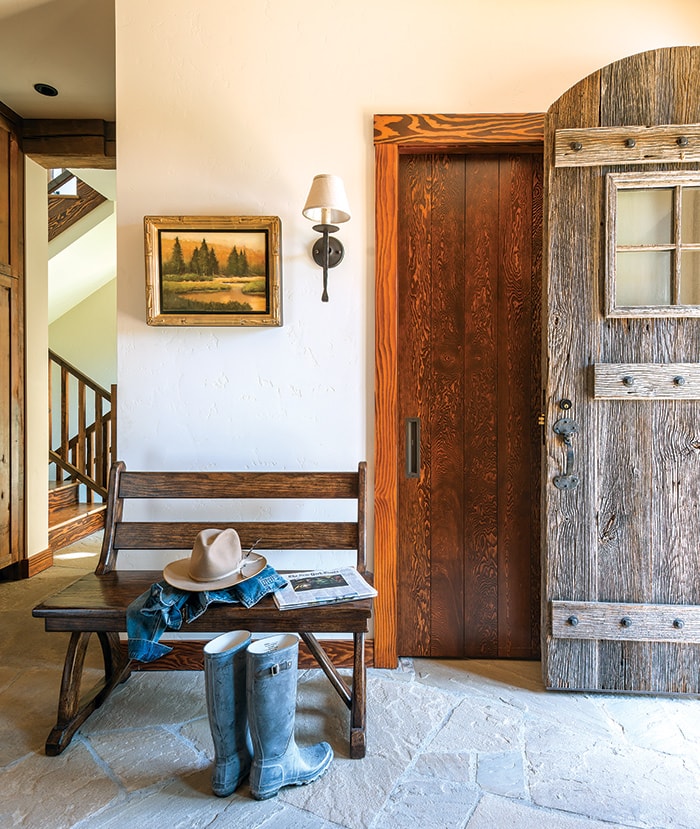
If only weight wasn’t a concern in the RV…
How to Remove the Slide-Out Moulding
Let me first say that you can update the moulding of your RV slide-out without removing the current trim. Most people paint it so you may want to consider that option, or if it’s real wood you may even want to sand and re-stain it. Our slide-out trim was more of a plastic covered with veneer and while I considered painting it, I wanted to add character and felt wood was the best way to achieve this.
The right side moulding turned out to be attached with velcro, which you can see from the photo below.

Unfortunately, the other side seemed a bit more permanent.

Rather than just yank them off (let’s pretend we didn’t try this), we turned to our RV Facebook groups to see if anyone had suggestions. A few people said the moulding is purely decorative and shouldn’t be a problem to remove, and that it’s usually just attached with long staples and screws.
Upon closer review we noticed tiny staple holes which made us feel more comfortable about using our mini crowbar to remove the rest of the moulding.
With that said, please do this at your own risk.

Removing the first piece of trim was a little nerve wrecking, but afterwards we felt much more confident.
The moulding was attached to the MDF underneath it using staples, and the MDF was attached to the slide-out with screws.


To save weight we opted to remove the MDF boards as well, but you can always add velcro to these sections to attach your new wood, or screw into them rather than removing them all together. We decided to use the existing screw holes to attach our new moulding for our living room slide-out.
However, by the time we got around to updating the trim in the bedroom we left the MDF in place and just nailed the new wood into the MDF (again you can use industrial strength velcro). We think this worked and looked better, but you can use whatever method works best for you.

Replacing the RV Slide-Out Moulding
You can purchase moulding made specifically for RV’s, but we decided to replace ours with wood instead.
I originally considered using reclaimed peel and stick planks like those sold from Stikwood, Epic Artifactory, or East Coast Rustic, mainly because they’re generally pre-cleaned and planed down pretty thin which saves on weight. I really didn’t want a “planked” look though, so I then considered purchasing reclaimed boards and getting them planed down. To be honest I didn’t find any decent reclaimed wood nearby that fit what we needed, and didn’t hear back from several companies I had reached out to, even after multiple attempts.
So while I would have loved to use reclaimed wood for our living room slide-out moulding, time was running out and I was getting impatient. Ultimately, we stopped by our local hardware store and purchased some cedar boards, which we had cut to size. I think we spent roughly $30 for the wood used to update our living room slide-out trim. (I’ll get to our bedroom slide-out in a minute).
The Living Room Slide-Out Moulding:
While I love the look and smell of cedar I wanted the boards to be darker and seem more rustic so I dinged them up using a hammer, planer, nails, screws, and well just a bunch of random objects from our garage. I then stained the boards using a mixture of stains. I honestly have no idea of the exact mixture because it was was more or less the leftovers of random stains we’ve collected over the years.
Side Note: We were debating between pine or cedar since both are softer, lighter woods, but the cedar didn’t cost much more which is why we went that route.

We installed the boards back onto the slide-out using the pre-existing screw holes. This was kind of a pain to figure out but we basically measured where the screw holes were then made marks on the back of our wood boards.
One thing I should mention is I had all of the boards cut down at the hardware store in order for the top piece to fit in our Jeep, and we didn’t realize our measurements were off until AFTER we installed all the pieces. Go figure.
You see, we forgot to account for the fact that our new side pieces were wider than the previous trim that was there. This meant our top header piece of wood didn’t hang over the sides like we had planned, boooooooooooo. Of course, you don’t have to do it this way, I just like the top piece hanging off a bit.
It drove me bonkets so we later replaced the top piece of the slide-out moulding to make it slightly hang off the edges. The hardware store I went to didn’t have a cedar board long enough so I grabbed pine (ya know, ’cause I was being impatient). I then had to stain all the wood darker to attempt to make it look more cohesive. I’d love to eventually replace it with antique hand-hewn skins and have been trying to source materials, but until then I still think it’s much improved!
Bedroom Slide-Out Moulding
I’d like to think we learned a thing or two after updating the RV slide-out moulding in the living room.
By the time we finished renovating the front and were ready to move onto the bedroom, we lucked out by snagging some reclaimed cypress wood. We had made a trip to North Carolina and it was given to us by the owner of the mountain wedding venue we were married at, who also planed it down to make it thinner.
If we were smart we could have just replaced our living room slide-out at the same time, but we completely forgot to get a piece long enough to fit the top. Woops.
We repeated the same process as above to remove the slide-out moulding and then cut our wood to size, making sure the top piece hung over this time.


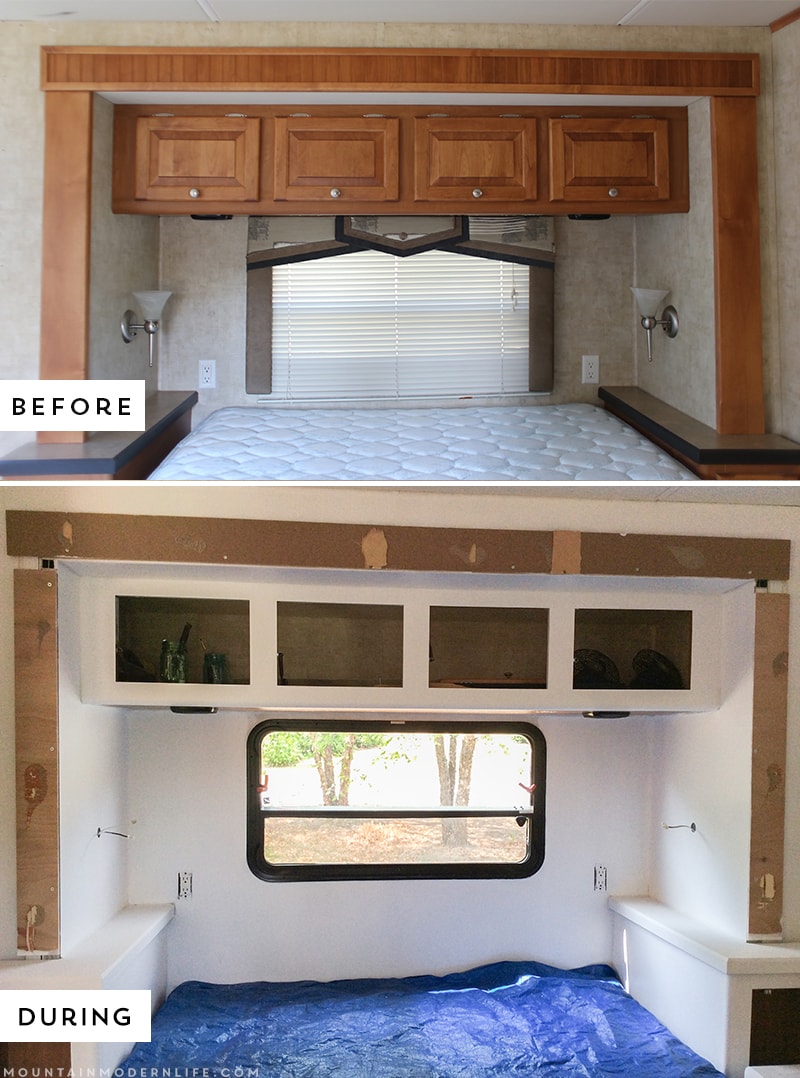
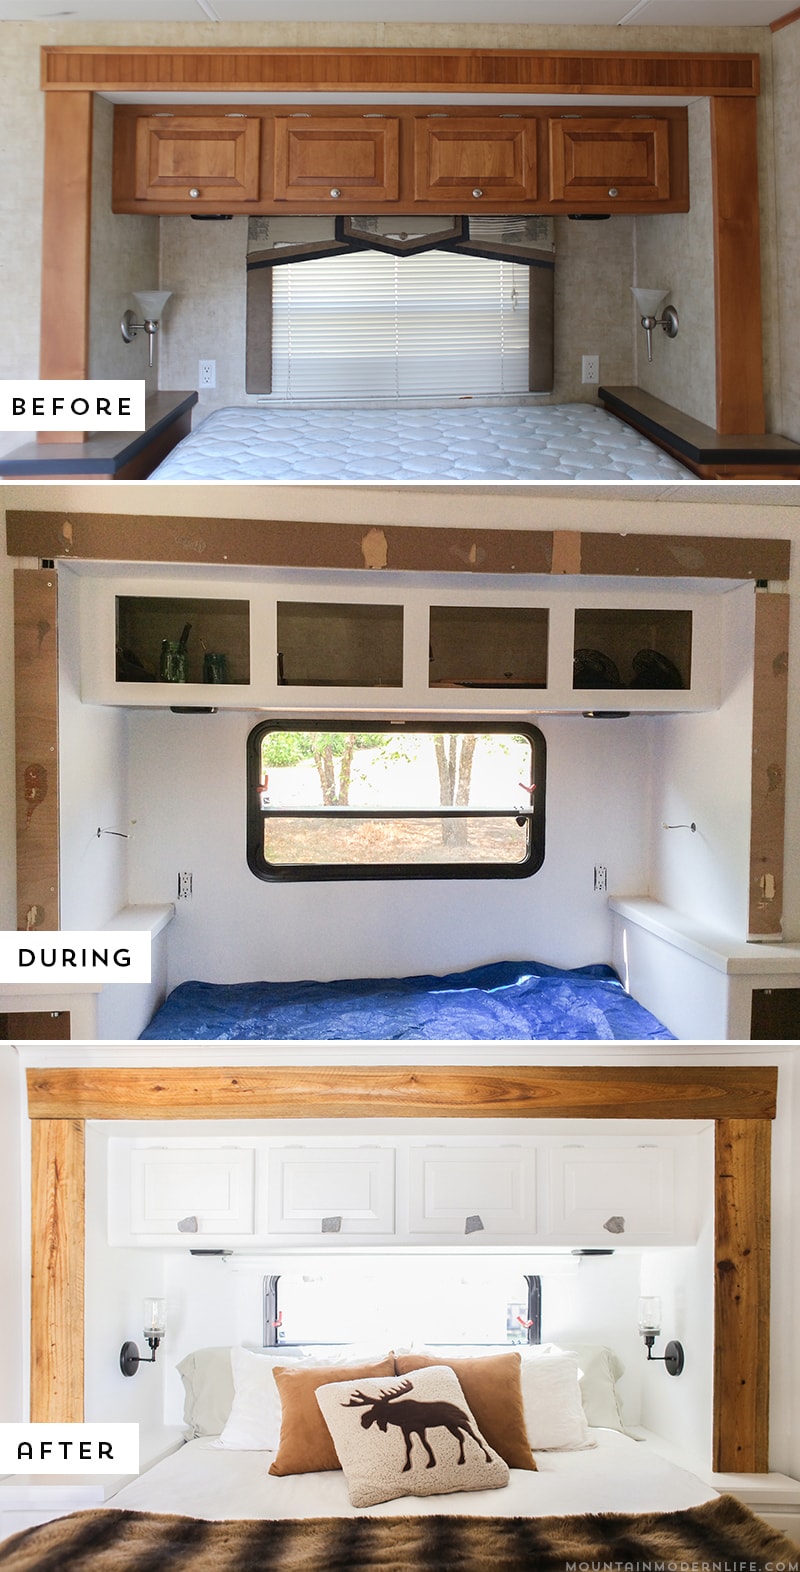
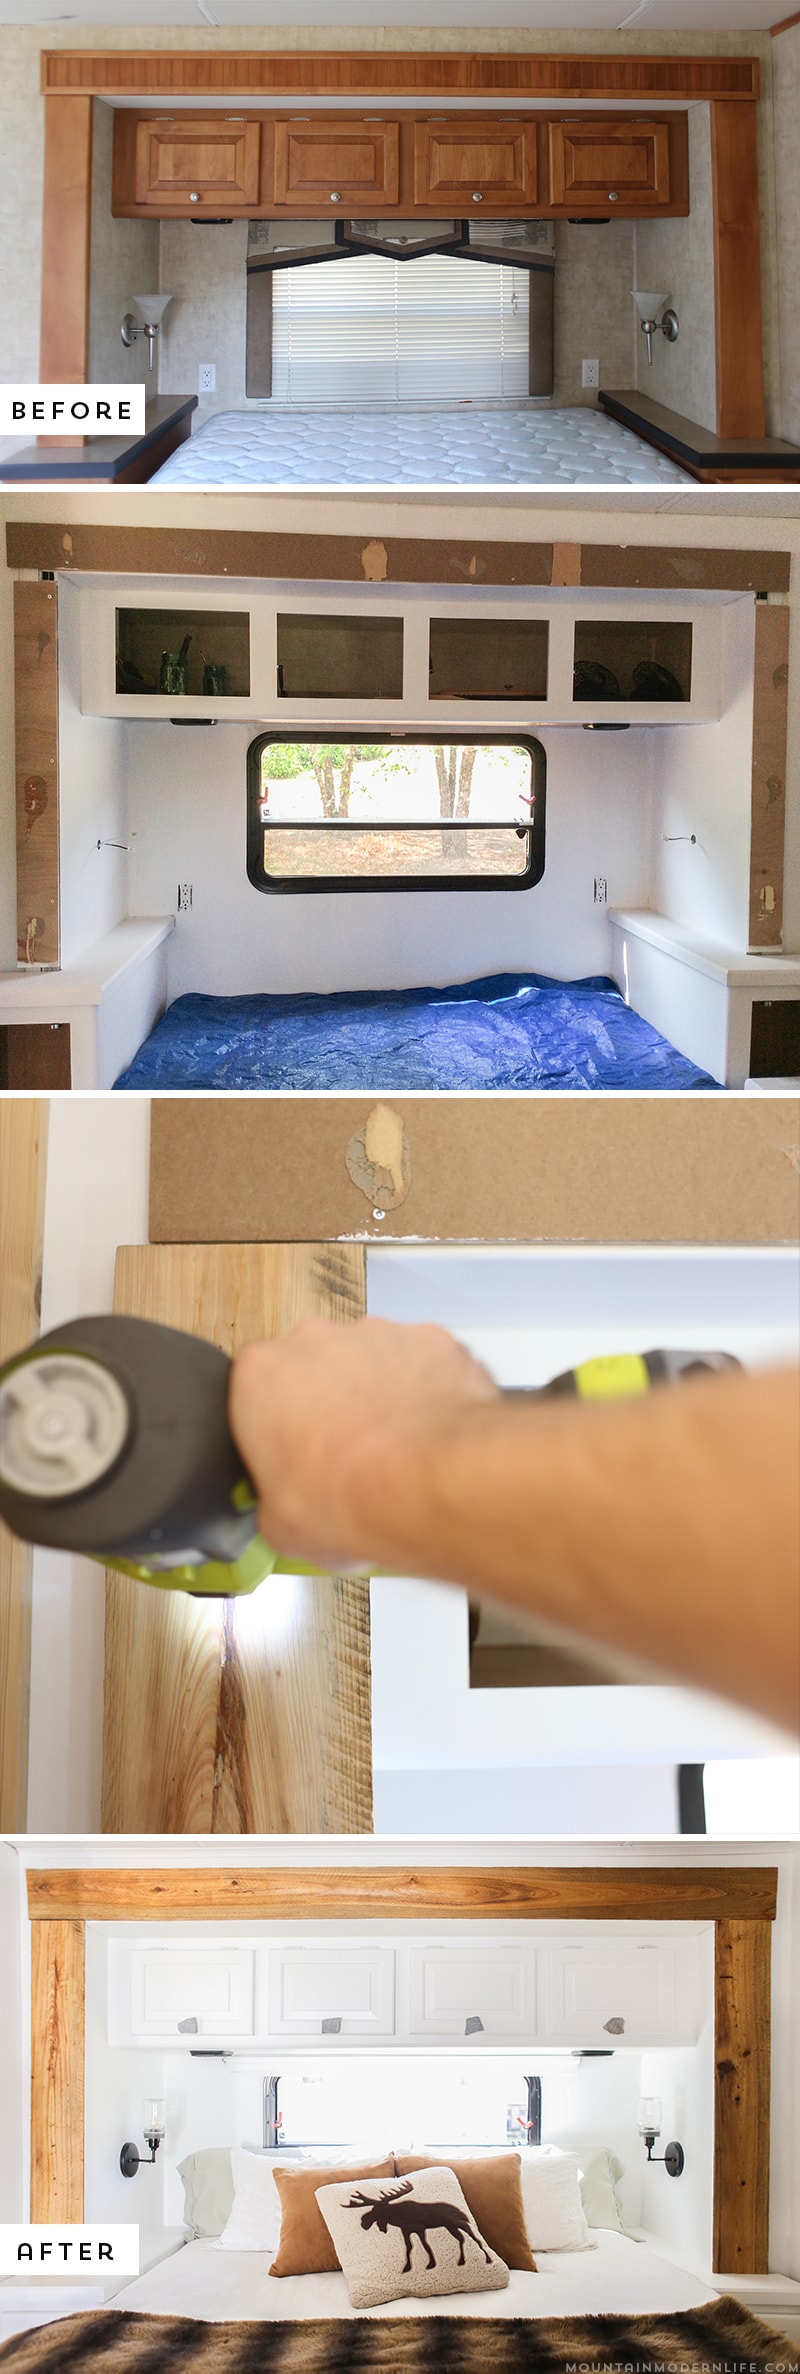
Here’s a photo showing what our bedroom looked like when we first bought our RV, and what it looked like once we removed the moulding:
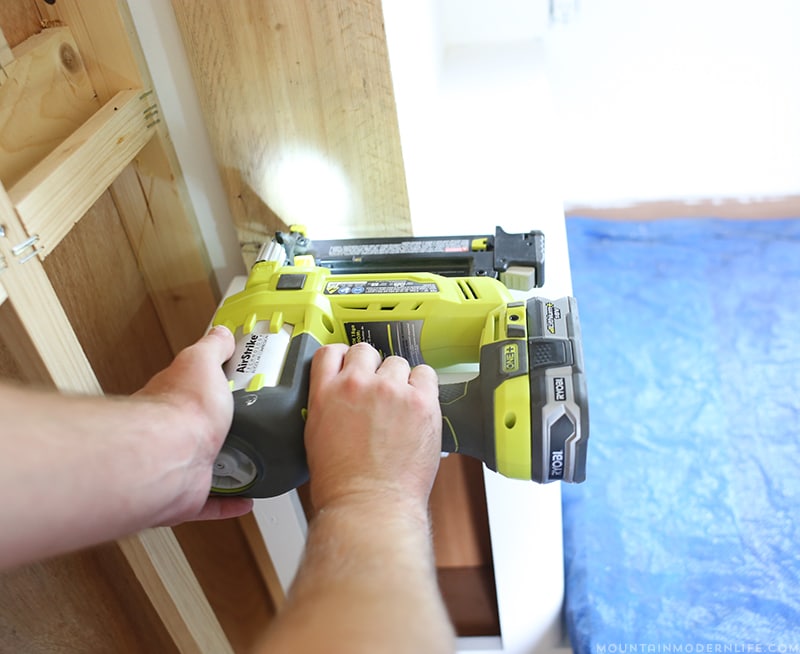
We then attached the wood to the MDF boards using our nail gun (probably our favorite tool ever!). Easy peasy.

Once the reclaimed cypress was installed I brushed on a couple coats of Tung Oil, which is what we used on our kitchen counters. I love how it enriched the wood grain.
I can definitely say that our bedroom slide-out moulding turned out much better then the trim in our living room. Live and learn, right?

We still plan to update the moulding in our living room (someday), but for now, we love the difference it’s made in our RV.
Update: We’ve since updated the slide-out moulding in our living room with reclaimed barnwood, which you can check out in this post.
Have you changed the slide-out moulding in your RV?
I love your ideas. I’m replacing all the moulding in our bedroom like you did. Just hope ours turn out as nice. Thanks for sharing your before and after pictures and giving such detailed instructions as to how you finished your remodel.
Look forward to more of your ideas.
Yay that’s awesome! Let me know how it turns out!
Katie
Love this so much! you’ve given me a whole new bounty of inspiration!
Thanks Teresa and yay, I can’t wait to see what you do!
Love it!! I didn’t realize what an awesome difference this could make…it looks great!! Thanks for the tips….I love ‘rustic’!
Thanks Terri and no problem on the tips we hope they’ve been helpful :). The moulding really blew our minds too, once we had them up it completely changed the feel of the space. Plus we love rustic too and just had to have that vibe in the RV.
I LOVE what you’ve done! I have a few questions.. Where did you get those jar/light sconces and how do you like NOT having curtains?? I feel like I need them for sleeping in and to add a little color to the rv… but love the view too.
Thanks Kristina! I made the mason jar sconces, but you should be able to find similar ones online. As for curtains… I thought about putting some in the hallway but was afraid our cat Duckie would pee on them. He has a tendency to pee on soft things if they’re left on the floor so we rarely let that happen. He’s been to the vet and is all good, but if we leave a towel, soft rug, or curtains that touch the floor, chances are he’ll eventually pee on it. Not fun. I considered adding some linen/natural style curtains but honestly love all of the light that comes in and prefer to be woken up from the sun anyway. I do have an eye mask that I use sometimes if I really want to sleep in though. You can also get the curtains as blackout shades, but I can understand wanting to add texture and warmth through the curtains. We had planned to frame all our windows out with rustic wood and then use the shades so the wood would have added warmth. That obviously didn’t happen (mainly due to time constraints and needing to get on the road and snag some shades asap), but maybe someday…
Thank you for your inspiration.!!
Redoing our 2005 fifth wheel camper and plan on doing the same thing y’all did in our slide Out!
We already took the old moldings of slideout off .. it was like a green carpet/ cloth material ;/
Can’t wait !!
So I should use cedar or pine right ?
Thanks so much ,
Kristi
I can only imagine the RV manufacturers talking about how a green carpet style would look great on the moldings, haha. I really do wonder where they come up with some of the decor choices.
You can use any wood you want really, pine and cedar are lighter so that’s why we used so much of them in our RV. Have fun and let me know how it turns out!
Katie
I’m excited to do this makeover on our motor home. Thank you so much!!!
I have enjoyed this and your other posts. Thank you for sharing! Where did you get the table/desk you have? I assume it retreats partially or fully into the slot? The added mug holder on the end is great! Do you have a separate post on that part of the make-over?
Thanks again for sharing! You do good work.
Hi Lisa! Thanks and we love the expanding table – I’m sitting at it right now in fact 🙂 You can find a post with more info here: https://mountainmodernlife.com/diy-pull-out-table/
great ideas you have. it feels like you have been peaking in my RV…..LOL. but really your slide-out molding turned out great. I was actually thinking of changing mine in my dining room area slide-out to match up with the cabin theme I have converted it to. I have actually been looking into this company called “faux beams” which is a sister company to “faux panels” which I have already been purchasing product from. a bit pricey, however great stuff. weather proof, extremely light weight, and their panels also add “R” rating value to your insulation. I have a lot of heat coming in the RV thru my dining room area walls in the summer so currently I am covering them with faux dry stacked stone. I have also used it around my fireplace, stair backing and on the sides of furniture I have made. It goes great with my bamboo flooring.
Hey Gregg, we really do love your RV, one of our main goals was to make our feel like a cabin on wheels. I’m not going to lie I think we’ve both made that happen. I really enjoy the faux dry stacked stone you have throughout, and with it adding better insulation value you can’t go wrong. Great work on your rig!
Omg, this turned out fabulous! We have a brand new travel trailer but the decor is still so dark and feels dated. My only problem I can foresee is convincing my husband we need to change things since it’s brand new. Lol, wish me luck!
Haha, I know what you mean. Good luck!
I can’t thank you enough for all your how to’s and your inspiration! I am considering nailing wood right on top of the moulding, what do you think? Did you remove it only for the weight? Thank you so much, Deanna
No worries at all Deanna we’re glad you are finding the information helpful. It’s hard to say exactly, depending on the wood you’re putting down and the moulding you’d be attaching it too. The main reason we took out the old was to conserve weight like you suggested, at the same time you want to be sure you’re going to get a smooth connection between the wood and the moulding. If you want to send us some pictures to [email protected] I may be able to get a better idea of the situation if I can see it. Anyway I hope this was at least somewhat helpful!
I love the Mason jar lights in your bedroom, but cannot find a video on how you made them?
Thanks Jan! I made those before we hit the road, and got photos but didn’t do a video on them. I hadn’t planned on waiting this long to post about them but it’s now been nearly 2 years and I don’t even know if I remember what I did, haha. I’ll have to look through my photos and see if it’s something I can post here soon. If so I’ll be sure to let you know 🙂
Katie
I actually pulled up your blogg to see how to reattach my molding that was coming loose. Now you got me thinking. I’m sure my DW will be intrested in the changes you made…. Great job guys. Thanks for the detailed sharing.
We’re glad you found us Phil! I hope it leads you and the DW down a path you’ll enjoy. Let us know if you have any questions we may be able to help with. Best Wishes, Eric
Ok. For real….ya’ll are my RV renovation spirit animals. We are currently remodeling our fifth wheel and have used so many of your ideas already! I love the space you created!
Thanks Jen and that’s awesome! Enjoy your reno and keep us posted! I especially love seeing 5th wheel before and afters!
Wow, what a transformation! Looks amazing! It looks like you also added some crown molding while doing your remodel. Can you explain what you used and how you attached the crown to the ceiling/wall? My vinyl ceiling is coming down around the edges and I want to hide the sagging vinyl with some small crown like your did. Thanks!
Hey Aron, sorry for the delayed response! We actually used our nail gun and placed small nails about every 6 inches. We had the nails go through the moulding and into the wall. It’s been over two years since we did it and the moulding is still holding strong. We used 18 gauge nails by the way. Anyway, I hope this helps and let me know if I can clarify anything for you.
Where do I get molding for a 2007 carrage compass fifth wheel
Hey Curtis, that is going to depend a lot on how you want to redo it. If you want to replace it with something close to the original I’d reach out to your manufacturer and see where they get it from. Otherwise, it’s going to depend on the dimensions of your slide out and what type of material you’d like to use.
I’m just starting to renovate and need ideas. You’re the first i’ve used as a major source. I really like your approach, and your RV looks fantastic.
Thank you so much Mary, I’m glad the information has been helpful. Make sure to let us know if you have any questions and we’ll do our best to help 🙂 Best of luck with the renovations!
Do you have any tips on getting long boards into the RV to use for the molding? Our longest slide is 12’10”, and I’m not sure we can get a board that long in through the door… since you’ve done it a few times now, maybe you have tips? Also, how thin did you plane the boards to balance weight and durability? It looks like maybe 1″ in your photos? Thanks!
Hmmm, we really just brought them in at an angle from the front door or did some maneuvering back and forth to get it in. The super long pieces could generally bend a little too (well trim pieces anyway). I’m not sure how your RV is set up but if you can go in some then have someone pulling it from inside that can move at an angle, that may help.
Oh and the thickness depends. The boards we bought from the lumber yards/home improvement stores are generally 1 inch, but if we had them milled down then they are closer to 1/2 an inch.