UPDATE: All new featured RV tours will be posted on my other website, Wanderful RV Interiors. Existing tours will slowly be moved to the new website, and anything already moved will automatically redirect.
Disclaimer: This post may contain affiliate links, meaning, if you click through and make a purchase we (or those featured in this post) may earn a commission at no additional cost to you. View our full-disclosure here.
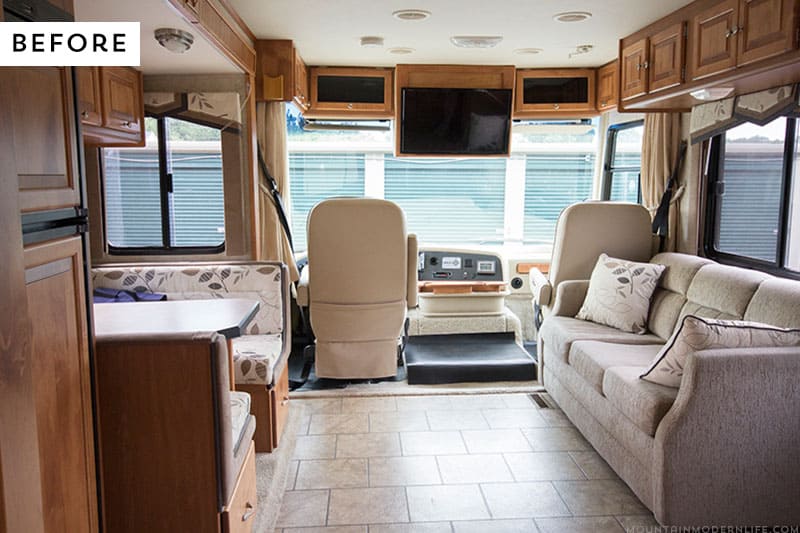
If you’ve spent any amount of time looking at RV floor plans, then you know the TV set-up in many older models is awkward, to say the least, as you have to turn your neck just to see the tube. Sure we plan to spend a decent amount of time outdoors, but that doesn’t mean we don’t like to cozy up in front of the tv for a good movie, or an episode of Game of Thrones.
With that said, this would have been difficult with the layout of our motorhome, as the main TV is located above the windshield in between the driver and passenger seats.
How to install a TV Lift and fireplace in an RV
That’s why we decided to re-adjust the space planning to create a cozier environment with more of a living room vibe. What’s funny is we knew we wanted this sort of setup back when we were researching RV’s and narrowed down our search to models where the dinette was located across from the sofa. I even created an excel spreadsheet to keep track of which manufacturers and models had this type of floor plan within our budget.
If you are looking at newer coaches, you are likely to find this type of set-up as it’s a bit more popular these days, but it’s a bit trickier to find in older models.
Another reason we chose our RV, a 2008 Tiffin Allegro Openroad 32La, was because of the amazing amount of windows it has throughout.
However, with limited wall space and natural light at a premium, we came to realize that the best option would be to install the TV on a lift.
This way it won’t block any windows when not in use, can be securely hidden, and will allow us to create a multi-functional area for lounging, working, and eating.
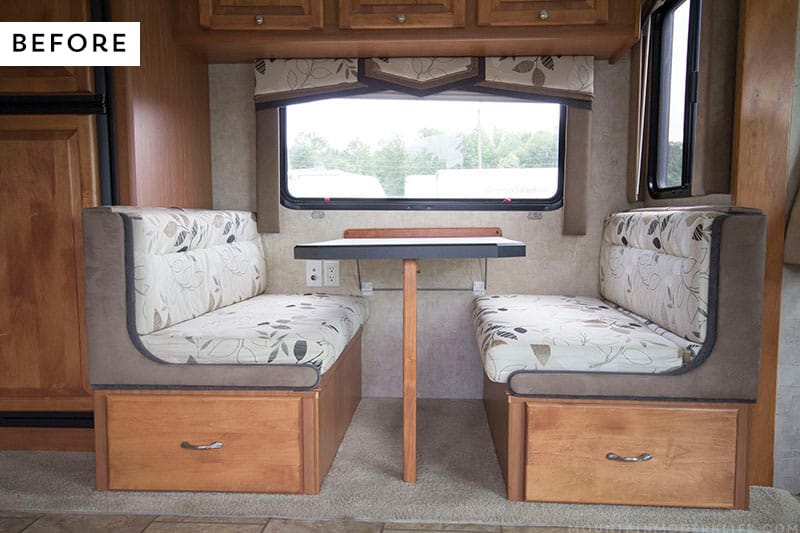
Removing the Dinette Booth
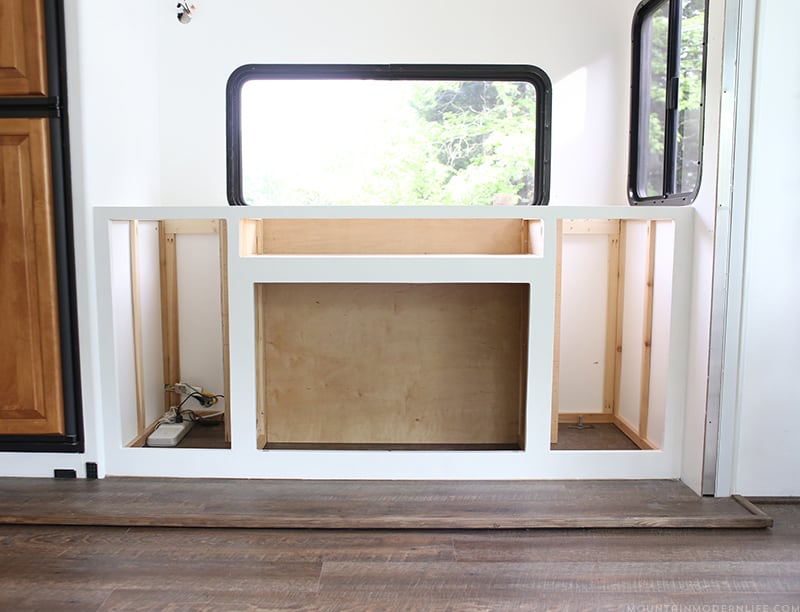
To do this we first removed the dining booth that came stock in our RV and designed a custom-built media cabinet in its place.
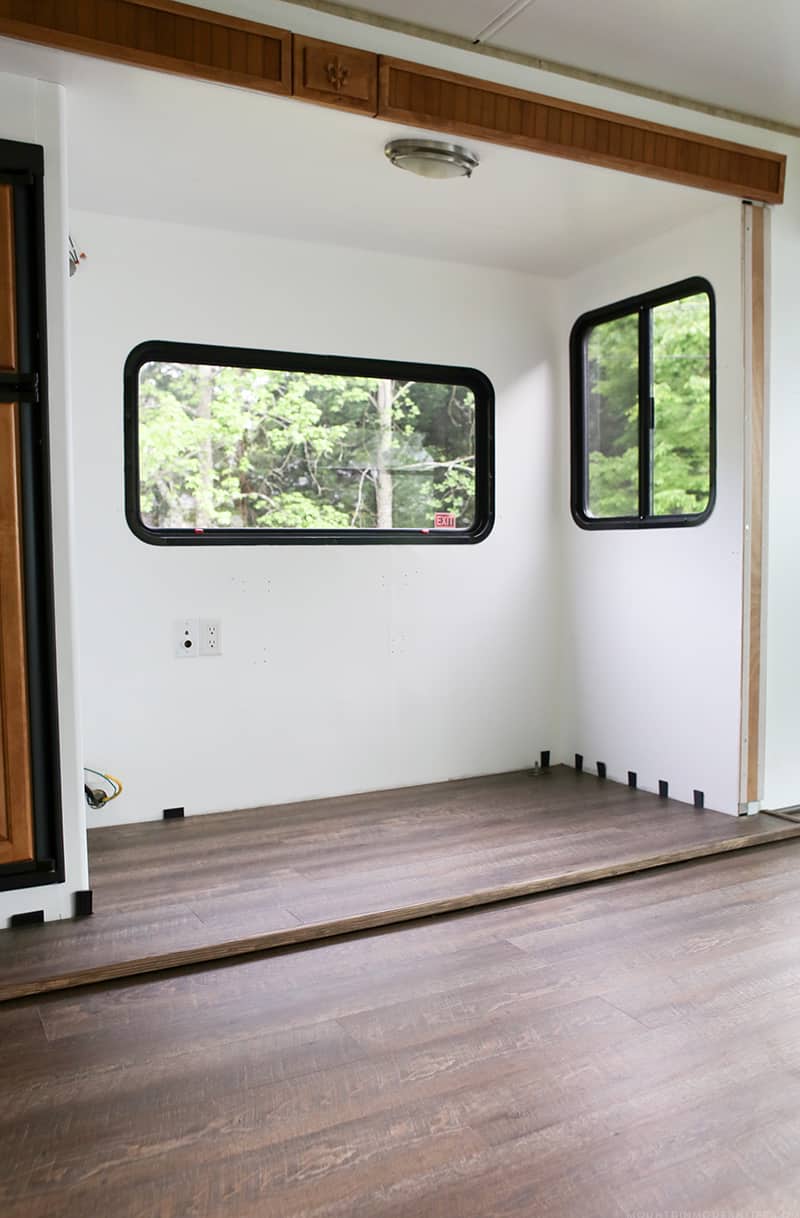
Here’s a photo showing the booth removed and new flooring installed. We had also removed the cabinet above it to provide more clearance for the TV (Eric wanted as big of a TV as we could fit, haha).
Once we made the decision to build a custom media cabinet for our TV Lift, we figured we might as well include an electric fireplace. I mean that will really make it feel like home, don’t you think?
We are super excited to have teamed up with Touchstone for this project and honestly can’t say enough good things about their products and service. They even had one of their lifts featured on House Crashers.
I played more of the design/assistant role in this project so I’ll let Eric explain how we installed these components in our motorhome.
If you’re looking for some ideas on installing a TV lift or electric fireplace inside your RV, we hope the information below will help guide you along the way or at least provide some inspiration on where to start.
Installing a TV Lift and Electric Fireplace in Our RV
Today I’m going to share some information on how we installed a TV lift and an electric fireplace in our RV. We wanted to show you the frame of the cabinet to give you a better sense of how we built it and how the components fit inside. However, we will be sharing the finished cabinet with you this weekend so be sure to check back then.
You can also watch a quick video I made that highlights how the TV lift and electric fireplace were installed in our cabinet.

Here are the specific products we used for this project:
- The Whisper Lift™ II PRO – Touchstone’s Advanced TV Lift Mechanism
- The Sideline36™ Touchstone’s 36-inch Recessed Electric Fireplace with Heat in Black
Every motorhome is different so keep in mind that the sizes along with voltage and weight restrictions can vary from one to the next. With that said, this is more of an inspiration post to give you some ideas on how you can create a custom media cabinet with a TV lift and/or electric fireplace inside your home or RV.
If you are going to install either of these components in your sticks and bricks home then you won’t have nearly as many challenges as we did since you won’t have to deal with weight restrictions.
Installing the lift and fireplace is a fairly easy job so anyone can do this. If you have any questions during the installation process you can always contact Touchstone and they can help you along as well.
Build vs. Buy
If you’d rather skip the building process you could retrofit the lift or fireplace into an existing cabinet or even purchase a cabinet from Touchstone with one or both of these items already installed.
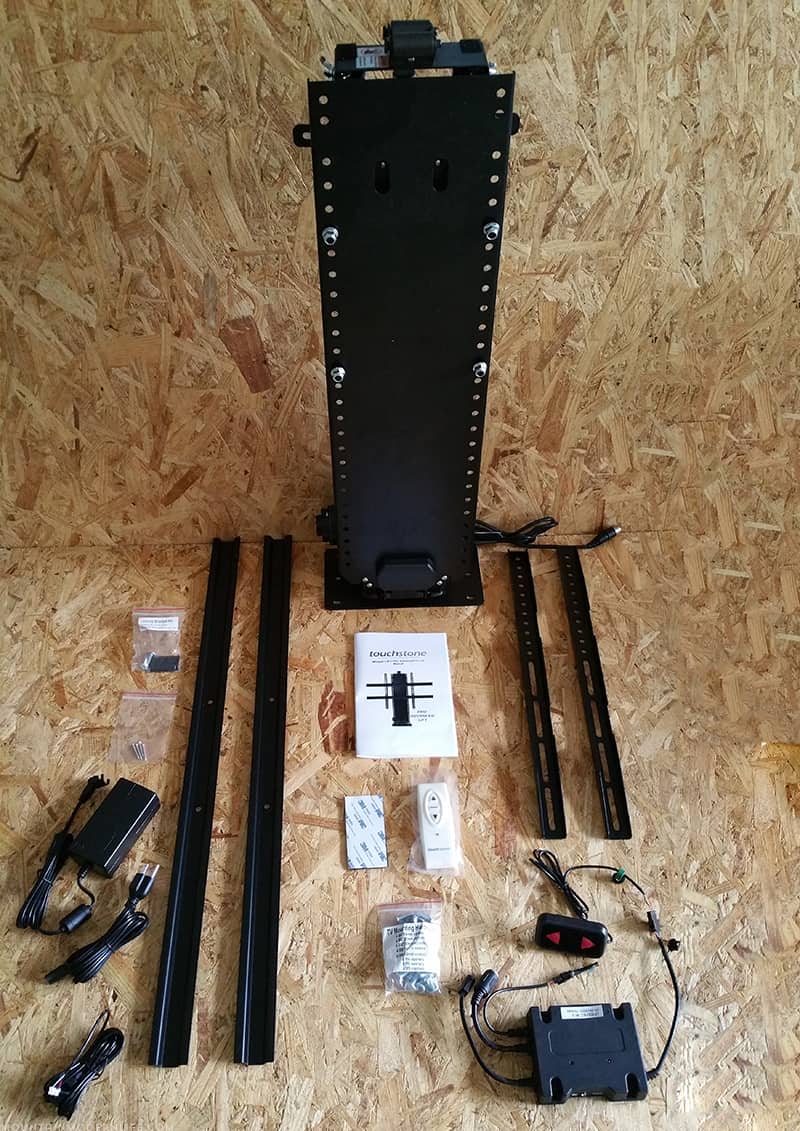
TV Lift Mechanism out of the Box
As you can see, the TV lift comes pretty much assembled out of the box. All you have to do is attach the tv mounting brackets and connect the power cables.
We went with the Whisper Lift II Pro Advanced which comes with an IR Repeater Kit so that we can use a remote for any audio/video components that are stored inside the cabinet. It also has height memory so we can customize the height we want it to stop at, which is pretty awesome.
Drop Down or Pop Up
This TV lift can actually be used as a drop-down or pop up. We used it as a pop-up, but depending on your situation you may prefer to have it come down from a cabinet instead.
Coming up with a plan
Once we had our design sketched out on paper, I came up with a plan on how to build the frame. Having never built anything like this before, I thought it would be best to create a to-scale sketch-up plan using the garage floor and some chalk.
I made sure my drawing was the same size as the finished product would be. The white outline of chalk I drew is 3/4 of an inch thick because that is the thickness of our wood. From this point, I brought out the TV Lift.

Once I had the lift in place I created a rough outline of the space I would need with the TV installed on the lift.
Now it was time to bring the fireplace into the equation.

Since we now had an exact replica of the cabinet drawn in chalk on our garage floor it was time to begin the construction.
When weight matters
With us building our media cabinet in the slide-out of our RV it was extremely important to keep an eye on the weight we were going to be putting in the slide-out (you should consult your owner’s manual or your manufacturer if you have any questions, considering all RVs are different).
In order to keep the weight down as much as possible, we decided to use cedar 1X2’s to make up the majority of the cabinet frame. Cedar is a really lightweight wood but also has some strength to it.
Make sure you pre-drill any holes first since cedar is a softer wood and more prone to cracking.
We also used a couple of common board 1X4’s to add strength and keep both weight and cost down. I got this idea from looking at the kitchen cabinets in our RV. As many of you may know we are in the middle of a remodel in our coach and currently do not have a countertop on our kitchen cabinets. This made it easy for me to look and see how they created the support in the kitchen.
We built our cabinet into the walls of the slide-out in an effort to use as little material as possible. This way we didn’t have to build exterior walls and could keep the weight down. However, if you are building a cabinet for you home instead of your RV you can use the same principles, you may want to consider the finished outside a bit more than I had thought.
Using the 1×2’s I built two side frames. Next, I constructed the back wall of the cabinet using a combination of the cedar 1X2’s and the common board 1X4’s. If you haven’t heard of the Kreg Jig you should definitely check it out. It has made building furniture like our dining table and desk possible for us. It is extremely easy to use and creates an extremely stronghold.

As you can see in the picture above, the frame is around the three walls that will help act as support. While it doesn’t look anything like a cabinet, it is time for the TV lift. Once I had the lift on the slide-out I found the center of the back wall I had just created and matched it up with the center of the TV lift.
The Touchstone Whisper Lift II Pro Advanced is extremely easy to install from this point. It is literally a matter of 6-8 screws, depending on if you use 4 or 6 at the base. Reading the instruction manual provided with the lift will help you decide which is best.
I chose to use all eight screw holes, when doing so I screwed all eight screws in about halfway. This includes the braces on the back of the lift as well as the holes on the bottom. Once I had all screws halfway in I went around and tightened them down. Now the tv lift is in place and secure.

Seeing this made me feel really good because it finally felt like it was all coming together.
Framing around the TV and lift mechanism
Using the distance I had created on the garage floor in the chalk outline I created two more walls that would attach to the back wall of the media cabinet and surround the TV on the left and right sides. I then constructed the wall that would connect those two pieces in the front, creating a box around the lift and the TV.
After I had constructed this box I realized the left wall I had created actually leaned in toward the lift. This, in turn, made it so the distance from sidewall to sidewall was different in the back than it was in the front. As it turns out, our slide-out isn’t completely square which didn’t help the situation. In order to avoid this, I would suggest spending a little extra time and measure, measure, measure.
Once you have the two side walls of the tv lift box attached to the rear wall I would measure that distance at the back then create the front wall accordingly. Alright, enough of that mistake, this is what it looks like with the frame around the lift.

I decided to mount our TV onto the lift to ensure it would fit and work properly before moving forward with the rest of the build.
Attaching the Front Frame
At this point, I turned my attention to the front wall of the custom media cabinet. I knew going in that we needed two cabinet openings on the sides, in addition to an opening for the fireplace and our slide out table just above the fireplace.
The first step was to measure the box of the fireplace from right to left, considering I already knew the height of the front piece (it needed to match the rest I had already built, which was 33 inches). By measuring right to left I was able to create my support beams.
After creating the rectangle for the front piece I put in the support beams that would stratal the fireplace, next I measured top to bottom and placed the top piece in. I then attached two more 1X2’s directly next to the fireplace frame because I wanted it to be secured to its own frame.


Strengthening the Frame
We had picked up a 4X8 piece of 1/4 inch birch plywood to attach to the front of the frame, creating a more finished look. Since I didn’t plan on attaching the plywood until after the frame was fully in place, I went ahead and placed the frame on top of the plywood and traced the openings. That way once I had it attached I could cut the plywood to fit right over the front.
So, at this point we have all four outer walls created along with the frame surrounding the tv and lift, so we just need to connect it all.

As you can see from the picture above, we created two walls that would attach to both the tv lift box and the front wall. Once these two walls were put into place the whole media cabinet became secure, like won’t move at all, which is especially important since we’ll be driving it down the road.
You can also see the shelf coming together in between those two newly created sidewalls. In order to create the shelf, I measured the height we wanted then placed a couple of 1X2’s across the middle creating a brace.
An important tip to note is that the middle braces I put in there ride 1/4 of an inch lower than the top of the side walls. This will allow me to place a piece of the 1/4 inch plywood on top. In the picture below you can see the 1/4 difference I am talking about.

We used our brad nailer to attach the rest of the plywood, which gave the cabinet more strength and a more finished look.

Prepare for Wires and Cables
When placing the plywood on the interior frames, try to think ahead and decide where you will want your wires to go. I cut out two 2 inch circles on the bottom left of both the side panel of the tv lift box, as well as the side panel of the fireplace box.
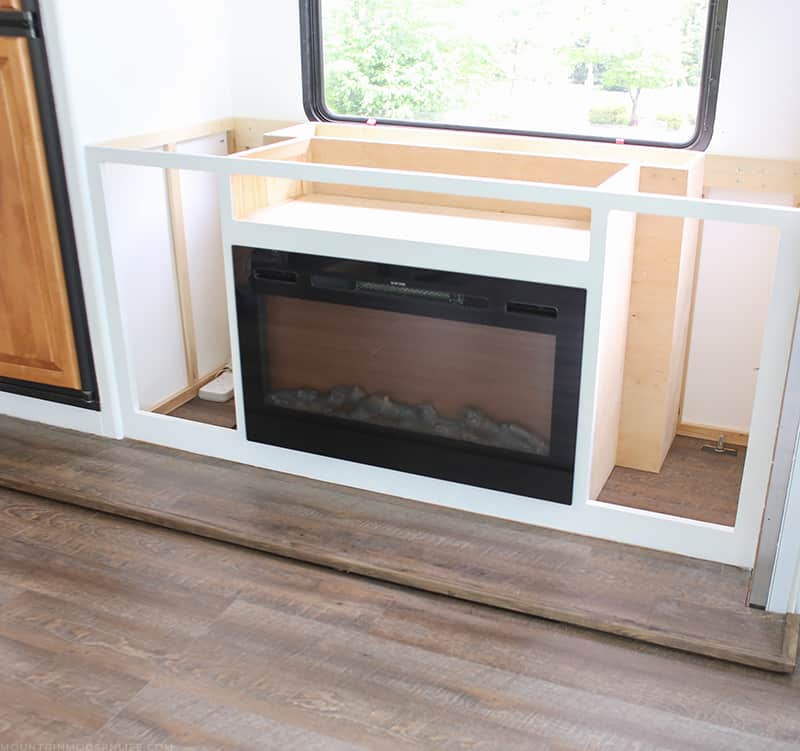
Installing the Electric Fireplace
Now with the base finished it’s time to install our 36″ Sideline Recessed Fireplace.
Just like with the Whisper Lift II Pro Advanced, the fireplace is extremely easy to install. If you are installing a fireplace and tv lift, make sure you reference the manual for how much space you need in between them. The heat from the fireplace comes from the back so that’s something to keep in mind.
When you receive the fireplace it will come fully assembled with the front glass piece in place. Before you install it you will need to remove two screws and lift the glass piece off.


We decided to use the faux logs for our fireplace, but Touchstone does include the crystals and mirror so you can use whichever you prefer.
Side note: Before we attached the front piece of the media cabinet frame we made sure the fireplace would fit inside.
We now used the six screws provided with the fireplace and secured it to the media cabinet.
Now you slide the glass piece back into its slots and replace the two little screws you previously removed from it.
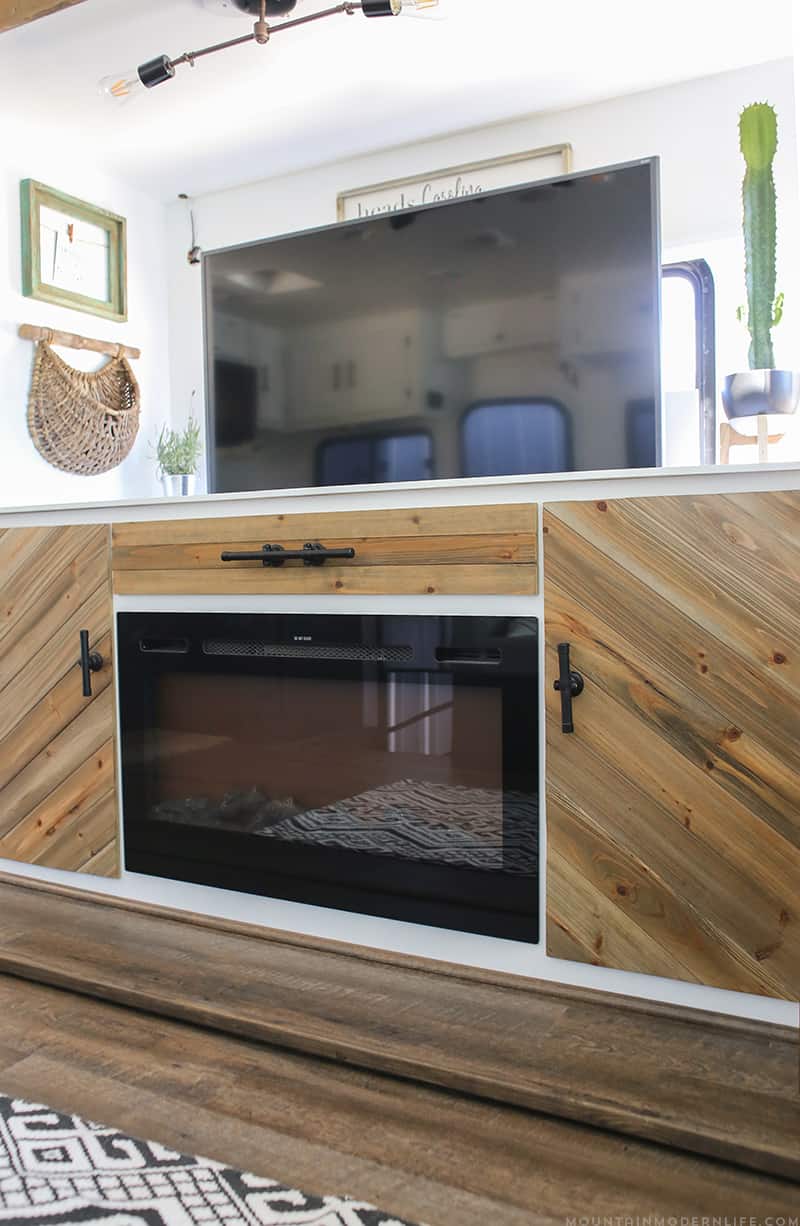
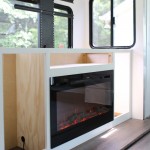
TV Lift and Electric Fireplace Installed
This is what it looks like with our new fireplace and tv lift installed inside the cabinet.
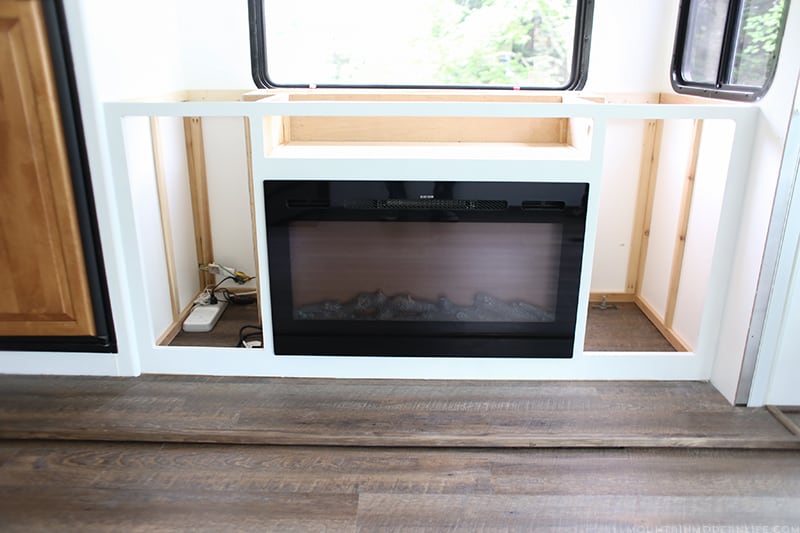
Here it is with the TV lift up and the fireplace turned on:

Doesn’t it look awesome? We’re pretty excited about it, and it’s not even finished.

I built a hinged lid for the top out of 1/2 inch plywood. I found it easier to cut out the gap for the lid, and then use a template and another piece of plywood to cut out the actual lid.

A 30 inch piano hinge was then added:

This is what it looked like before we painted it white and installed it on top of the cabinet:

This was my first experience building a custom media cabinet with no exact plans to go off of, and while I can’t say it was easy, it was fun and challenging and I think the results turned out great.
Here’s an updated photo showing the tv lift in action, along with our extending table.

Are you are planning to replace your dining booth with something different? Let us know in the comments!

Be sure to visit Touchstone at the links below for more information on their products. They also have some really helpful videos on Youtube.
Touchstone Website | Facebook | Youtube | Pinterest | Twitter | Houzz
Thank you so much to Touchstone for providing us with the TV lift and fireplace for this project. As always, all opinions are 100% ours and we only share products we use and recommend.


This looks so great in the RV! You guys will have the most comfortable and lovely RV out there!!
Thanks Amy! We still have a ways to go but that’s definitely the plan 🙂
Wowza! How cool is that! That’s an amazing built-in, my friend! Can’t wait to see the finished RV! it will be fabulous.
Thank you Aniko! You and me both, haha.
Installation looks great! Does the tv lid connect to the lift some way? Or do you have to manually close the lid after lowering the tv? Thanks, jh
Thanks a lot John!! That was one of my biggest concerns when we first thought of building it haha, I didn’t want to have to manually close the lid. And with the lift we have you don’t have too! So, we used a piano hinge on the back of the tv lid, and with the way the tv lift is constructed it pushes the lid back on the way up. As it continues to go up the lid stays slightly leaned forward onto the back of the lift. This in turn makes sure when the lift goes down the lid is guided back into place, using gravity is the main factor. Hope this answers your question, best wishes!
I WOULD LIKE TO SEE HOW THE EXTENDING TABLE CAME OUT. HOW DID YOU MAKE THE TABLE TOP?
STEVE
Hey Steve, we used extension slides for the table to pull out, it comes out to about the sofa. Katie ordered specific table legs however to make a long story short they got lost in the mail and we had to cancel the order after about 5 weeks. We have everything we need now though and will be sharing how we made it here soon.
Eric,
How did you attach the interior framing to the slide walls? I see you used the Kreg to attach the framing, just don’t see how you attached this to the slide.
I don’t know what material is in the walls of a slide, nor do I know its thickness.
Thanks,
Steve Sprint
Hey Steve, thanks for the great question. I was struggling with the same one for awhile, then I thought back to when I was removing the dinette booth that was here on the slide before. The manufacturer had it screwed into the floor of the slide with 3 inch screws and into the back wall with 1 1/4 inch screws.
When I was securing my frame to the floor of the slide I used a bit larger screws than they had (I went with 3 1/2 inches). I felt good doing this because I had added 1/2 inch flooring and 1/4 inch OSB myself. I also noticed when I had everything removed that the floor of my slide out was made with an extremely thick piece of wood, I can’t say exactly how thick because I couldn’t get a tape measure in the right position, but it was thick.
As far as the sides go, I actually used 1 inch screws (a little smaller than the manufacturers). I did this because I felt confident in the floor screws I had in place, and was like you, unsure of the thickness of the walls.
So far we have been on the road in our RV for over two months and it has been perfectly secure with no movement what so ever. If you are still unsure in moving forward I would give your manufacturer a call, I have leaned on Tiffin many times when needing questions answered.
This wasn’t the cut and dry answer I wish I could give, but I hope that it helps you moving forward with your project. Best Wishes.
Looks really amazing! Great job! So, my first concern is doesn’t the fireplace heat up from the back? TVs aren’t supposed to be near heat. What is your thought? I’d love to do this in my RV, but concerned about the TV getting damaged.
Hey Kristi, thank you, we are really happy with the way it turned out! Heat from the back of the fireplace was one of our concerns as well. When we built the cabinet we actually left 15 inches between the back of the fireplace and the tv (which is the recommended amount), we also have an interior wall that creates separation between the two. Even so I was still concerned about the heat so I’ve kept a close eye on it since we’ve been using it. What I’ve found is that our fireplace doesn’t put off much heat out of the back, the majority of it comes out of the front, also I am unable to feel any heat in the side cabinets or the back tv cabinet. I hope this helps. A lot of companies do sell the cabinets pre-built but as you know weight is a concern in an RV, so we elected to build our own. If you are going to do this I would figure out how much space you have where you plan to put it, then keep that spacing in mind as you look at different fireplaces and their recommendations. I will say that we can not say enough good things about Touchstone, we have been completely satisfied.
Man, you are insane! Did you finished the RV? I wish I can ride on that. simply awesome.
Thank you so much Samantha! We’ve finished most everything, however we do have a couple of little touch up items to finish. Soon we should be coming out with a video walkthrough tour. But it has been really nice living in it all made up the way we wanted it.
Where did you put your components? I am doing the same thing where my desk was in my Tropi-Cal but I am not sure where to put my Dish Receiver.
Hey Bob, we actually built a couple of shelves in the side cabinets of our media cabinet that hold our components. I am still working on getting the antenna cable routed over to the slide out (when I say working on it I mean I haven’t gotten around to it yet haha). We really like them stored in the side cabinets but I do put my PS4 in the box when we travel (better safe than sorry). I hope this helps, best wishes Eric
Love this design! Would you be interested in sharing your spreadsheet of makes/models with dinettes across from the couch? We’ve run into a handful, but want to make sure we aren’t missing any that might be a better fit!
I’ve been meaning to do something with that spreadsheet, just haven’t gotten around to it yet. I’ll take a look at it this week, clean it up and see what I can find on there and include here on the blog 🙂
Awesome – thanks Katie! And best wishes for getting your rig repaired after the accident!
This is very close to something I wanted to do in place of my dinette but you took it 2 steps further! This is so awesome! Thank you for the well-explained tutorial, you did a great job. I may copy what you have done,if my rig allows for such a cool mod.
My question for you was, are you living in your RV while renovating it at the same time? See, I just bought my first used RV but only have 2, maybe 3, months to fix it up. Well, fixed up good enough to live in at that point. I am a single female in my 30s doing this completely by myself (with the help of a friend time to time). I have almost no woodworking or handyman experience! I am literally learning everything from scratch – but I am having a BLAST! However, this also takes up a lot of time, all this learning stuff. So, I am worried that renovating the interior while living in it will be almost impossible??? Do you have any tips?
I will be certainly reading more of your blog, it is really well written and I believe your entries will most certainly help me achieve my renovated rig. Thank you for the inspiration!
Thanks Jillian and congrats on your new RV! While we had some experience making projects around our house, we didn’t know what we were doing either when it came time to work in the RV, haha. We did do most of the big projects before we hit the road, and then worked on finishing things up after we left. We planned to do it all before we left but it just didn’t pan out that way, and honestly I think it was for the best. You really get a sense of the space while you’re living in it and that can help you better plan your reno. I’m sure you’ll be doing some amazing things but feel free to reach out with any questions. I think as long as you write down what projects you want to get accomplished before you leave and stick to those first, you can get more focused on what matters most. Leave the details and decorating until after you get the bulk of the projects done and I wouldn’t stress so much on researching finishes or how to make specific projects until you’re ready to purchase or make that specific project because research can definitely be a huge time suck. I love researching but would say I spent more time on that then working on projects so just be aware and know when to walk away. Most of the time I ended up empty handed and had to wing it anyway. I can’t wait to see what you do!
Katie
Is there a link to show us how you did the extended table? I couldn’t find it. I really like it!!
Hey Katie,
So I just found your blog and have fallen in love with your RV! My husband and I just purchased our new baby yesterday!! EEK! and are looking forward to doing her makeover and repairs before going full time in November.
Out of curiosity, where did you find your cabinets and drawer facings for this project? They are beautiful and I’m wondering if I can implement something similar.
Thanks and happy travels! Also, your blueprints for this project would be awesome to have access to!
-Elizabeth
This reno is AMAZING. You are a true professional, obviously. Important question: Did you loos sleeping space by removing the booths? Can you sleep 4 people with this payout? If not, any ideas how to make up for the lost sleeper?
Definitely not professional, but we enjoy the process, and learn a lot from our mistakes, haha. We did lose sleeping space by removing the dinette, but for us it wasn’t a big deal because it would have been used maybe once or twice a year, if that. It’s just us and we figured if anyone does come visit and want to stay over in the RV (which is unlikely since we generally go to visit people vs. the other way around) they can tent camp, sleep on the sofa, or bring an air mattress. I think you just need to make adjustments for your own needs.
I’ve been browsing the internet looking for that ideal multi tasking media center. Your plan was exactly what I’ve been looking for. Thank you for sharing. Hope it’s ok to replicate for our MH. Can’t wait to start remodeling.
Yay, that’s awesome! Ours may not be perfect, but we were hoping to bring ideas or inspiration to anyone looking for something similar. Let us know how it turns out!
Hi, my wife and I enjoyed your media center reno but I was wondering how you dealt with your cabling for your tv and media devices. All our cabling runs to a cabinet above the drivers seat since our tv is centered up front between the two driving seats. How did you get it over to your media center and what did you do since you built it in the slide. Thanks we like your blog!
Hey Marc and Nancy, that is a great question :), and to be honest I haven’t completely handled it as of yet. So, in the media cabinet we have a device that wirelessly transmits hdmi signals. So whatever we have hooked up to either tv via hdmi can be transmitted to either tv. Along with that most of our media devices are set up in the media cabinet. The biggest problem is that I haven’t taken the time to figure out how to get the wire for the antenna on top of the rig to the media cabinet tv, we generally watch antenna tv in the bedroom. But is that because it isn’t hooked up in the living room haha. Our tv was up between the driver and passengers seat as well which makes it a bit of a headache to get it into the slide out. This is a project on my to do list though, so as soon as I figure it out I’ll let you know. If you guys figure it out first though, I’d love to hear how you handled it 🙂 . Best Wishes, Eric
I love it! I’m in the process of building one in my motorhome. I will not be putting it in the slide. Decided to put across from it. Sorry if I missed it, but what were the dimensions of it? Thanks for making this available.
Hey John, I’m stoked that you’re building one in your motorhome, you’re going to love it. Were you looking for the dimensions of the fireplace or the entire media cabinet? Anyway let me know and I’ll get the dimensions for you.
Thanks for sharing..
No worries at all Garry I hope it was helpful 🙂
How did you route the wiRing to the slide? Our tv/fireplace hookups are on the wall shared by the bedroom (over the fiFth wHeel)…So the kinked neck is daily. The slide where We are wantIng to do this has the lOveseat, thin wall, then fridge. Any info would be amazing! You did a great job on this (a vision i’Ve had for aWhile, but ive never followed theough…yet)!
Hey Ashley, that is a very good question and to be completely honest we haven’t re-wired it to the slide as of yet. The only thing we’d need to wire is the coaxial cable for antenna TV. We already had outlets on the back wall of the slide out for power, and we have a wireless HDTV transmitter that transfers signal back and forth from the back TV to the front. One day I do want to route the coaxial over there but I just haven’t gotten to it yet. Sorry, I’m not much help on this one, but as long as you guys have a power supply and a second tv you could look into a wireless HDTV transmitter and maybe avoid having to run the physical wire. If you have any other questions feel free to let me know and maybe I’ll have more solid answers 🙂
Thanks for showing this project. Me and my wife are going full time after the first of 2019. I have been looking at crazy projects like this. at home we are using streaming tv from directvnow with the new fire tv and think we have found a provider we can get a truely unlimited hotspot and data. since our house did not come wired for cable we have found this to be a great option. I am wanting to take our 55″ TV with us. and maybe work on another project in the bedroom for our 37″. what size tv did you go with and if you had it to do over again would you go bigger/smaller? My surround sound has wireless rears so that will help alot also. This was more of a question and suggestion. But would love to hear your comments on the tv sizes you ended up with.
Hey Scott and Jaime, congratulations on going full time 🙂 you’re going to love it! The TV we have in our living area (on the lift) I believe is 48″ or maybe 50″ can’t quite remember but it’s actually the largest size we could get that would fit in the area we wanted it. I think if you get to 60 inches or bigger it may end up being too much because you can’t really get far enough away from it in the rig to make it worth it, well I guess if you had slides across from one another you could but otherwise it may not work. Our bedroom tv is 32″ I believe and actually worked perfectly in the space we had back there. So as far as size goes we kind of took the approach of putting the biggest tv that would fit 🙂 For tv we use, the fire stick (which we just got this past christmas and are extremely happy with) and the PS4. We’ve noticed that the fire stick will play tv shows and movies with a much lower speed internet which has been awesome. We haven’t really done anything with the sound yet but I think it is a project I’d like to take on this year! You’d mentioned a provider that is truly unlimited, do you like it so far? Anyway I hope this was helpful and safe travels, Eric
What a great project. We really liked the finished look. We are doing something similar in our RV. What type of screws did you use to attach the frame to the RV walls and floor?
Hey Dan & Melody, so sorry for the delayed response, and thank you so much. We used standard wood screws, though the size was more specific to our rig. We actually removed our dinette booth from the spot where our media cabinet now sits. So as I was removing the booth I kept some of the screws so I could match what they used with what I’d be putting back in. Anyway, I hope this was helpful and not too late, but if I am I’d love to hear how it turned out for you guys!
Hello, We love what you did here and am looking at building one similar to in our toyhauler. Would i be able to get the dimensions of this media cabinet from you. I am looking for the depth of each box more than anything
Hey kc and lance, I’m so sorry for the delayed response. It is important to note that every rig is different so what worked for us dimension wise may not fit your space, though it may fit your space also haha 🙂 Anyway the depth of our side cabinets is 27″ to from the back wall to the face of the cabinet. Anyway I hope this helps, though I may be too late in responding. Anyway, feel free to let me know if you have any other questions and I’ll make sure to respond much quicker.
I own a Monaco Diplomat 04 I noticed you do not have cabinets above your slide out window which I do. I may either need to remove them or make this project a smaller profile. I love this project making the RV look so comfortable. You did an awesome job wondered what size lumber an amount it took start to finish an electrical wiring. Sat rec.STEREO & speaker connections. Going to do this project soon. thanks Rich FL.
Hey Rich, that’s awesome you’re going to take on this project I think you’ll love it when it’s finished up 🙂 We actually had cabinets above the window but decided to remove them in order to accommodate the tv coming up on the lift. I think we ended up creating the same amount of storage with the cabinets below. We used a combination of 1×2 and 2×3 boards but most of it was 1×2’s for the framing. Our electrical was already wired to the cabinet from the dinette booth that was previously there, and we didn’t end up wiring sat. or stereo because we have that all pretty much wireless. Though I have had wiring in the antenna cable on my to-do list for a long time and plan to finally get to it within the next couple of months 🙂 I would say the total job was roughly a 2-3 day job, the main problem was when we were building this there weren’t many examples available to look at so we had to make it up as we went. Anyway I hope this helps and feel free to let me know if you have any other questions, best wishes, ERic
Richard, I have an 05 Diplomat and want to do this project as well. Did you end up removing your cabinets to make room for a larger TV? I am not sure how large a TV will fit with the cabinets not removed. I would love to hear how yours turned out. Thanks Scott
How many steps are missing from this install? A lot.
The build quality exceeds a novas “first attempt” and is on par with a high end cabinet builder.
What they don’t show is you need a nail gun, table saw, mitter saw, jig, and slide clamps with a kreg pocket jig.
Hey Matt, I’m sorry you feel that way. We didn’t do a full step by step process because every RV is different and the measurements and frame will be different. I appreciate you thinking it looks as if it was on par with a high-end cabinet builder but this was my first time building a cabinet not to mention one with a tv lift and fireplace. I did build a table once but this was by far my most ambitious project to date at the time, and I feel any novas could do this. I do want to thank you for bringing to my attention that we did not include a tools list, we do in all of our other posts and must have overlooked it on this one, though I do list all of those tools as I go through the steps I took. To be honest this post was more to provide inspiration for possibilities people can take in their own RVs. Anyway, thank you for swinging by 🙂